
The newest Text Animation Preset tutorial which is easier to master than AE is coming. YouTube Movie Maker has many text animation examples for you to pick up the most suitable one. If you like to make it with a more creative personal style, all parameters of setting an animated text effect can be customized here.
Let’s dig to its parameters’ setting first.
Generic: The settings that are used on all text special effects.
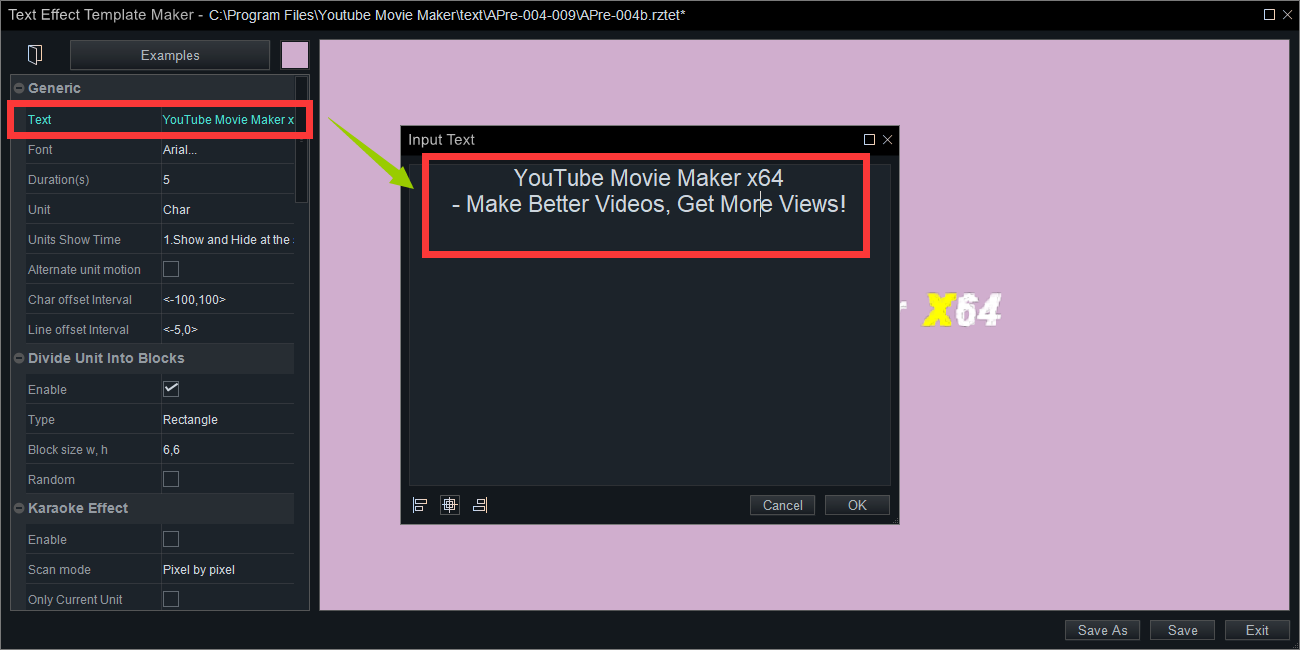
Text: you can type in or paste the text you want to show on the display screen
Font: the font settings including size, color, style, etc..
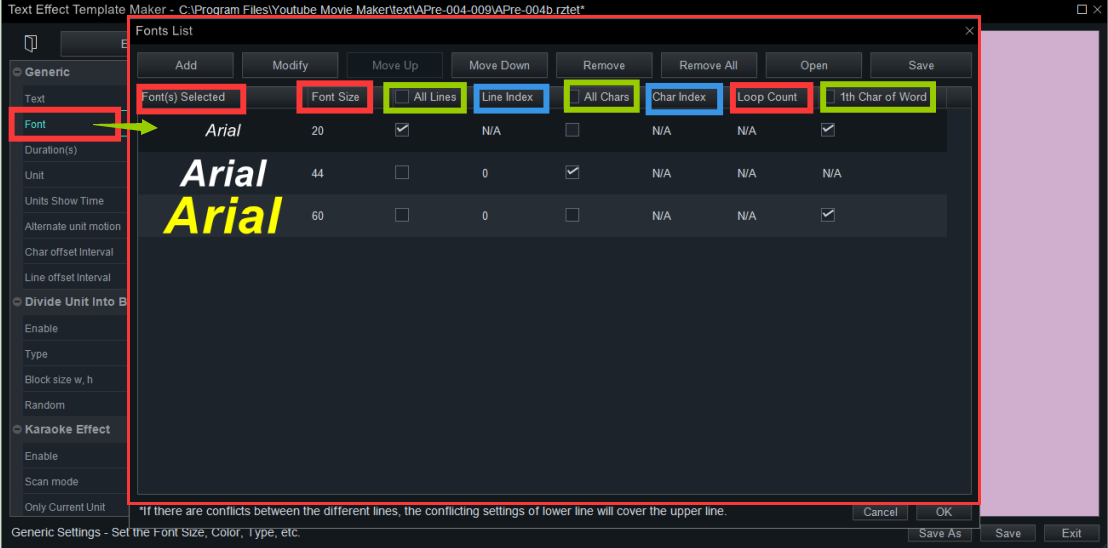

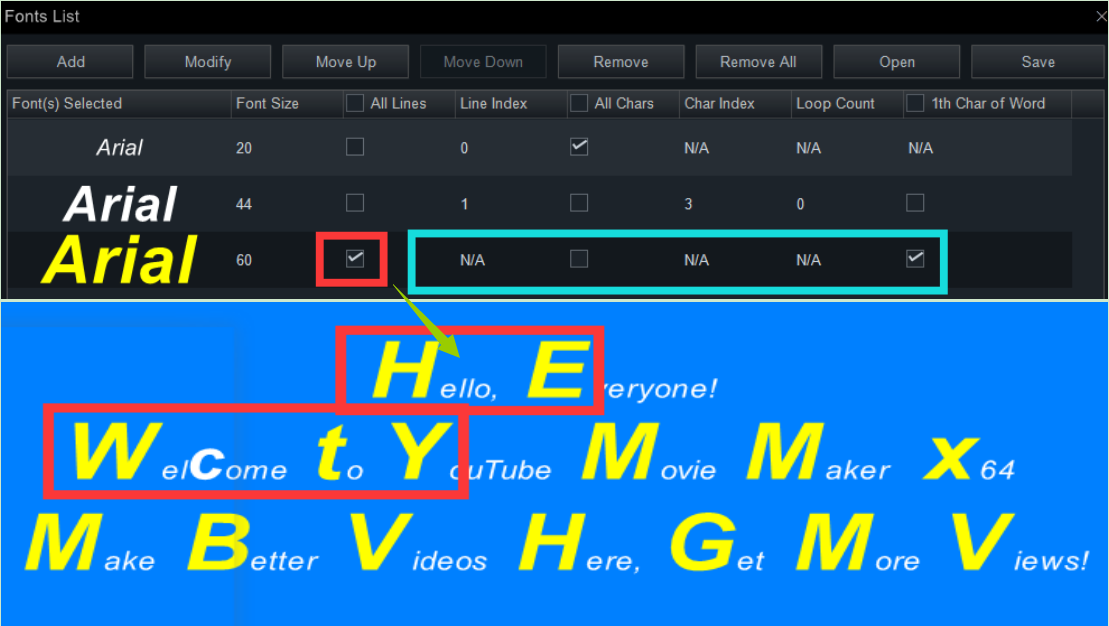
You can click “Add” to add a new line if you have many lines of text and tend to show them with different styles.
You can pick one line and click “Modify” and then change its font, size, style, color, shade, etc. in the Font Options UI.
You can also click “Move Up” and “Move Down” to change the order of the lines.
You can remove a certain line or all lines by clicking “Remove” or “Remove All” in the top tool tab.
You can click “Save” to save your font list settings as a *.rzflt file in case to use next time.
You can click “Open” to load a font list file(*.rzflt) you saved before.
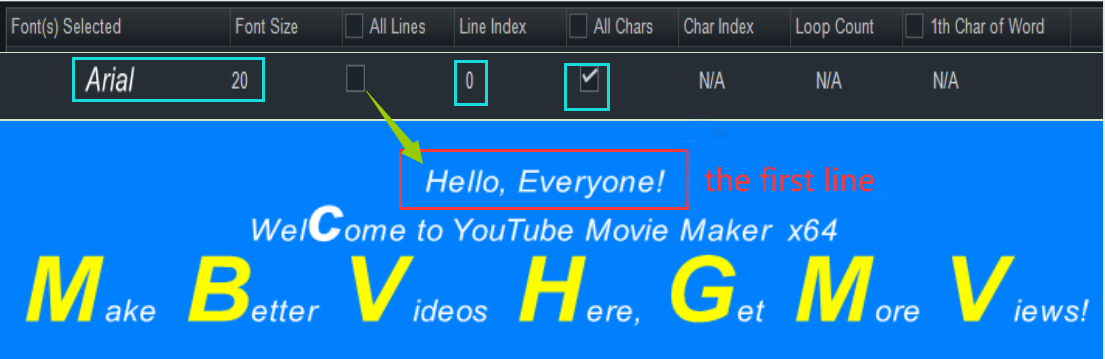
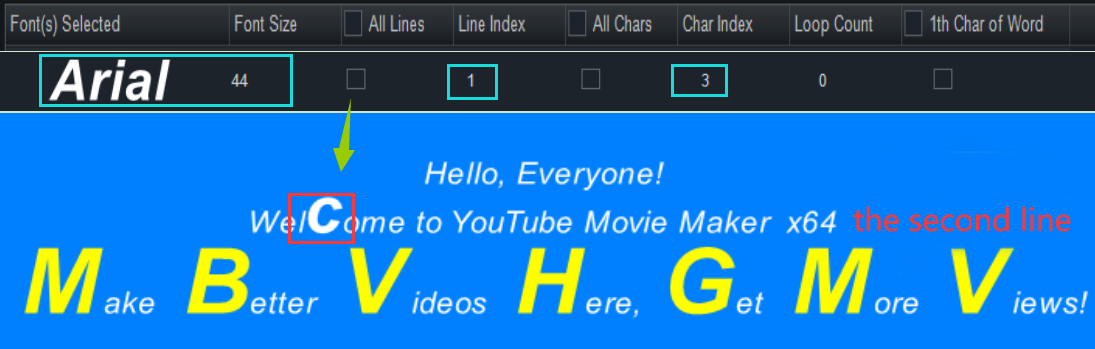
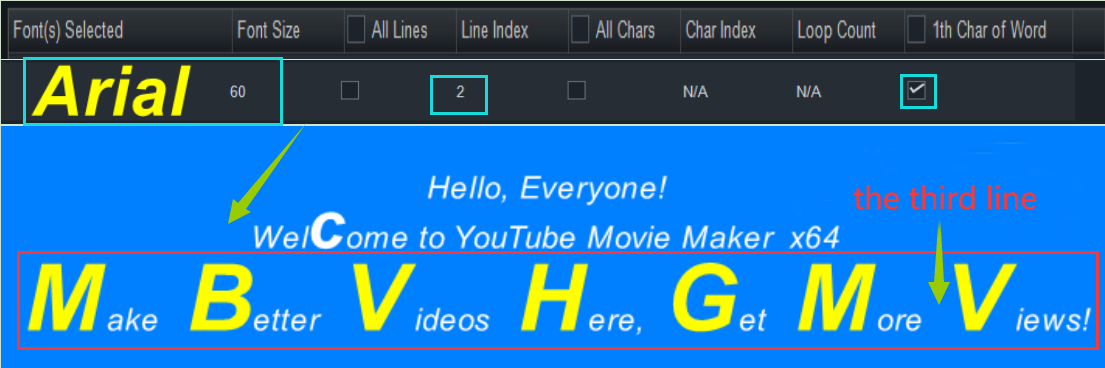
You can use a font to all lines or a certain line. But remember the line and character measured from 0. In other words, 0 is equal to 1 in our common sense. Similarly, 1 is equal to 2 and 2 is equal to 3 here.

This means that all characters in the first line are “Arial” font of 20 font size.
This means that the fourth character in the first line are “Arial” font of 44 font size.
This means that all the first character of each word in the third line are “Arial” font of 66 font size.
Attention: If you check the option “All lines” of a certain line as follows, the settings of this line will be added to all lines.
Duration(s): Set the total duration of the Text Effect demo, and the time is measured in seconds.
Unit: Set the minimum individual unit of the text, and it could be character, word, line or the whole text.
Units Show Time: Set the appear and disappear style of the text. Once you select one of its options like “Show and hide at the same time” which means the text appears and disappears on the display screen at the same time.
If you choose “Show in delay but hide at the same time”, and then you’ll find that a certain delay between two unit text(character/word/line) when they appearing. But they would disappear at the same time.
Alternate unit motion: Check this option and the adjacent unit text will automatically move in reverse.
Char offset Interval: If you set the unit as “Character” above, then you can set the offset interval on the X-axis and the Y-axis between individual characters.
Line offset Interval: If you set the unit as “Line” above, then you can set the offset interval on the X-axis and the Y-axis between individual lines.
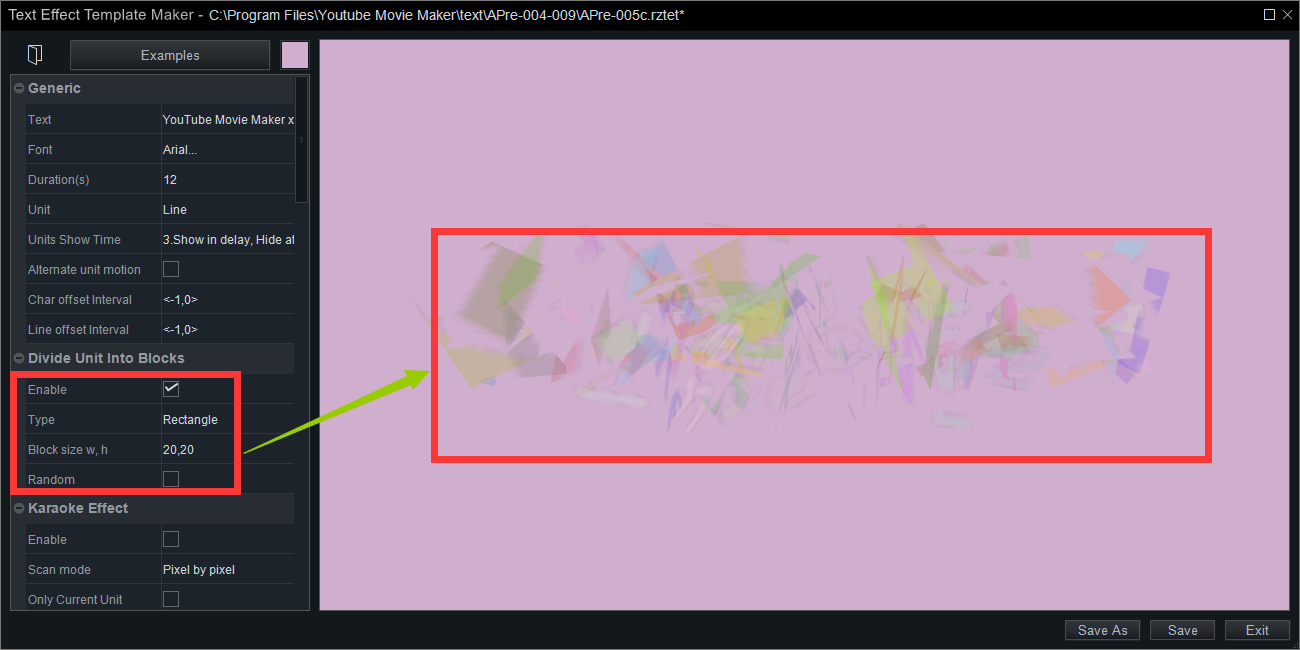
Divide Unit Into Blocks:
Check this option, and the unit will be divided into blocks in a rectangle or a triangle shape.
Type: the minimum unit will be divided into many rectangles or triangles.
Block size W, H: Set the value of the Width and the Height of each block.
For example, we choose the type of the block as “Rectangle” and set the Width and the Height of the Rectangle as 20. Then we can see the beginning of the Text Effect as follows. If you can see it clearly, you can set the value of the “Duration” of the “Appear Process” part a larger number.
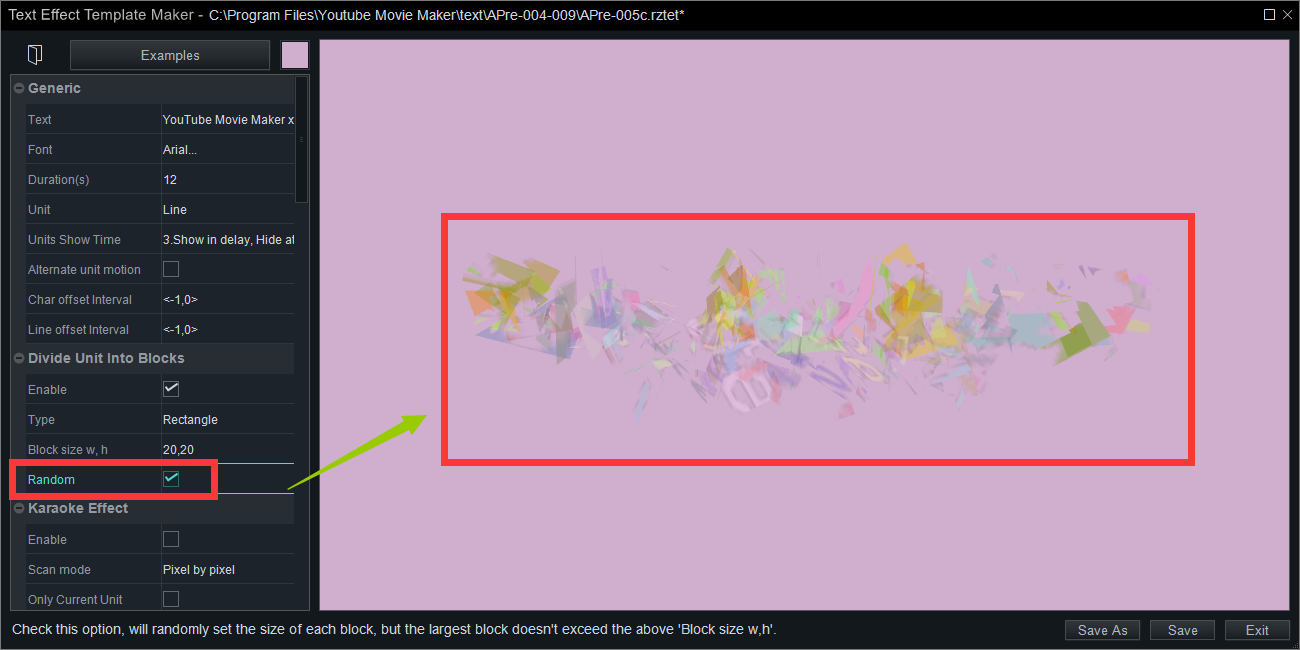
Random: Check this option and the block(rectangle/triangle) size will be random on the scale of 0 to 20( the block size set before).
Karaoke Effect:
Enable this option to add an extra Karaoke Effect to the text.
Scan mode: Choose the scan mode of the Karaoke Effect for the text. Choices are “pixel by pixel”, “character by character”, “word by word” and “line by line”.
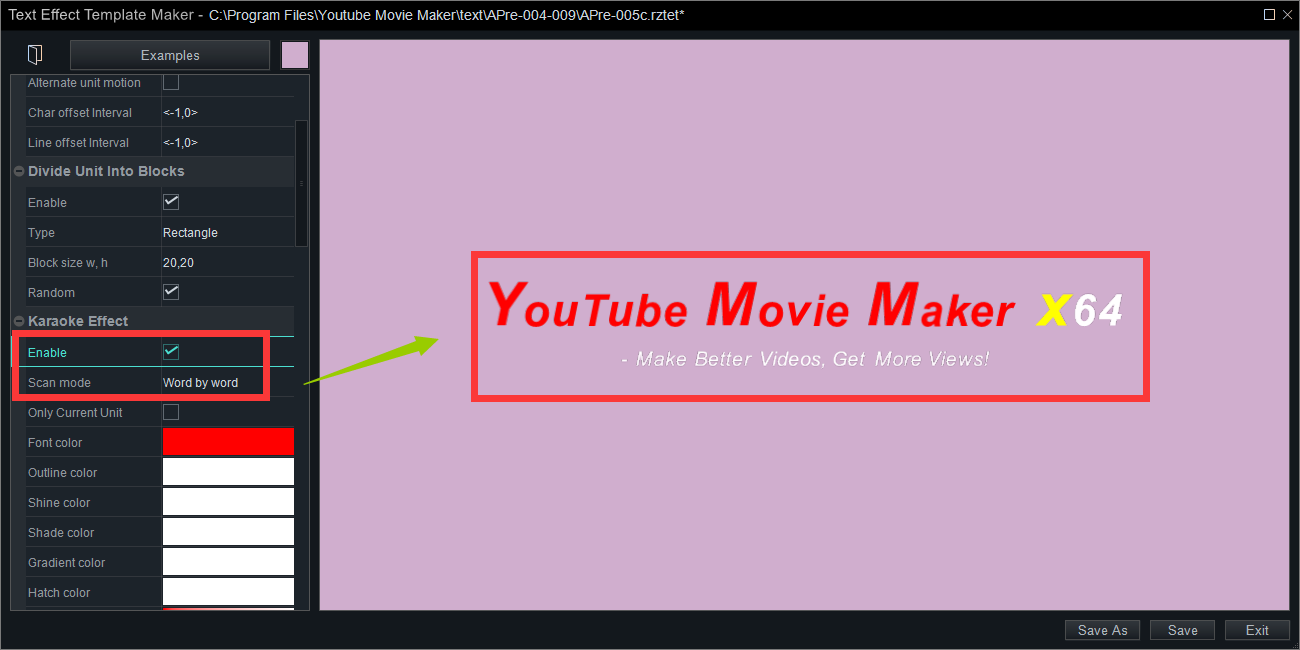
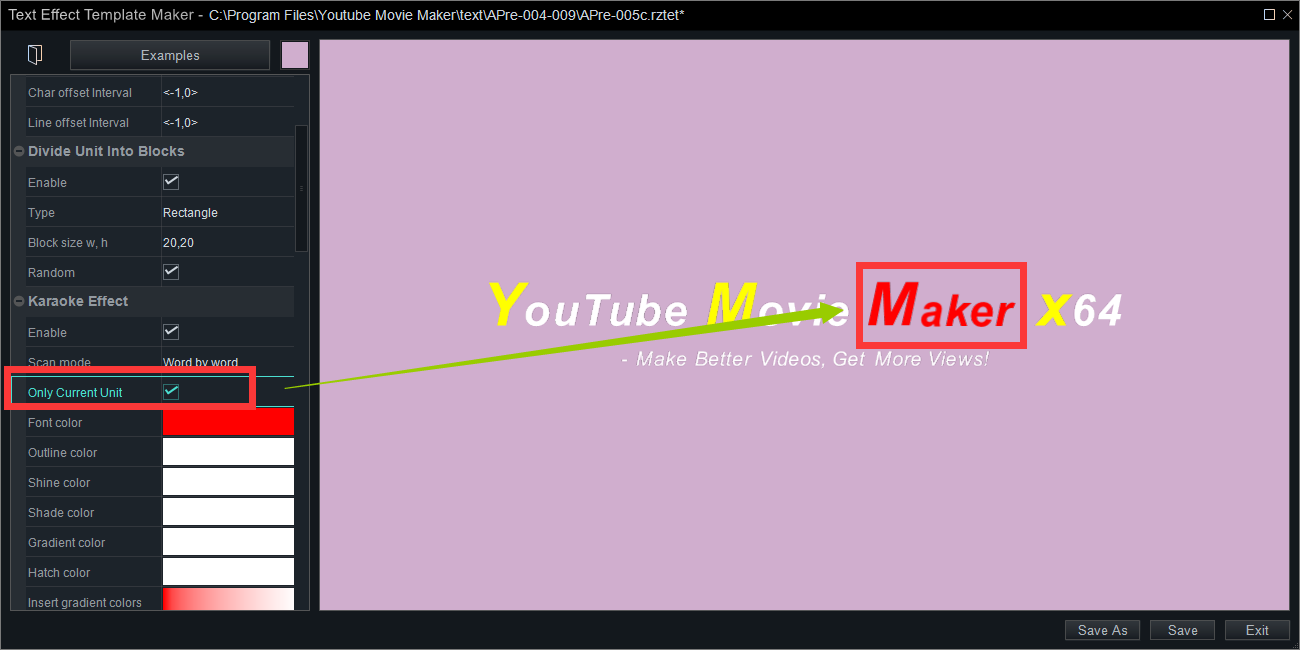
Only current unit: Check this option and only the current unit will have a Karaoke Effect.
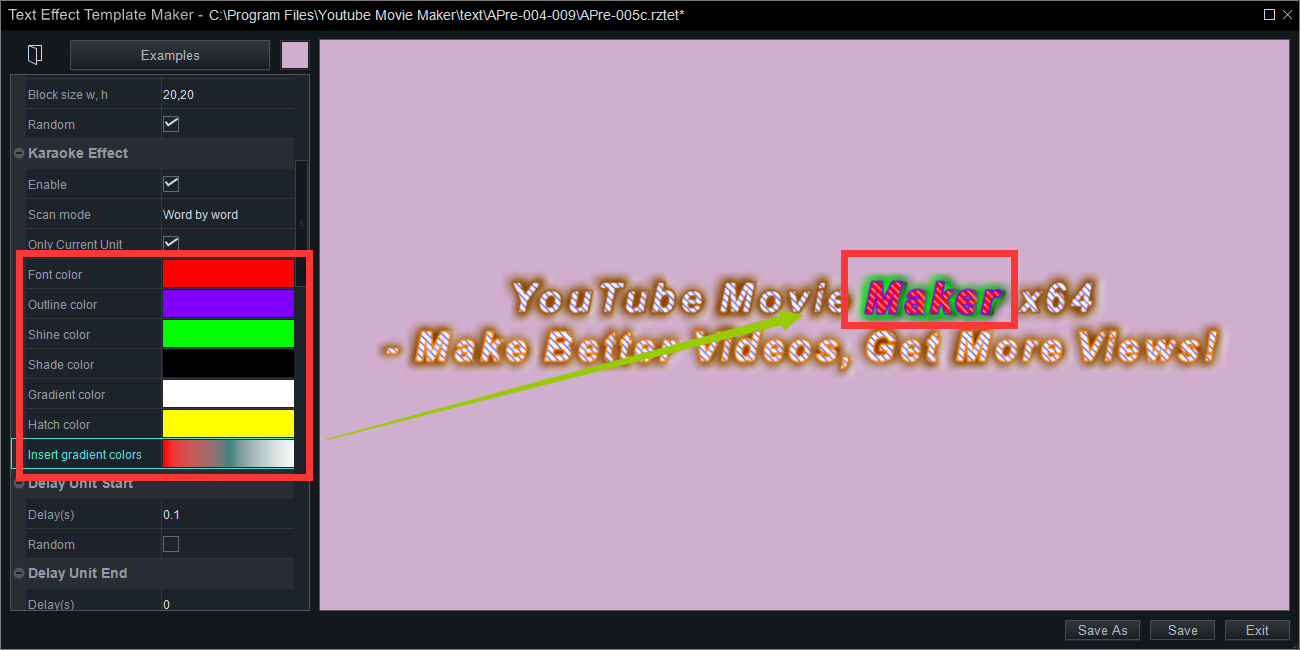
Font color: Set the font color of the text being scanned.
Outline color: Set the outline color of the text being scanned.
Shade color: Set the shade color of the text being scanned.
Gradient color: Set the gradient color of the text being scanned.
Hatch color: Set the hatch color of the text being scanned.
Insert gradient colors: Insert the several colors to create a gradient color of the text being scanned.
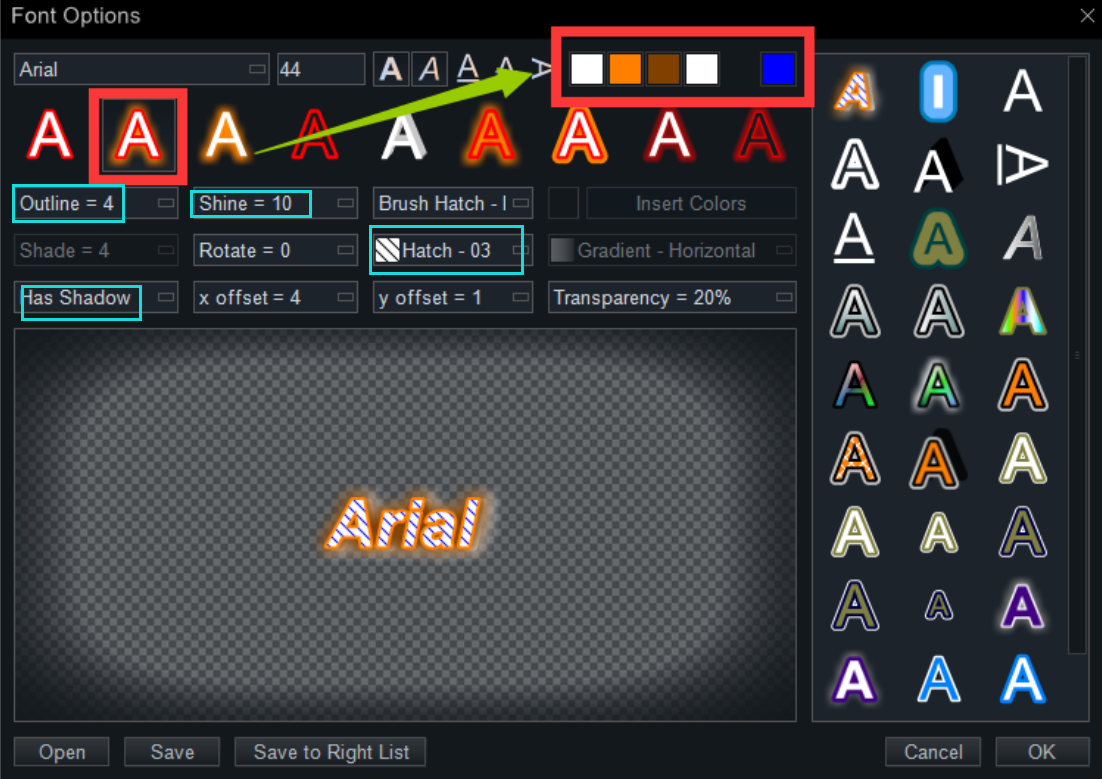
Attention: When setting these colors, you have to choose a font style with these elements such as outline, hatch, shade, etc..
For example, we set the font style like this:
Next, we set the color elements of the text being scanned as follows. Then, we can see a final effect in the right display screen.
Delay Unit Start
Delay(s): Set the delay time of every unit text when they appearing.
Random: Check this option, and every unit text will appear randomly within the time horizon from 0 to the value set in “Delay”.
Attention: The two settings work only when the style is selected in the “Unit Show Time” including “Show in delay”.
Delay Unit End
Delay(s): Set the delay time of every unit text when they disappearing.
Random: Check this option, and every unit text will disappear randomly within the time horizon from 0 to the value set in “Delay”.
Attention: The two settings work only when the style selected in the “Unit Show Time” including “Hide in delay”.
A text effect is usually divided into 3 phases, appear process, normal process and disappear process. And each of them has a separate setting.
Appear Process
Duration(s): Set the total duration of the appearing process in seconds.
Predefine offset X: Set the initial position where the unit text appears on the X-axis direction. Here are 7 options.
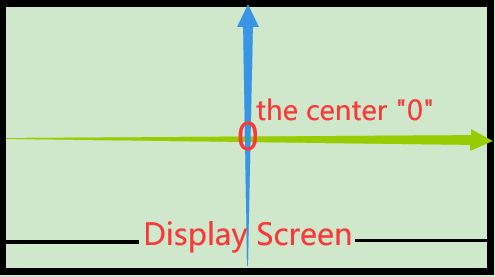
“0” means the unit text appears at the “0” position, the center on the display screen.
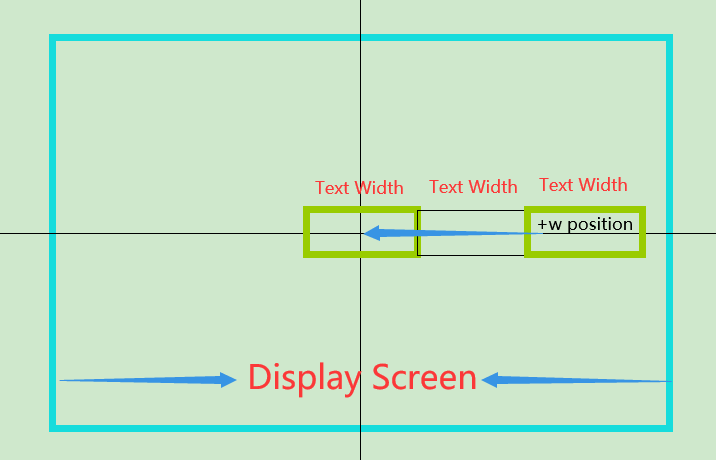
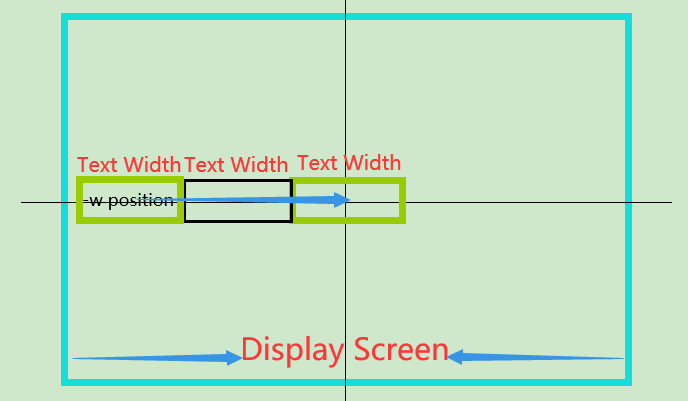
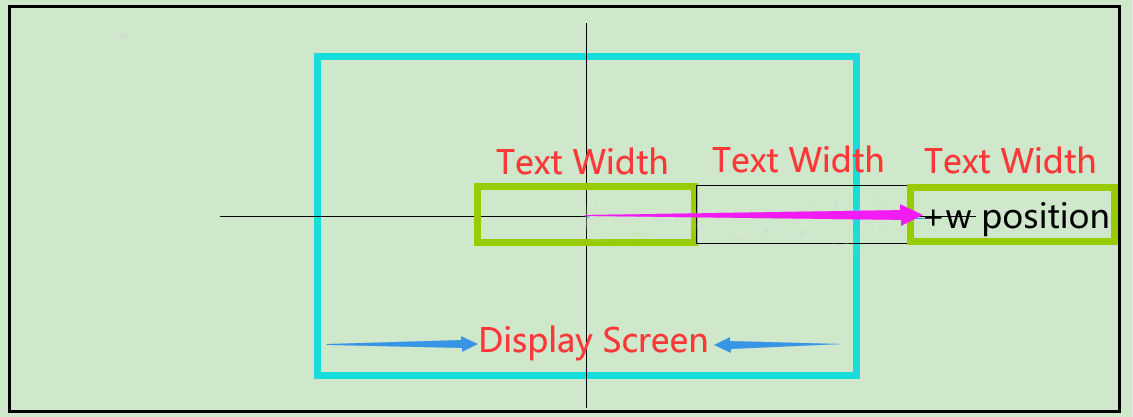
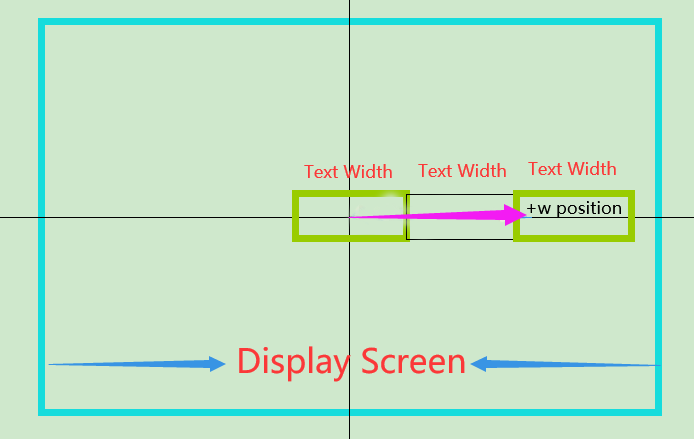
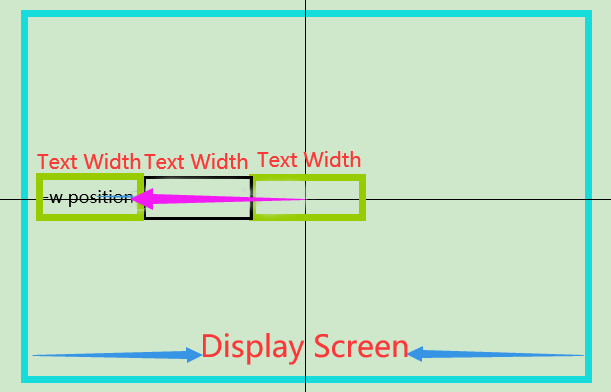
“+w” means the unit text appears at the “positive” direction, the right part of the “0(center)”.
When the text is quite long, the initial position is one-text-width away from the center.
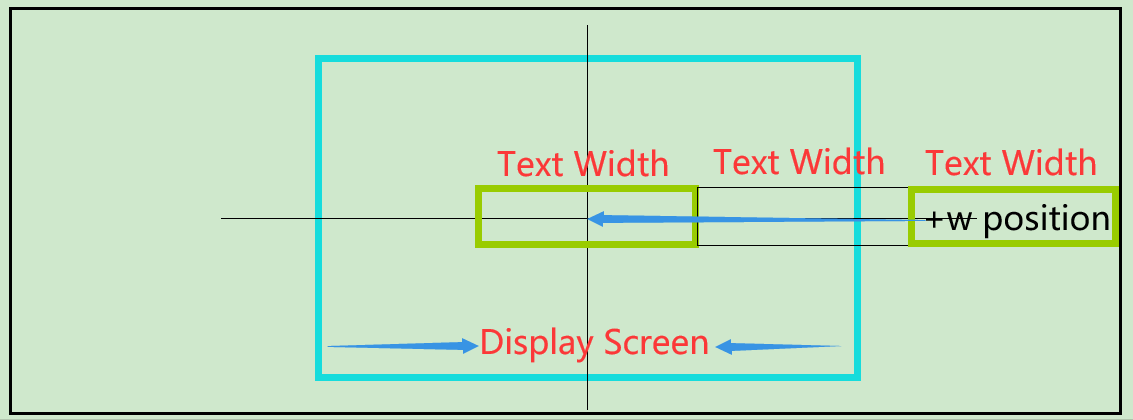
When the text is short, the initial position is also one-text-width away from the center.
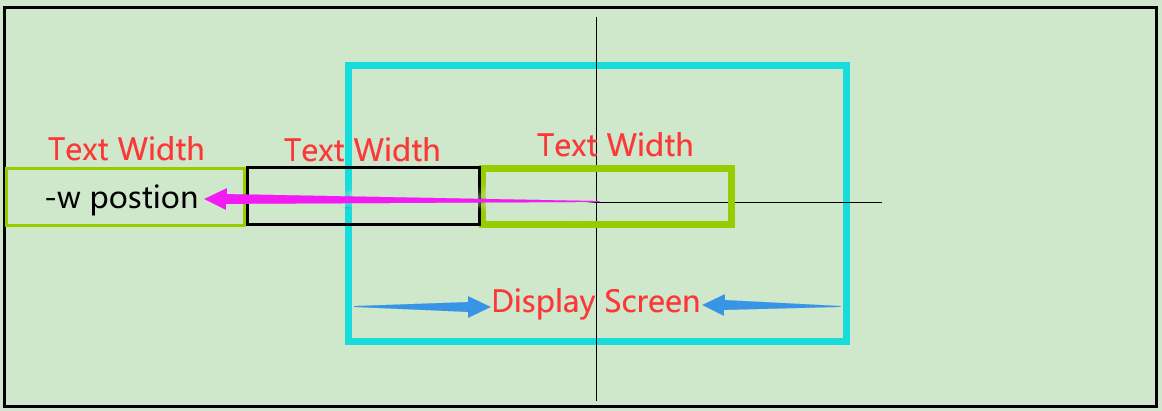
“-w” means the unit text appears at the “negative” direction, the left part of the “0(center)”.
When the text is quite long, the initial position is one-text-width away from the center.
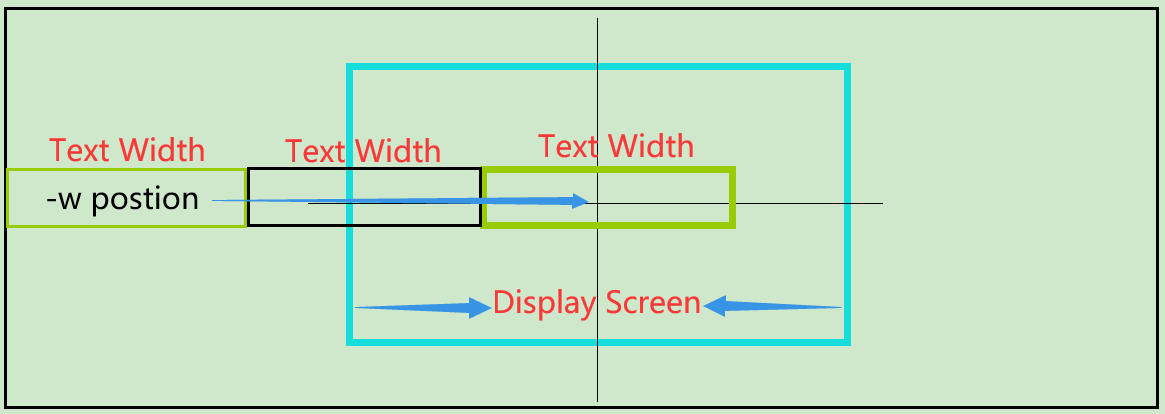
When the text is short, the initial position is also one-text-width away from the center.
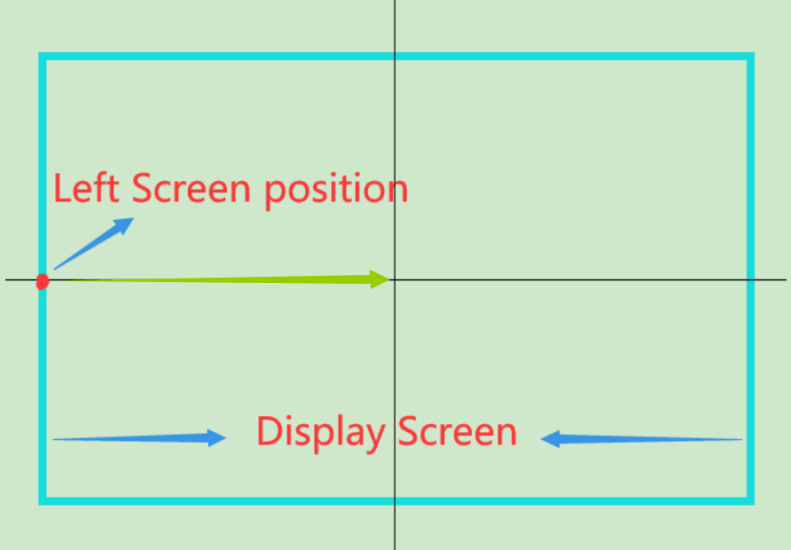
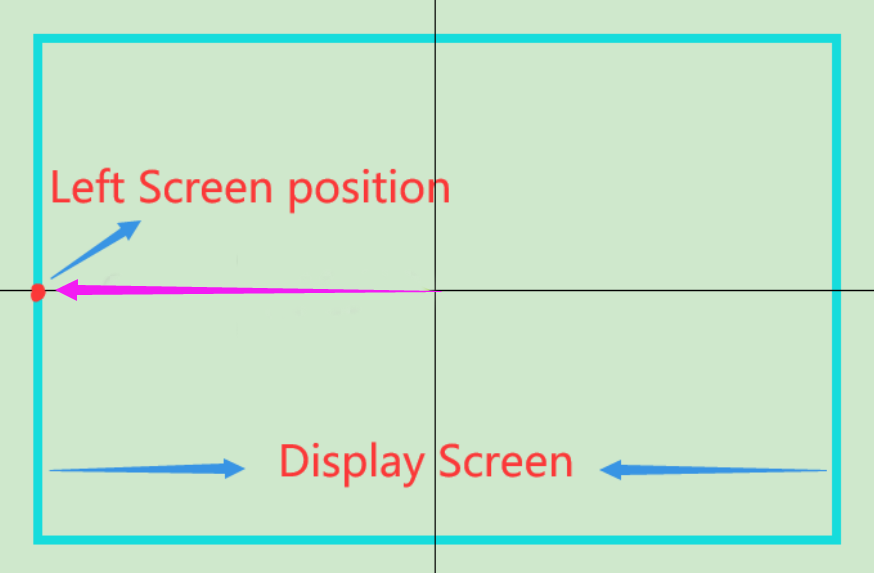
“Left Screen” means the unit text appears at the junction point(the point that the left boundary of the display screen intersects with the X-axis).
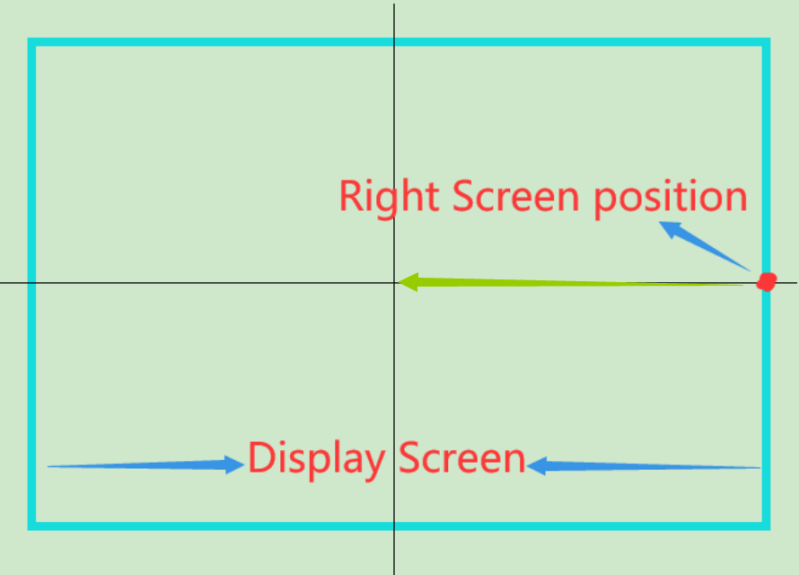
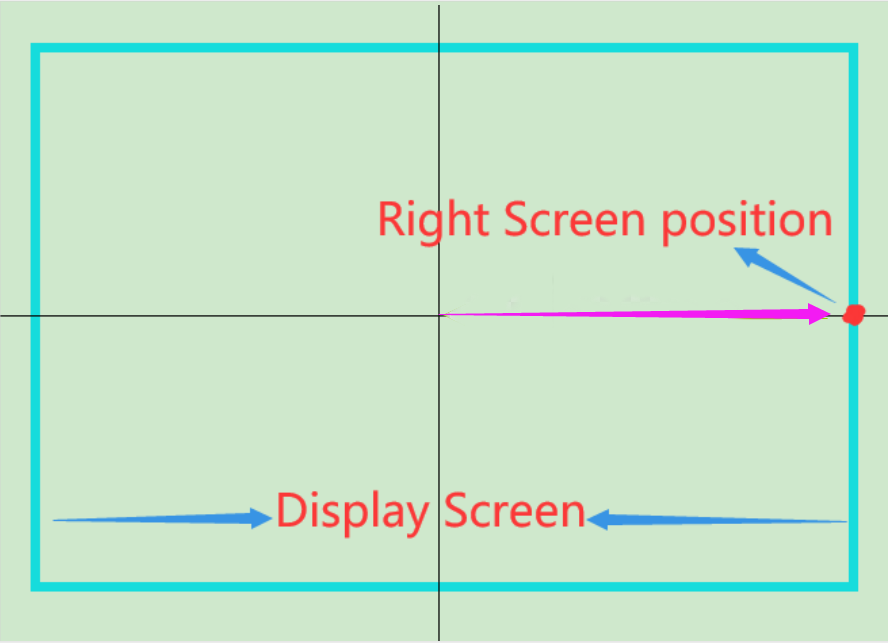
“Right Screen” means the unit text appears at the junction point(the point that the right boundary of the display screen intersects with the X-axis).
“Out of left screen” means the unit text appears at a position that out of the left screen.
“Out of right screen” means the unit text appears at a position that out of the right screen.
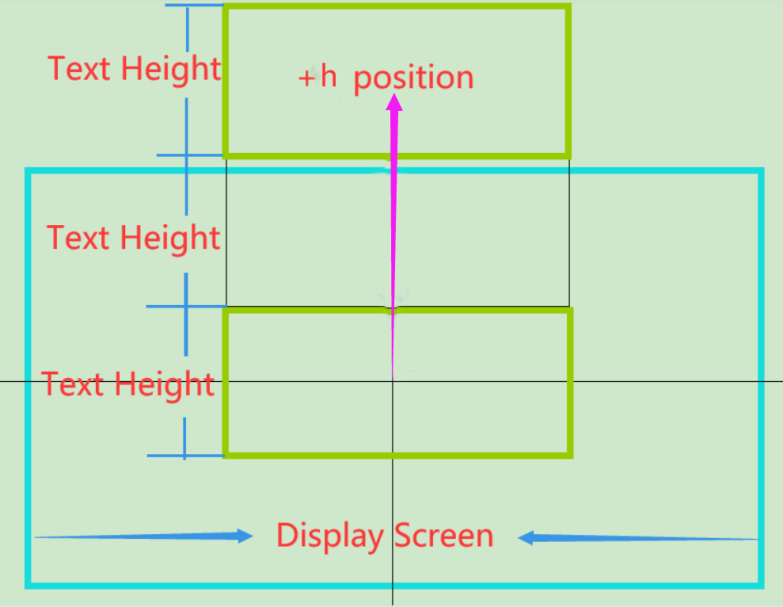
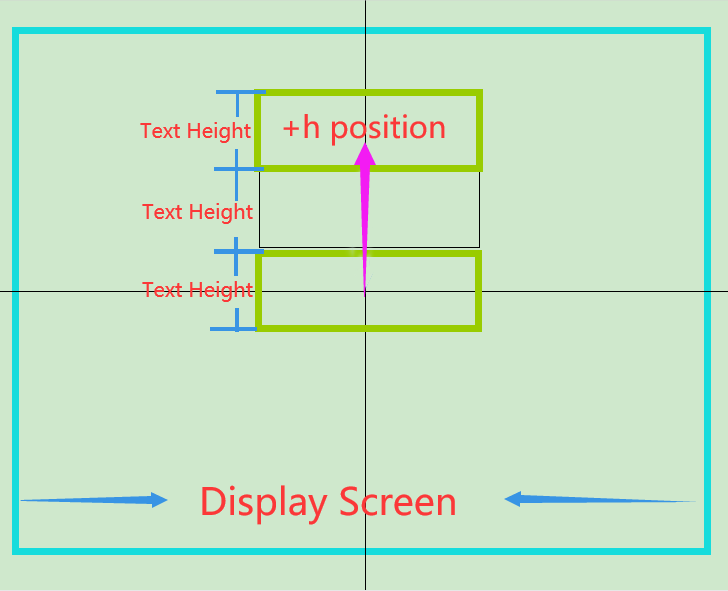
Predefine offset Y: Set the initial position where the unit text appears on the Y-axis direction.
Here are still 7 options.
“0” means the unit text appears at the “0” position, the center on the display screen.
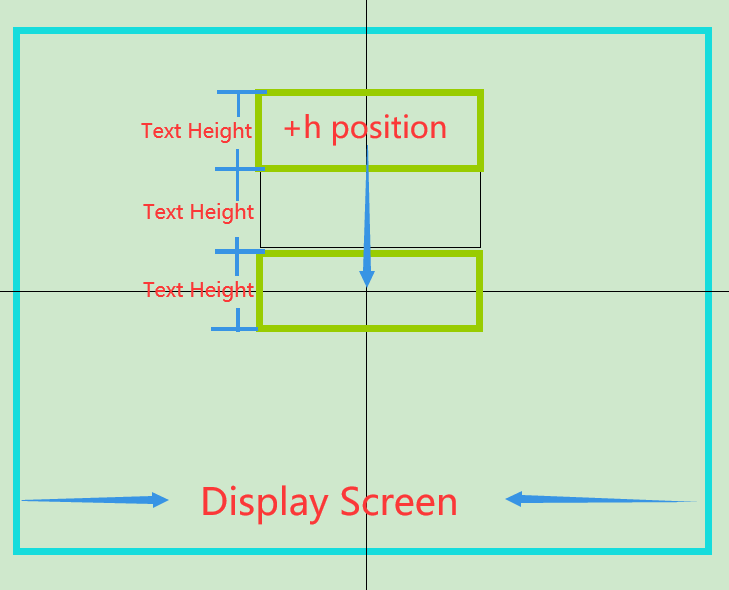
“+h” means the unit text appears at the “positive” direction, the upper part of the X-axis.
When the text lines are quite many, the initial position is one-text-height away from the center.
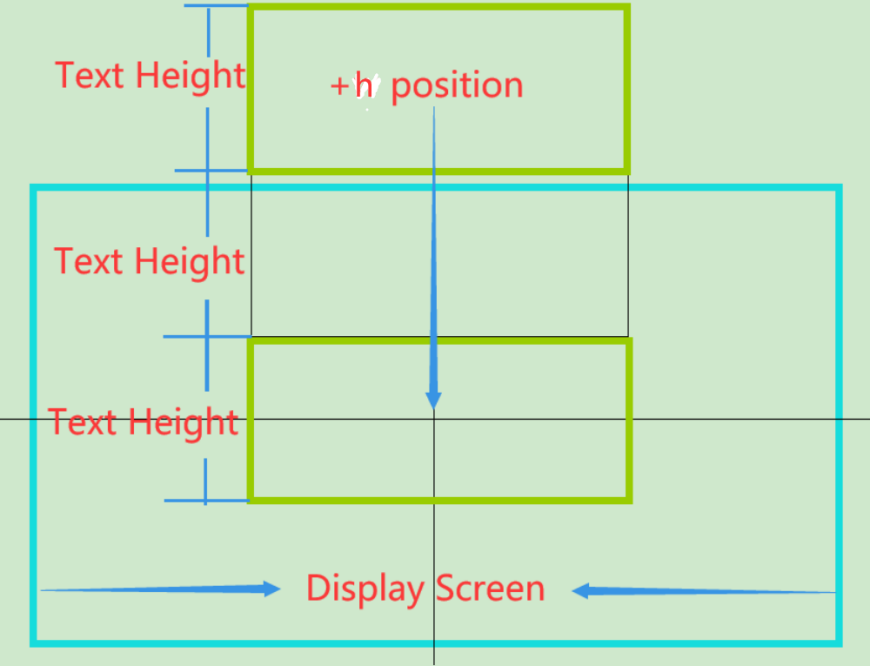
“+h” means the unit text appears at the “negative” direction, the upper part of the X-axis.
When the text lines are not so many, the initial position is also one-text-height away from the center.
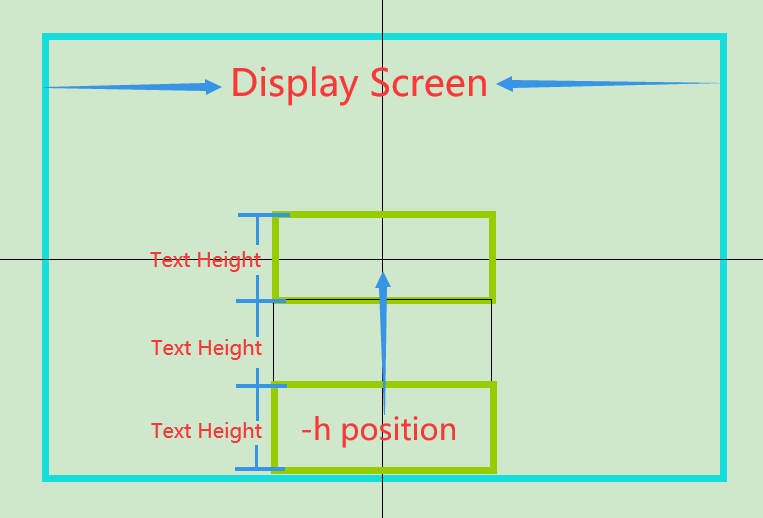
“-h” means the unit text appears at the “positive” direction, the lower part of the X-axis.
When the text lines are quite many, the initial position is one-text-height away from the center.
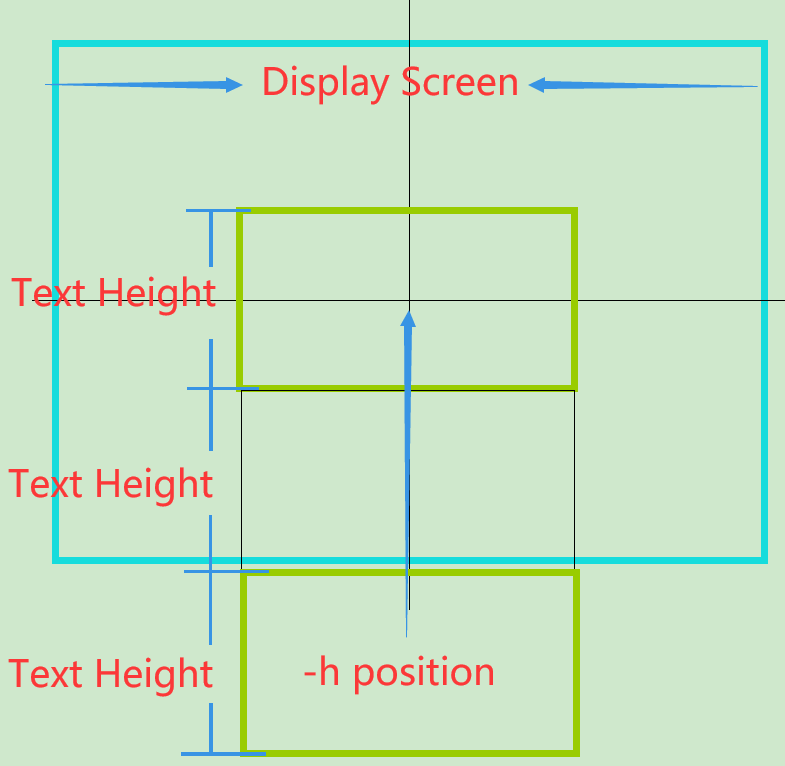
“-h” means the unit text appears at the “negative” direction, the lower part of the X-axis.
When the text lines are not so many, the initial position is also one-text-height away from the center.
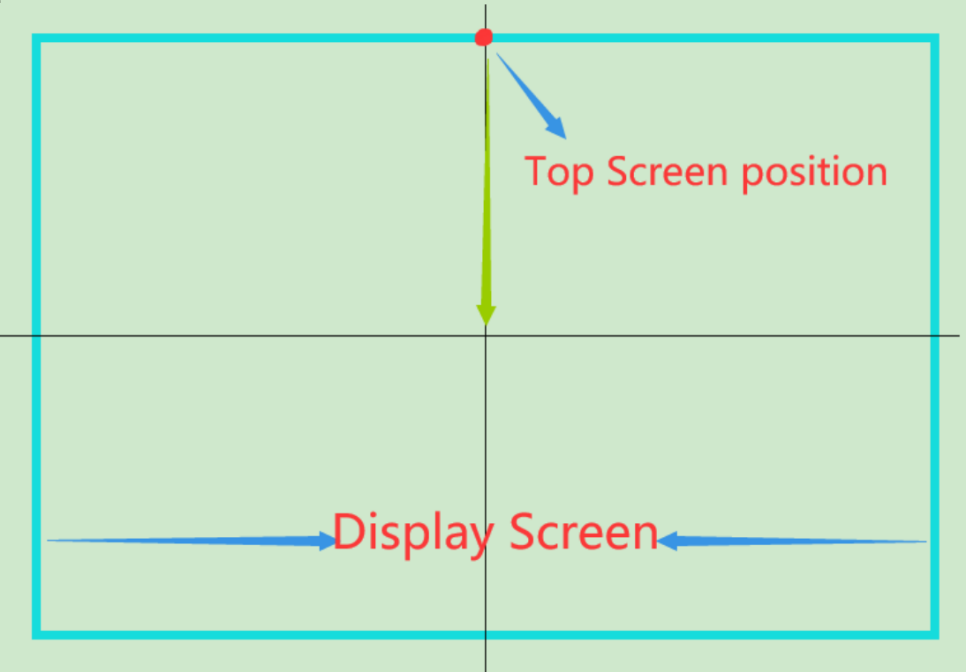
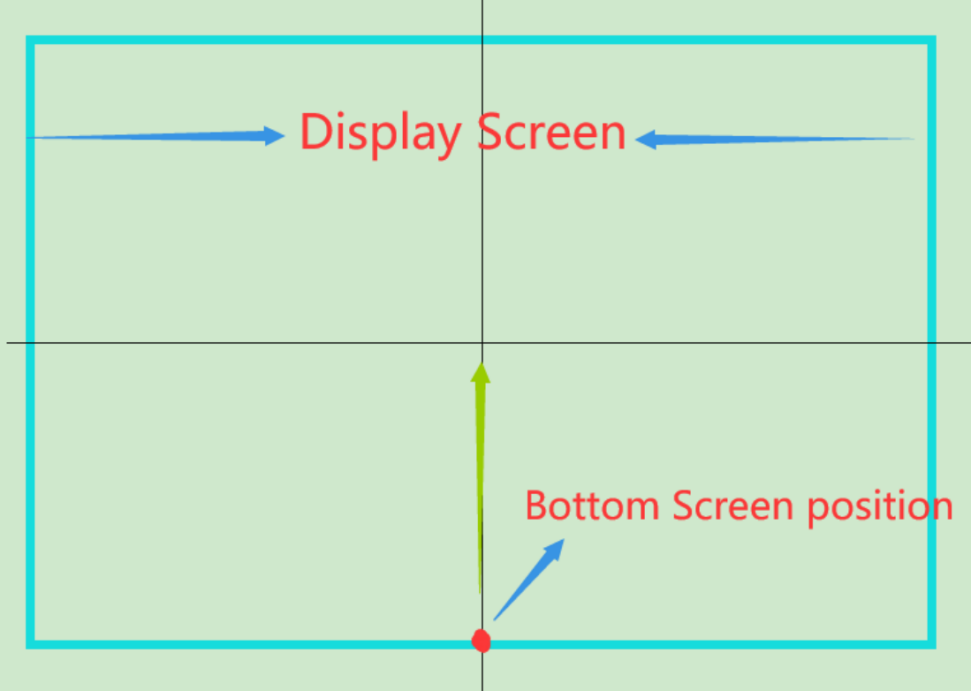
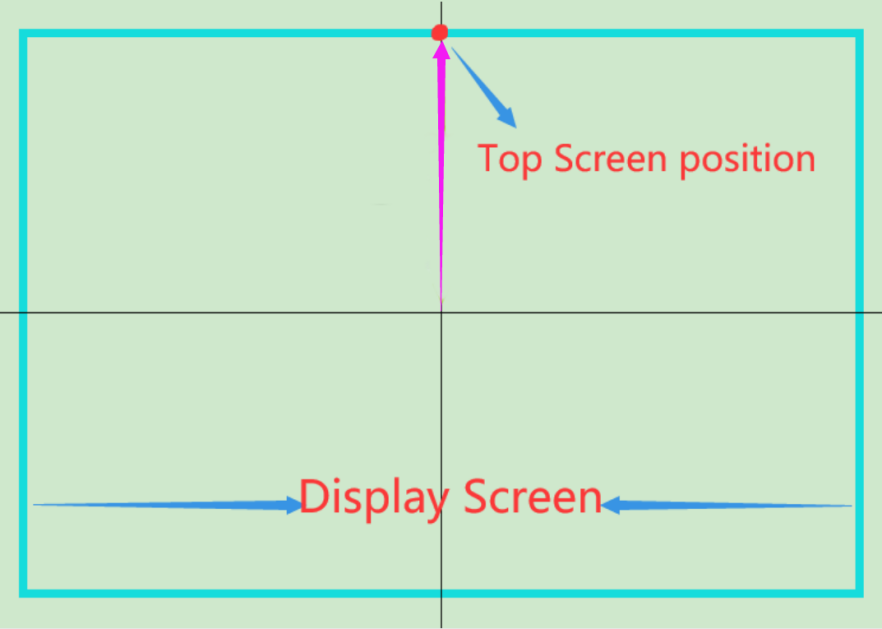
“Top Screen” means the unit text appears at the junction point(the point that the top boundary of the display screen intersects with the Y-axis).
“Bottom Screen” means the unit text appears at the junction point(the point that the bottom boundary of the display screen intersects with the Y-axis).
“Out of top screen” means the unit text appears at a position that out of the top screen.
“Out of bottom screen” means the unit text appears at a position that out of the bottom screen.
Offset X, Y, Z: Set the value of the X, Y and Z axes separately to change the initial position where the unit text appearing.
For example, we set the “Predefine offset X” as “left screen”, and we can see the unit text appears from the left screen(the initial position).

While we set the “Predefine offset X” as “left screen”, the vale of the “offset X” as 200, and we can see the unit text appears from the new initial position. In other words, the new final position moved 200 in the positive direction of the X-axis.

Similarly, if we set the value of the “offset Y”, then the initial position of the unit text will vary with the value.
Random: Check this option, and every unit text will appears randomly within the range from 0 to the value set in “offset X, Y, Z”.
Random/Frame:
In the moving process from the initial position to the center, there are many frames of the moving text. If you check the option of “Random/Frame”, then you’ll see the frames at different positions showing randomly.
Global Offset X, Y, Z: Set the initial offset angle on the X, Y and Z axes of the whole text when they appearing.
- We set the value of the “Global Offset X, Y, Z” as 0, the value of the “Single Offset X, Y, Z” as 0, and we’ll see the whole text appearing like this:
- We set the value of the “Global Offset X, Y, Z” as 100, the value of the “Single Offset X, Y, Z” as 0, and we’ll see the whole text appearing like this:
- We set the value of the “Global Offset X, Y, Z” as 500, the value of the “Single Offset X, Y, Z” as 0, and we’ll see the whole text appearing like this:
Random: Check this option, and the whole text will appear randomly within the angle range from 0 to the value set in “Global Offset X, Y, Z”.
- We set the value of the “Global Offset X, Y, Z” as 100, the value of the “Single Offset X, Y, Z” as 0, and check the random option. Then, we’ll see the whole text appearing like this:
- We set the value of the “Global Offset X, Y, Z” as 500, the value of the “Single Offset X, Y, Z” as 0, and check the random option. Then, we’ll see the whole text appearing like this:
Single Offset X, Y, Z: Set the initial offset angle on the X, Y and Z axes of every unit text when they appearing. But if you enable the option of “Divide Unit Into Blocks”, then the set value will work on every block(rectangle/triangl
- We set the value of the “Global Offset X, Y, Z” as 0, the value of the “Single Offset X, Y, Z” as 100, and we’ll see every block appearing like this:
- We set the value of the “Global Offset X, Y, Z” as 0, the value of the “Single Offset X, Y, Z” as 100, and we’ll see every block appearing like this:
Random: Check this option, and every unit will appear randomly within the angle range from 0 to the value set in “Single Offset X, Y, Z”. But if you enable the option of “Divide Unit Into Blocks”, then this will work on every block(rectangle/triangle).
- We set the value of the “Global Offset X, Y, Z” as 0, the value of the “Single Offset X, Y, Z” as 100, and check the random option, then enable the option of “Divide Unit Into Blocks”. Next, we’ll see every block appearing like this:
- We set the value of the “Global Offset X, Y, Z” as 0, the value of the “Single Offset X, Y, Z” as 500, and check the random option, then enable the option of “Divide Unit Into Blocks”. Next, we’ll see every block appearing like this:
Finally, we set values to both the “Global Offset X, Y, Z” and the “Single Offset X, Y, Z”.
- We set the value of the “Global Offset X, Y, Z” as 100, the value of the “Single Offset X, Y, Z” as 100, and we’ll see the text appearing like this:
- We set the value of the “Global Offset X, Y, Z” as 100, the value of the “Single Offset X, Y, Z” as 100, and check the random option. Then, we’ll see the text appearing like this:
- We set the value of the “Global Offset X, Y, Z” as 500, the value of the “Single Offset X, Y, Z” as 500, and we’ll see the text appearing like this:
- We set the value of the “Global Offset X, Y, Z” as 500, the value of the “Single Offset X, Y, Z” as 500, and check the random option. Then, we’ll see the text appearing like this:
Scale X1, X2, X3…: Set the scale proportion of the unit text on the X-axis. The value “1” means the original proportion. And then the bigger value, the larger scale proportion.
- When we set the value of the “Scale X1, X2, X3…” as 5, the value of the “Scale Y1, Y2, Y3…” as 0, and we’ll see the changes as follows.

- When we set the value of the “Scale X1, X2, X3…” as 10, the value of the “Scale Y1, Y2, Y3…” as 0, and we’ll see the changes as follows.

Compared the above two examples, we can find that the width of every unit text increased on the X-axis.
Scale Y1, Y2, Y3…: Set the scale proportion of the unit text on the Y-axis. The value “1” means the original proportion. And then the bigger value, the larger scale proportion.
- When we set the value of the “Scale X1, X2, X3…” as 0, the value of the “Scale Y1, Y2, Y3…” as 5, and we’ll see the changes as follows.

- When we set the value of the “Scale X1, X2, X3…” as 0, the value of the “Scale Y1, Y2, Y3…” as 10, and we’ll see the changes as follows.

Compared the above two examples, we can find that the height of every unit text increased on the Y-axis.
- When we set the value of the “Scale X1, X2, X3…” as 0, the value of the “Scale Y1, Y2, Y3…” as 10, and we’ll see the changes as follows.
Transparency t1, t2, t3…: Set the transparency of every unit during the appearing process.
The value should between 0 and 1.
0 is fully opaque.
1 is fully transparent.
And 0.5 is half transparent.
Mix start color: Select a color to mix it with the font color of every unit text in the appearing process.
Random: Check this option, and the font color of every unit text will mix with variations of the selected color randomly within the same color system.
Another example;
Normal Process
Offset X, Y, Z: Set the final offset coordinate position (X-axis, Y-axis, Z-axis) of every unit text in the normal process.
- We set the value of “Offset X, Y, Z” as 100,0,0.
Global X, Y, Z: Set the initial global angle (X-axis, Y-axis, Z-axis) of the whole text in the normal process.
- We set the value of “Global X, Y, Z” as 100,0,0.
We can see the text staying still at the set global angle in the the normal process.
Global Offset X, Y, Z: Set the final offset angle(X-axis, Y-axis, Z-axis) of every unit text.
- We set the value of “Global X, Y, Z” as 100,0,0 and the “Global Offset X, Y, Z” as 100,0,0.
We can see that the whole text rotates from the initial global angle to the final global angle.
Single X, Y, Z: Set the global angle on the (X-axis, Y-axis, Z-axis) of every unit.
- We set the value of “Single X, Y, Z” as 100,0,0.
Single Offset X, Y, Z: Set the normal offset angle (X-axis, Y-axis, Z-axis) of every unit. But if you enable the option of “Divide Unit Into Blocks”, then the set value will work on every block(rectangle/triangle).
- We set the value of “Single X, Y, Z” as 100,0,0 and the “Single Offset X, Y, Z” as 100,0,0. Then, enable the option of “Divide Unit Into Blocks”.
We can see that every block shaking with a certain angle.
Scale X1, X2, X3…: Set the scale proportion of every unit text on the X-axis. The value “1” means the original proportion. And then the bigger value, the larger scale proportion.
Scale Y1, Y2, Y3…: Set the scale proportion of the unit text on the Y-axis. The value “1” means the original proportion. And then the bigger value, the larger scale proportion.
Transparency t1, t2, t3…: Set the transparency of every unit during the normal process. The value should between 0 and 1. 0 is fully opaque. 1 is fully transparent, and 0.5 is half transparent.
Mix color: Select a color to mix it with the font color of every unit text in the normal process.
Random: Check this option, and the font color of every unit text will mix with variations of the selected color randomly within the same color system.
Disappear Process
Duration(s): Set the total duration of the disappearing process in seconds.
Predefine X:
Set the final position where the unit text disappears on the X-axis direction.
Here are 7 options.
“0” means the unit text disappears at the “0” position, the center on the display screen.
“+w” means the unit text disappears at the “positive” direction, the right part of the “0(center)”.
When the text is quite long, the final position is one-text-width away from the center.
When the text is short, the final position is also one-text-width away from the center.
“-w” means the unit text disappears at the “negative” direction, the left part of the “0(center)”.
When the text is quite long, the final position is one-text-width away from the center.
When the text is short, the final position is also one-text-width away from the center.
“Left Screen” means the unit text disappears at the junction point(the point that the left boundary of the display screen intersects with the X-axis).
“Right Screen” means the unit text disappears at the junction point(the point that the right boundary of the display screen intersects with the X-axis).
“Out of left screen” means the unit text disappears at a position that out of the left screen.
“Out of right screen” means the unit text disappears at a position that out of the right screen.
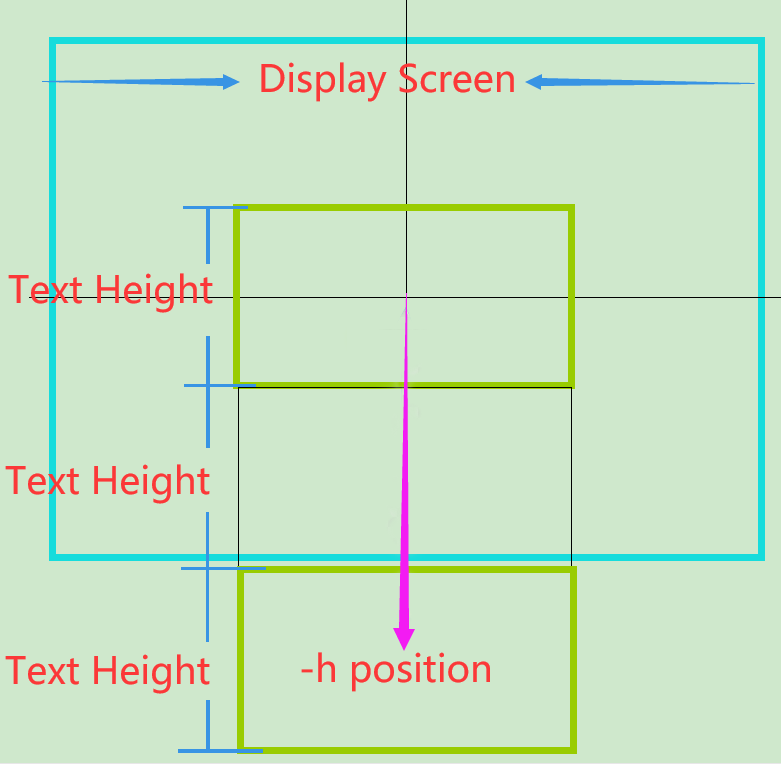
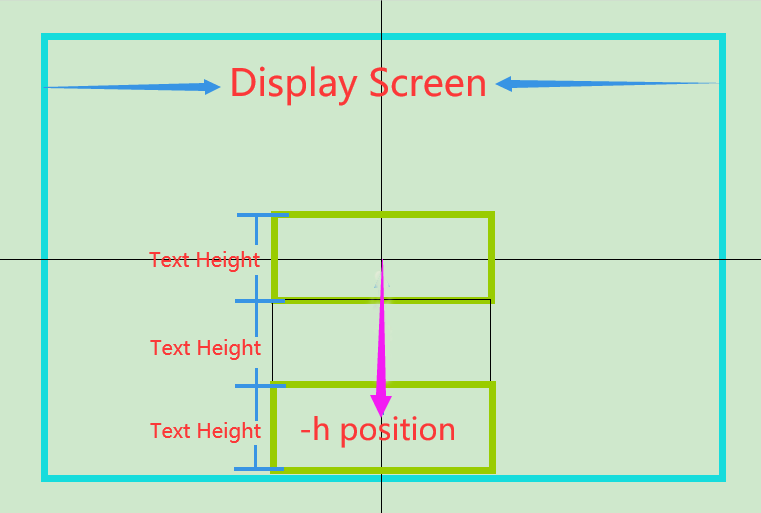
Predefine Y: Set the final position where the unit text disappears on the Y-axis direction.
Here are still 7 options.
“0” means the unit text disappears at the “0” position, the center on the display screen.
“+h” means the unit text disappears at the “positive” direction, the upper part of the X-axis.
When the text lines are quite many, the final position is one-text-height away from the center.
“+h” means the unit text disappears at the “negative” direction, the upper part of the X-axis.
When the text lines are not so many, the final position is also one-text-height away from the center.
“-h” means the unit text disappears at the “positive” direction, the lower part of the X-axis.
When the text lines are quite many, the final position is one-text-height away from the center.
“-h” means the unit text disappears at the “negative” direction, the lower part of the X-axis.
When the text lines are not so many, the final position is also one-text-height away from the center.
“Top Screen” means the unit text disappears at the junction point(the point that the top boundary of the display screen intersect with the Y-axis).
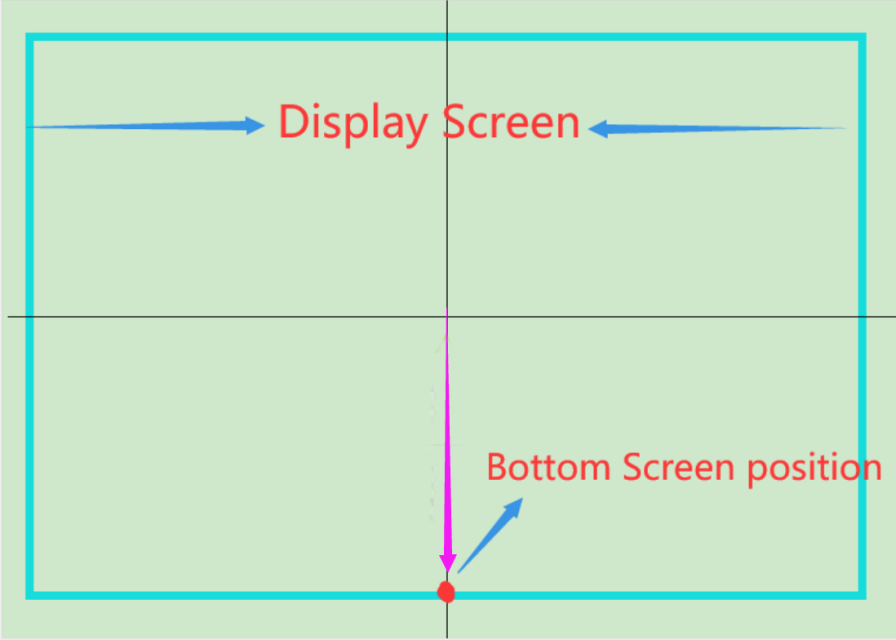
“Bottom Screen” means the unit text disappears at the junction point(the point that the bottom boundary of the display screen intersect with the Y-axis).
“Out of top screen” means the unit text disappears at a position that out of the top screen.
“Out of bottom screen” means the unit text disappears at a position that out of the bottom screen.
Offset X, Y, Z: Set the value of the X, Y and Z axes separately to change the final position where the unit text disappearing.
For example, we set the “Predefine offset X” as “right screen”, and we can see the unit text disappears from the left screen(the final position).

While we set the “Predefine offset X” as “right screen”, the vale of the “offset X” as -200, and we can see the unit text disappears from the new initial position. In other words, the new final position moved 200 in the negative direction of the X-axis.

Similarly, if we set the value of the “offset Y”, then the final position of the unit text will vary with the value.
Random: Check this option, and every unit text will disappear randomly within the range from 0 to the value set in “offset X, Y, Z”.
Random/Frame:In the motion process from the center to the final position, there are many frames of the moving text. If you check the option of “Random/Frame”, then you’ll see the frames at different positions showing randomly.
Global Offset X, Y, Z: Set the final offset angle on the X, Y and Z axes of every unit text when they disappearing.
Random: Check this option, and every unit text will disappear randomly within the angle range from 0 to the value set in “Global Offset X, Y, Z”.
Single Offset X, Y, Z: Set the final offset angle on the X, Y and Z axes of every block(rectangle/triangle) when they disappearing.
Random: Check this option, and every block will disappear randomly within the angle range from 0 to the value set in “single offset X, Y, Z”.
Scale X1, X2, X3…: Set the scale proportion of every unit text on the X-axis. The value “1” means the original proportion. And then the bigger value, the larger scale proportion.
Scale Y1, Y2, Y3…: Set the scale proportion of every unit text on the Y-axis. The value “1” means the original proportion. And then the bigger value, the larger scale proportion.
Transparency t1, t2, t3…: Set the transparency of every unit during the disappearing process. The value should between 0 and 1. 0 is fully opaque. 1 is fully transparent, and 0.5 is half transparent.
Mix end color: Select a color to mix it with the font color of every unit text in the disappearing process.
Random: Check this option, and the font color of every unit text will mix with variations of the selected color randomly within the same color system.
That’s all detailed explanation and guideline for Text Special Effect, Whether you use it in Intro/Outro Video, or in the whole video just like the subscribe button on your YouTube videos, it is always the best choice to add a text special effect to your Brand/Logo Name.
If you find it’s helpful, feel free to share it with your friends. You can also share it on your personal website/blog, helping more people practically on enhancing their brands with videos.

")
