This is the most important part of how to make a particle effect.
We create all life-like particles with these parameters, so it’s crucial to figure out what they are for.
Let’s kick a start.
First, we need to pick a particle layer, and then we’ll see its all parameter settings in the below functional box.
The first one is the emitter.
The emitter is the only required tool for creating particles, and we can set the emission direction, emission angle, emission speed and so many parameters to create various fantastic dynamic scenes, such as raining, snowing, foggy, firing, and even the moving milk way.
Let’s learn about the specific parameters that influenced the particle effect first.
Position(x,y,z): Set the value of the X, Y, Z axes to fix the initial position of the particle emitter on the screen. Or you can directly drag the source point on the screen casually to change the initial position of the particle emitter on the screen.
Direction(x,y,z): Set the value of the X, Y, Z axes to fix the particles’ emission direction in a 3D space.
Examples:
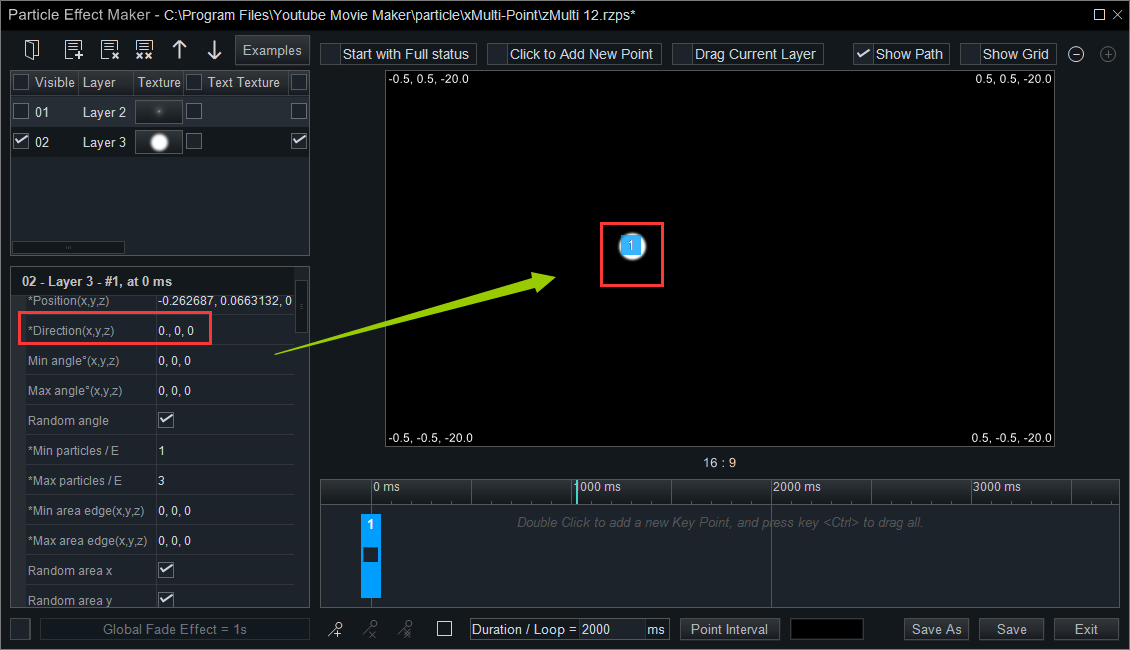
When you set the value of the X, Y, Z axes as the default( 0, 0, 0 ) which means the emitter is in the middle of the screen. The particles don’t shoot around, and it just looks like a dot.
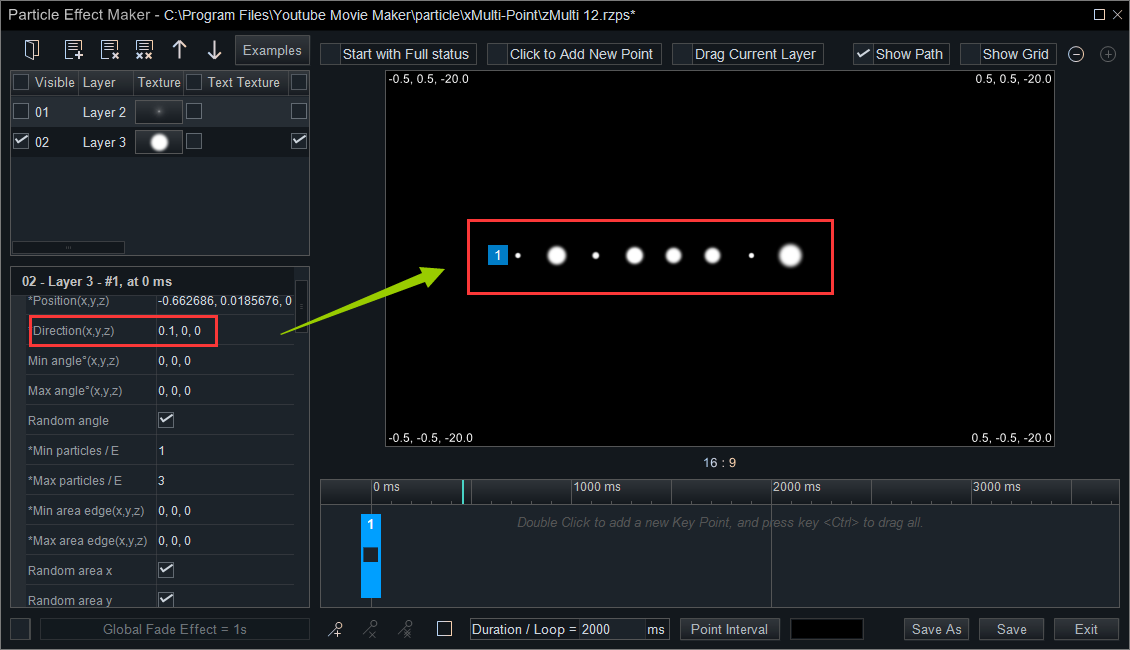
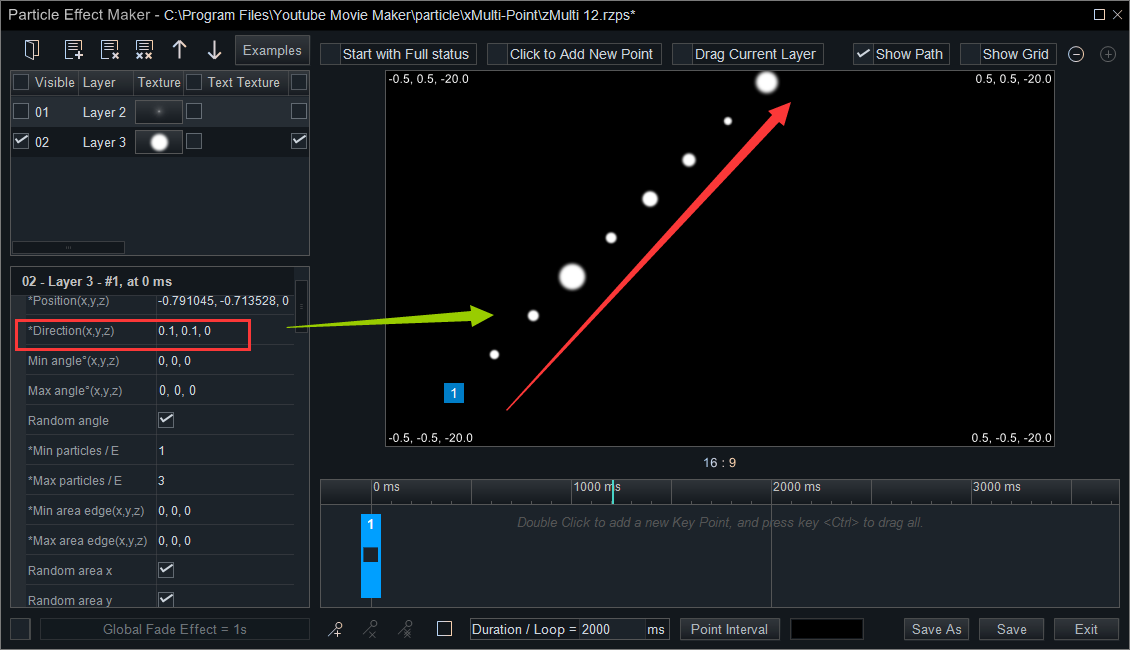
If you only set the value of the X-axis as 0.1, you’ll see the particle effect as follows.
(0.1 means the particles are emitted in the X direction, to the right of the screen. Minus 0.1 means the particles are emitted in the Y direction, towards the left of the screen.)
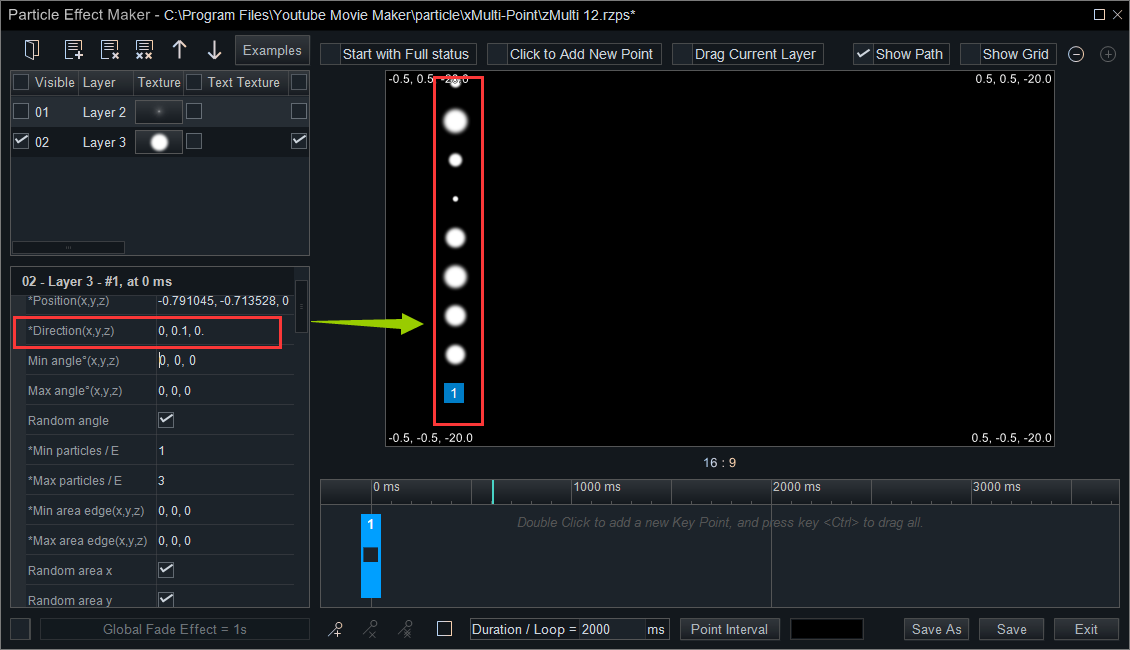
If you only set the value of the Y-axis as 0.1, you’ll see the particle effect as follows.
(0.1 means the particles are emitted in the Y direction, towards the top of the screen. Minus 0.1 means the particles are emitted in the Y direction, towards the bottom of the screen.)
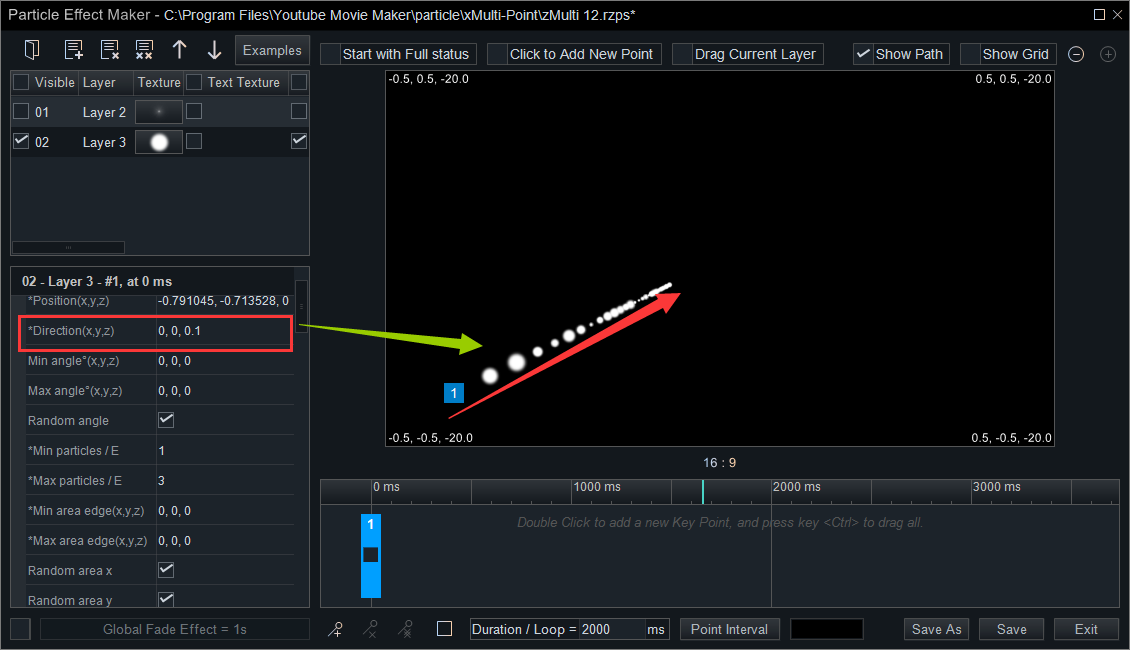
If you only set the value of the Z-axis as 0.1, you’ll see the particle effect as follows.
(0.1 means the particles are emitted in the Z direction, towards the inside of the screen. Minus 0.1 means the particles are emitted in the Z direction, out of the screen.)
If you set the value of the X and Y axes as 0.1, you’ll see the particle effect as follows.
(Setting X and Y to 0.1 at the same time means that the particles are emitted at the intersection where X and Y are both 0.1.)
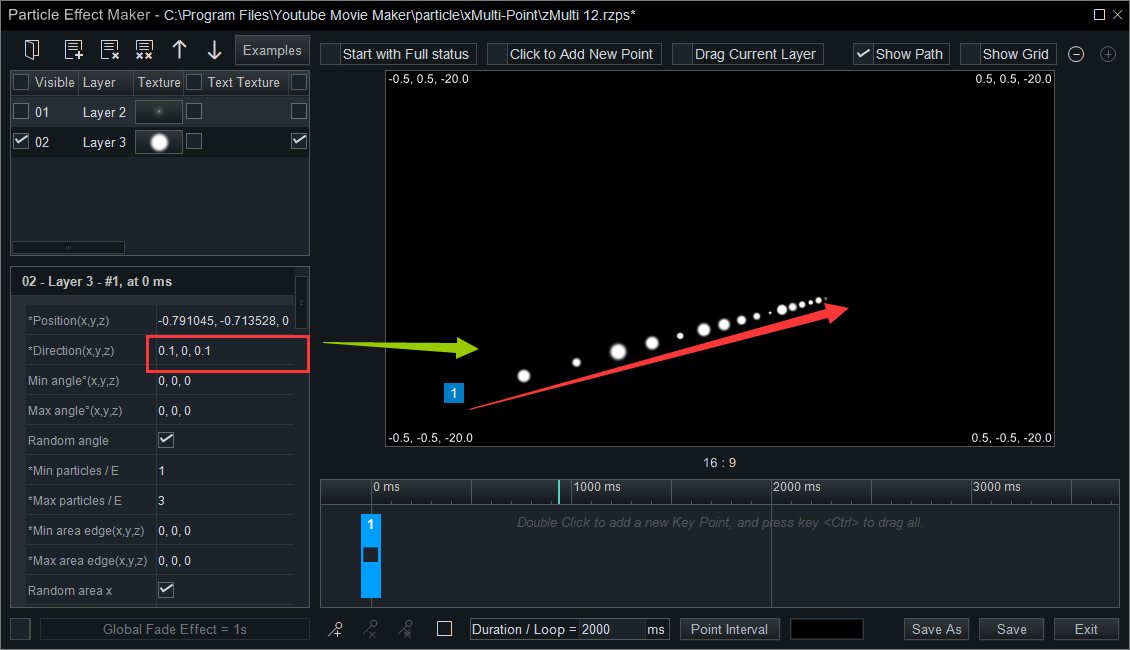
If you set the value of the X and Z axes as 0.1, you’ll see the particle effect as follows.
(Setting X and Z to 0.1 at the same time means that the particles are emitted at the intersection where X and Z are both 0.1.)
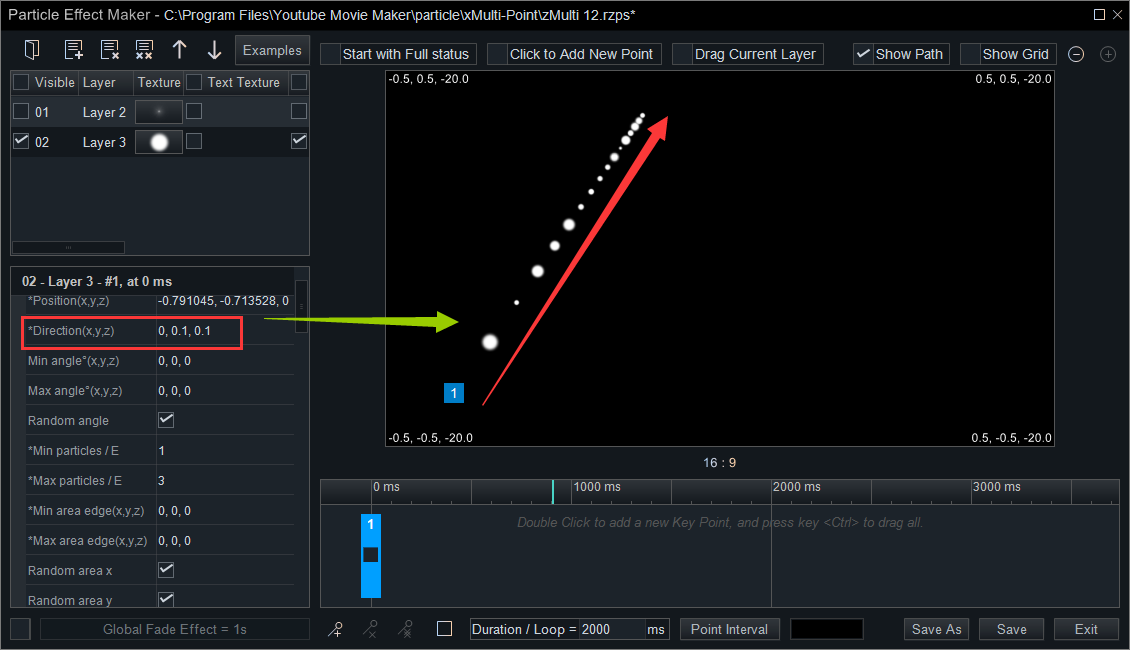
If you set the value of the Z and Y axes as 0.1, you’ll see the particle effect as follows.
(Setting Z and Y to 0.1 at the same time means that the particles are emitted at the intersection where Z and Y are both 0.1.)
If you set the value of the X, Y and Z axes as 0.1, you’ll see the particle effect as follows.
(Setting X, Y and Z to 0.1 at the same time means that the particles are emitted at the intersection where X. Y and Z are both 0.1.)
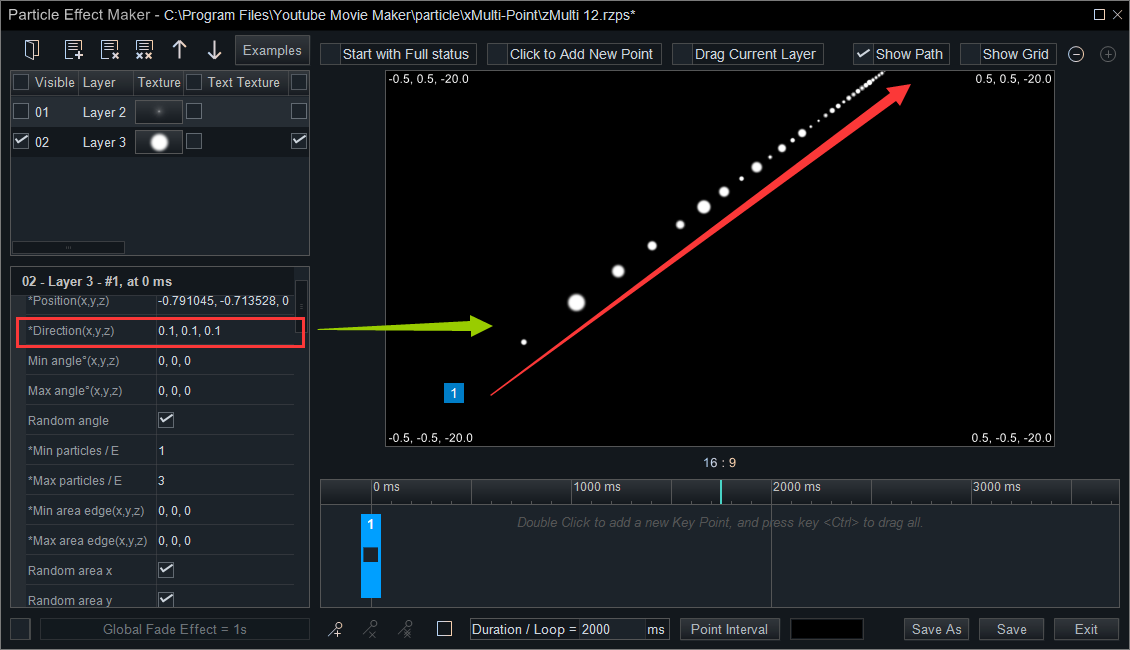
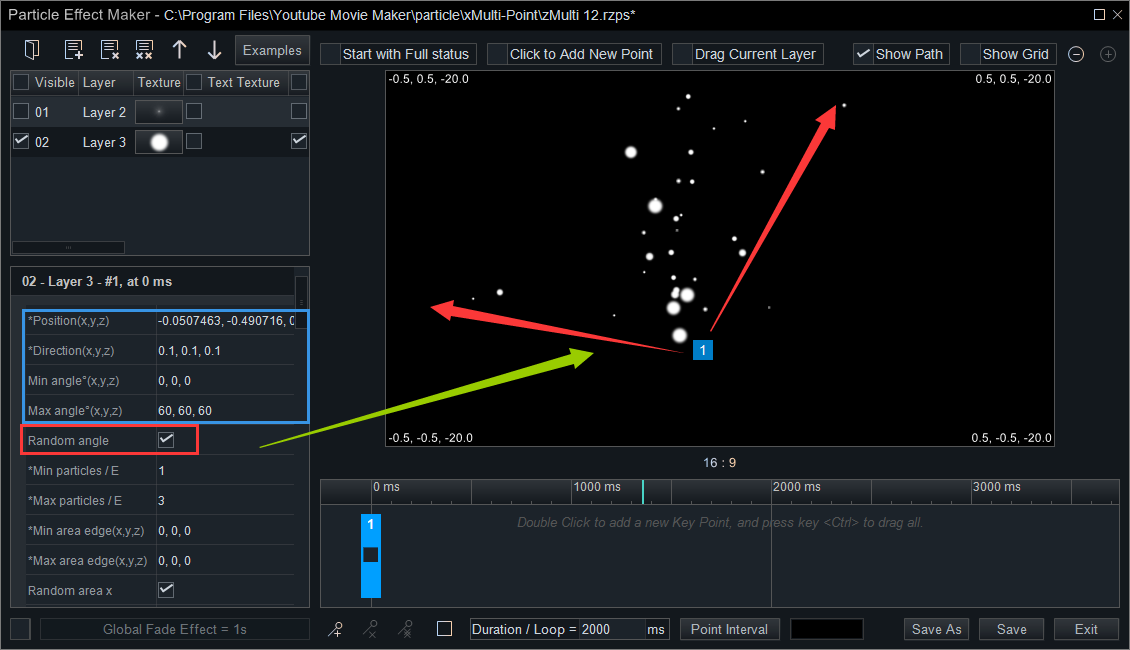
The emission angle cooperates with the emission direction, and they determine the particles to be emitted to which specific 3D space.
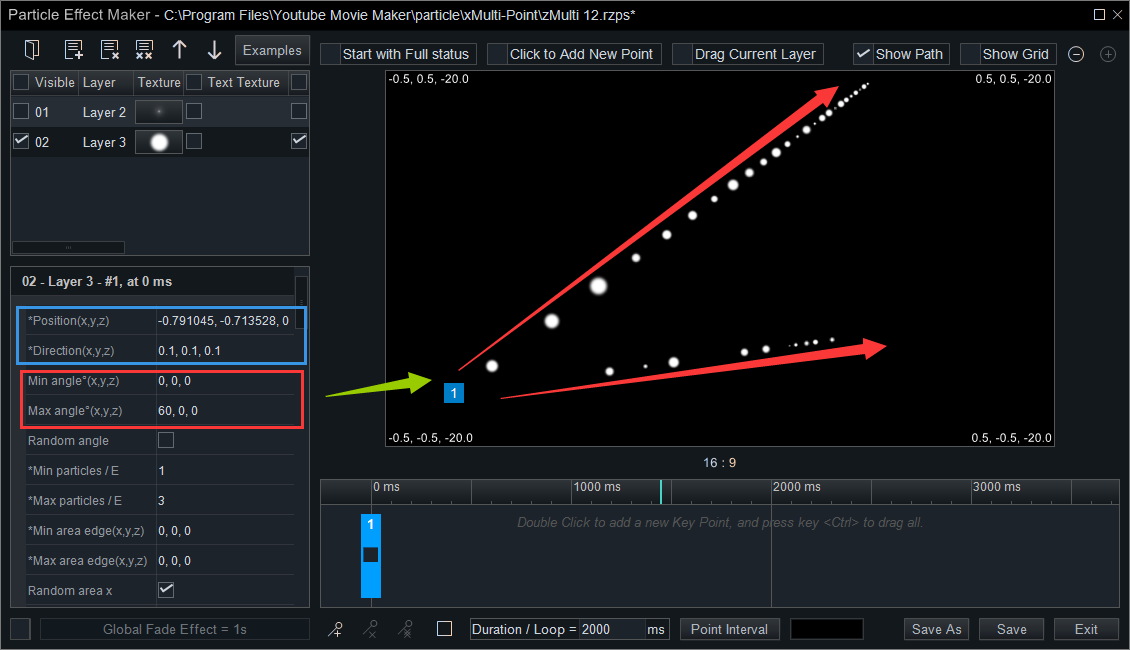
Min angle: Set the value of the X, Y, Z axes to fix the particles’ min emission angle in a 3D space.
Max angle: Set the value of the X, Y, Z axes to fix the particles’ max emission angle in a 3D space.
Examples:
If you set the value of the max emission angle on the X-axis as 60, you’ll see the particle effect as follows.
If you set the value of the max emission angle on the X, Y and Z axes as 60, you’ll see the particle effect as follows.
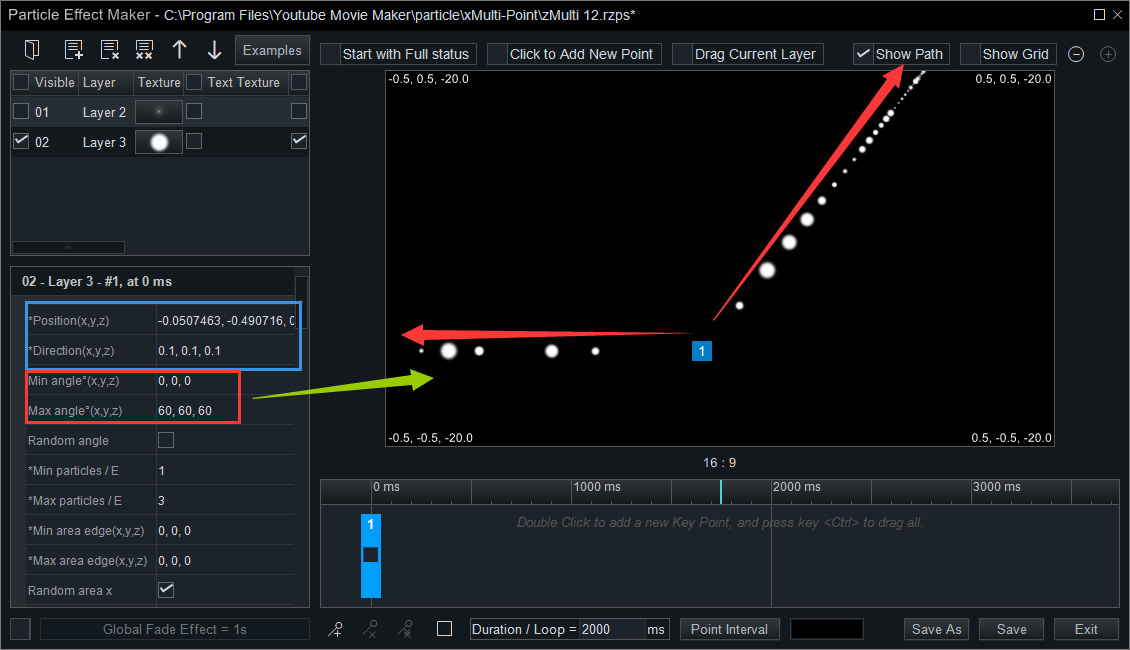
(Once the values of min angle and max angle were set, the particles would be emitted along the set angle. But when the min angle is equal to the max angle, the particles will be emitted into a straight line.)
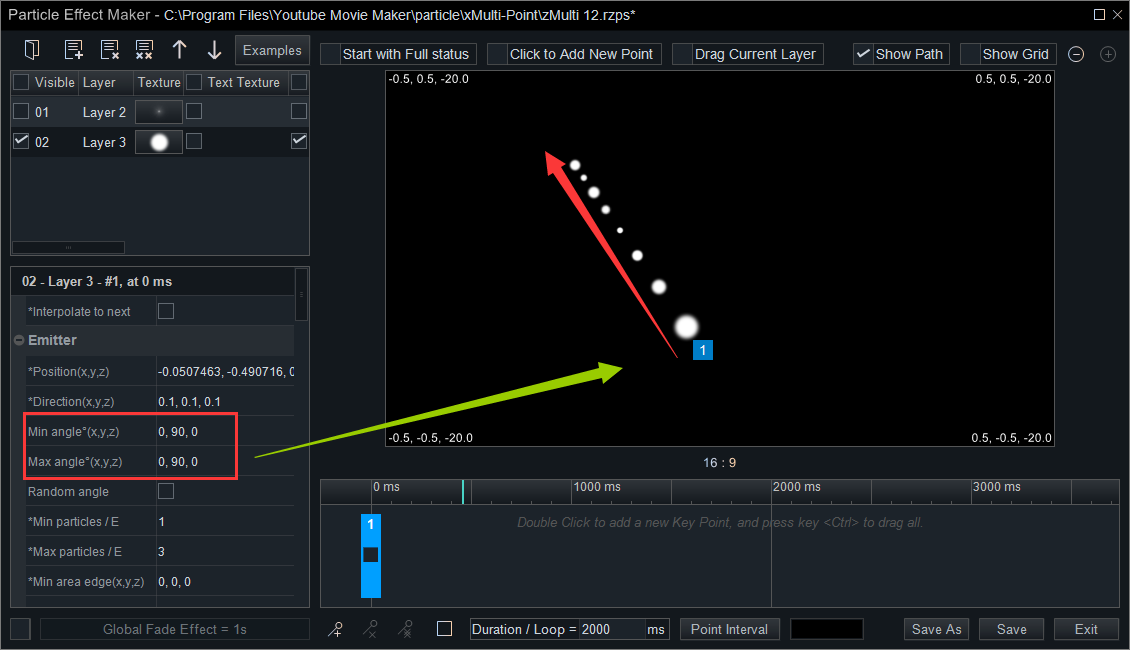
Random angle: If you check the box, the particles will be emitted at any angle within the range of the minimum and maximum.
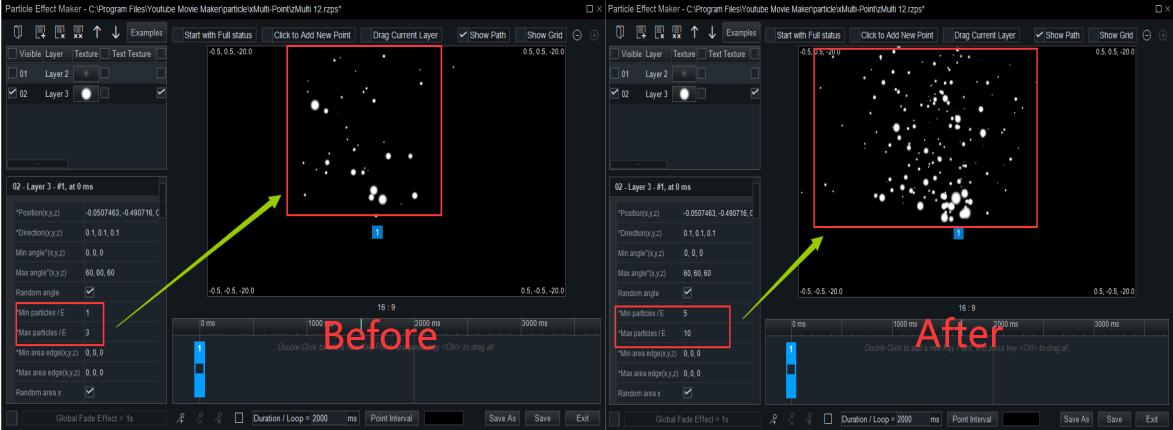
By setting the number of particles, you can change the density of the particles. For example, if you want to make a snowing effect, you can change these two parameters to create flurry or heavy snow. Of course, you can change other parameters, such as the emission speed, to make the effect more real.
Min particles/E: Set the number of how many min particles you want to emit per unit time.
Max particles/E: Set the number of how many max particles you want to emit per unit time.
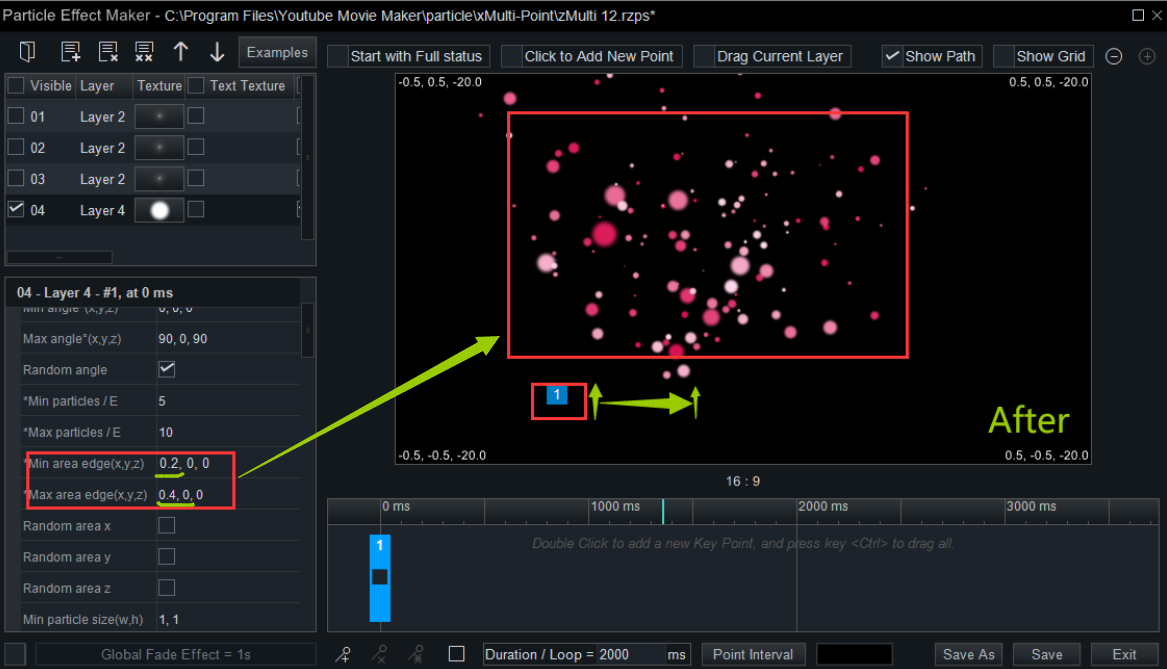
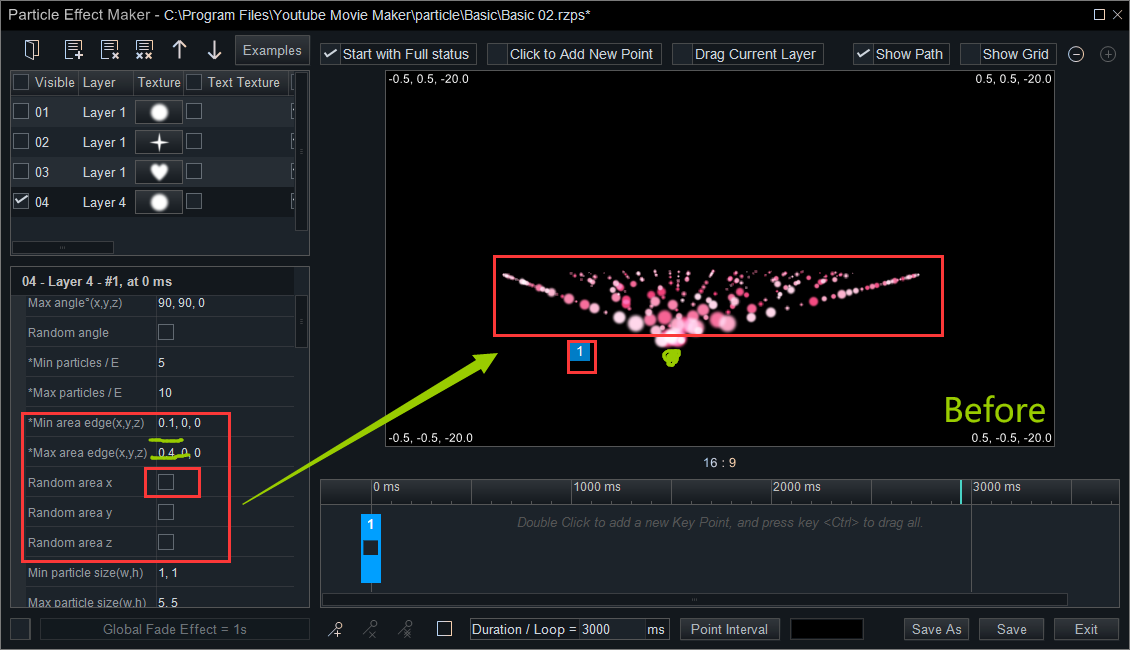
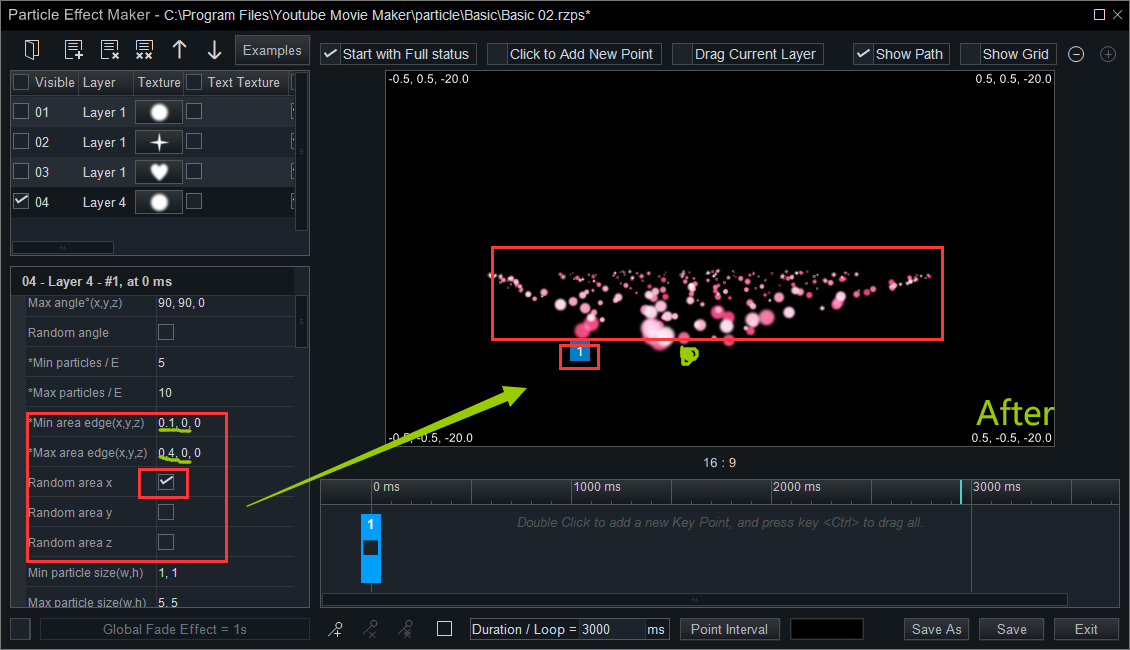
The parameters below can help you limit the particles in a fixed area.
Min area edge: Set this value to determine the minimum distance from the emitter where the particle is emitted.
Max area edge: Set this value to determine the minimum distance from the emitter where the particle is emitted.
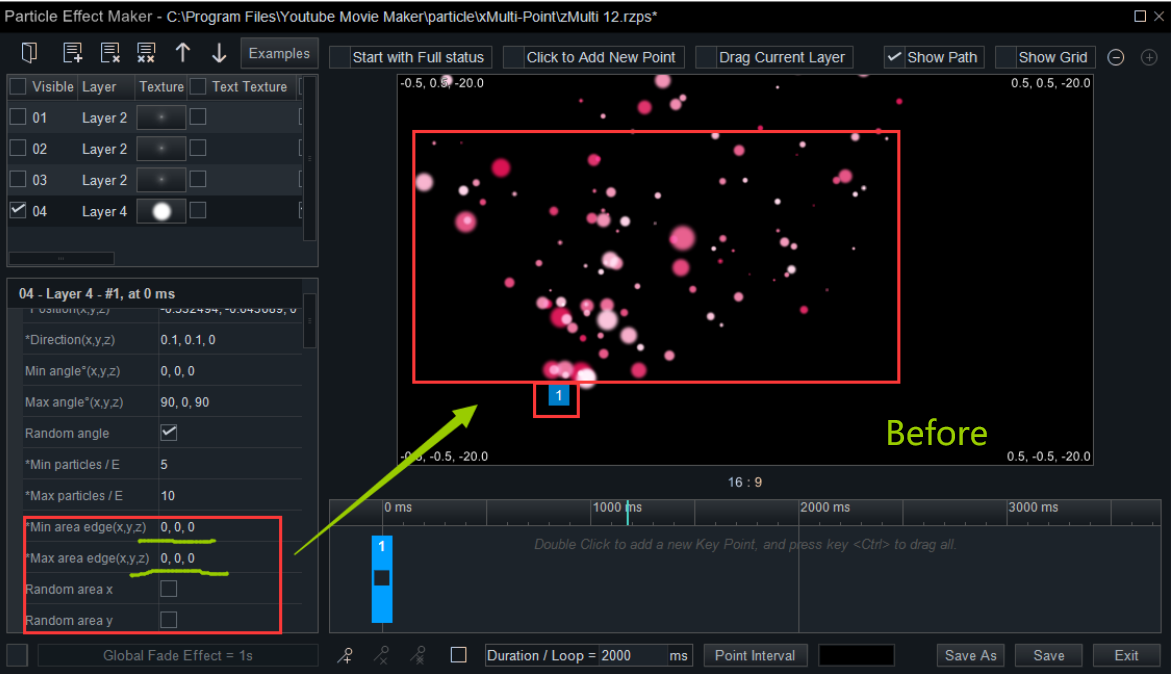
Random area X: Check the option to allow the particles can be emitted at random locations within the minimum and maximum range of X-axis.
Random area Y: Check the option to allow the particles can be emitted at random locations within the minimum and maximum range of Y-axis.
Random area Z: Check the option to allow the particles can be emitted at random locations within the minimum and maximum range of Z-axis.
For example, set the min area edge as 0.1 and the max area edge as 0.4 on X-axis, then check the box of “Random Area X” the particles can be emitted from 0.1~ 0.4 on X-axis.
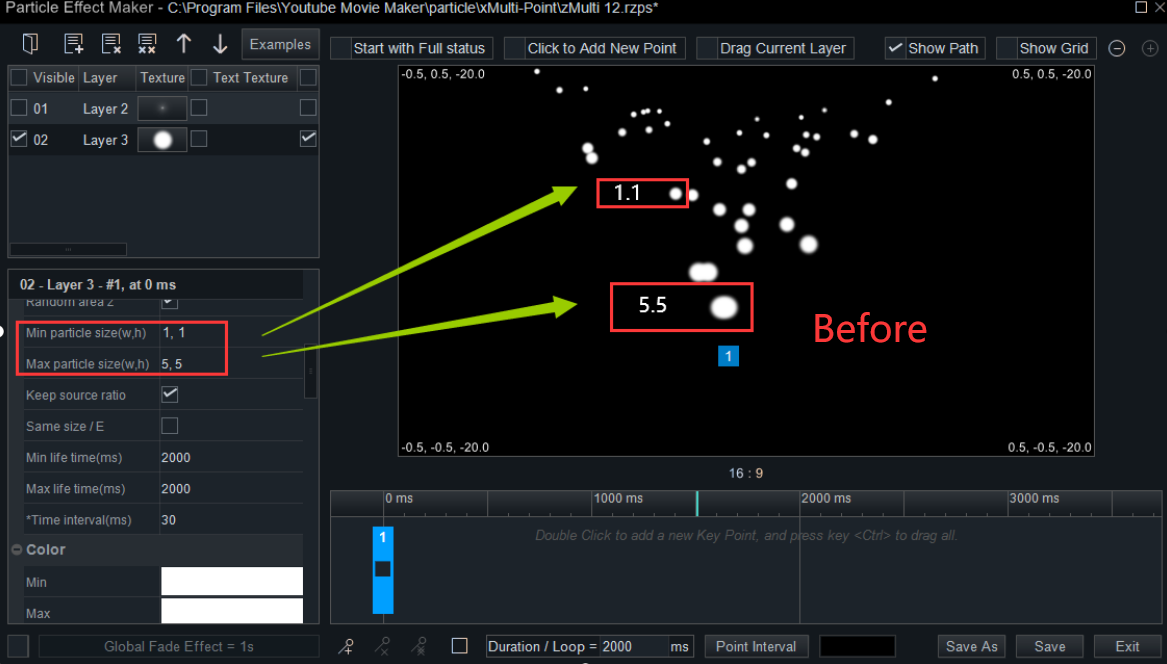
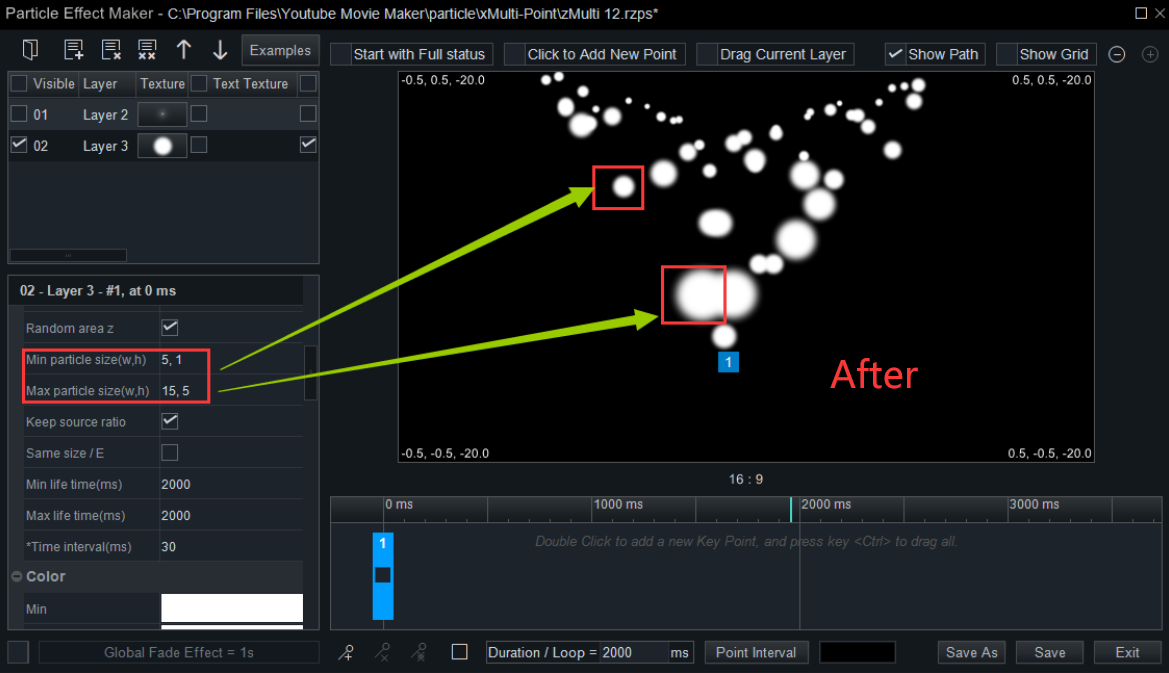
Min particle size: Set the minimum size of a single particle.
Max particle size: Set the maximum size of a single particle.
Examples:
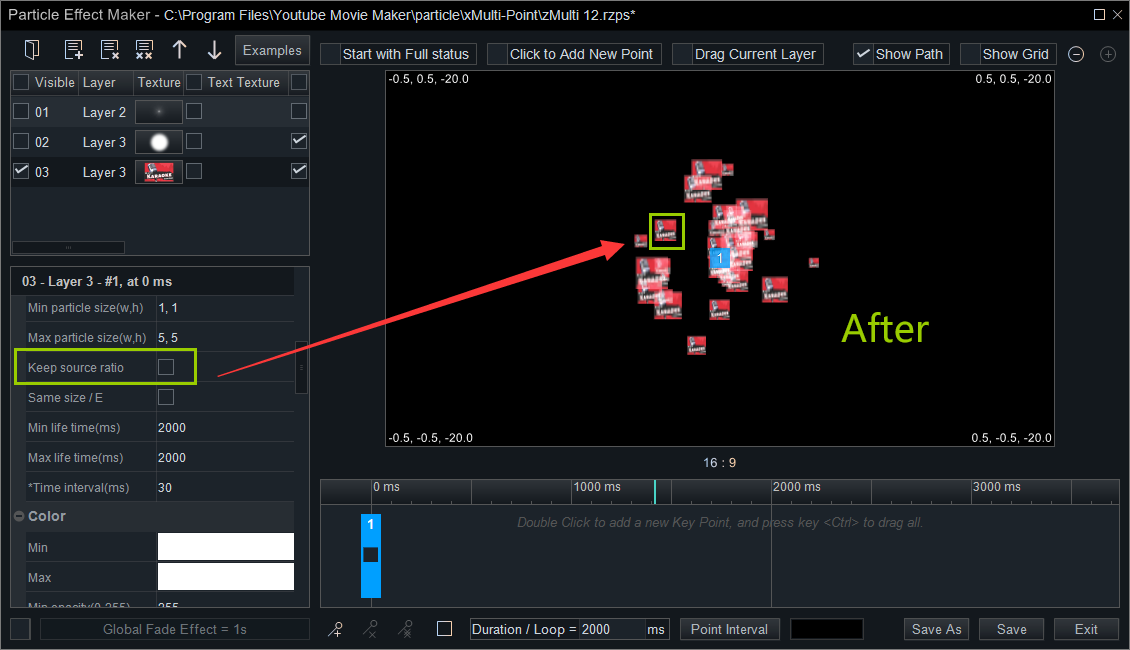
Keep source ratio: Check this option, the emitted particles will retain the aspect ratio of the original image. But if this option is not checked, the emitted particles will be a 1:1 aspect ratio as default.

Same size/E: Check the box, and all particles have the same size.
Min life time(ms): Set the value of the minimum duration from creation to the disappearance of a single particle.
Max life time(ms): Set the value of the maximum duration from creation to the disappearance of a single particle.
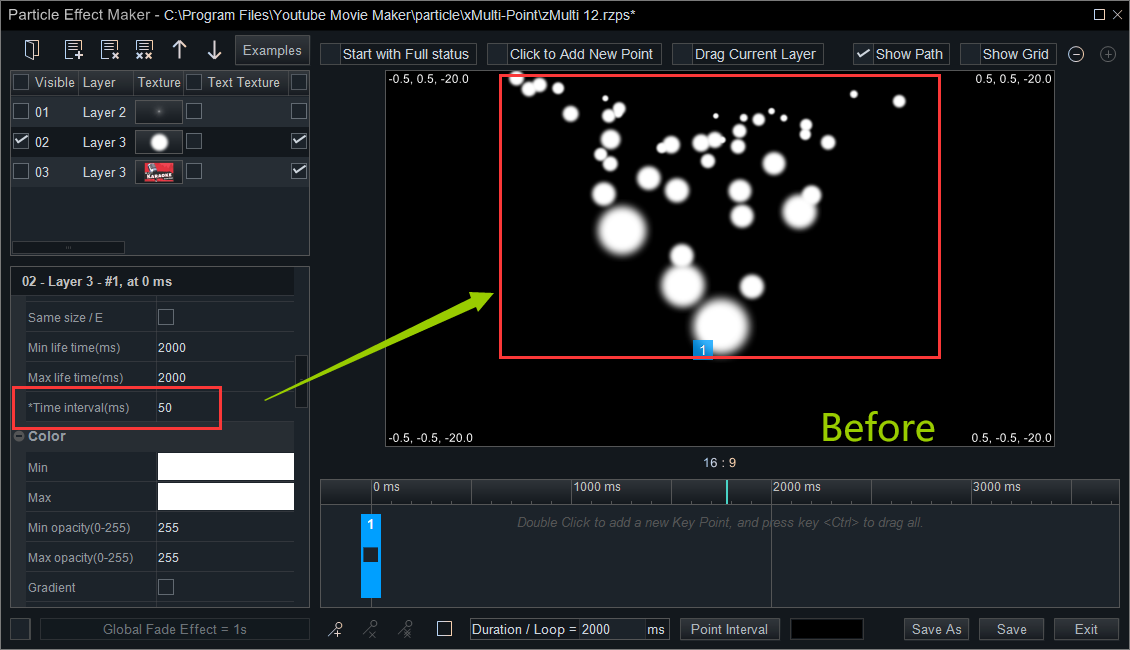
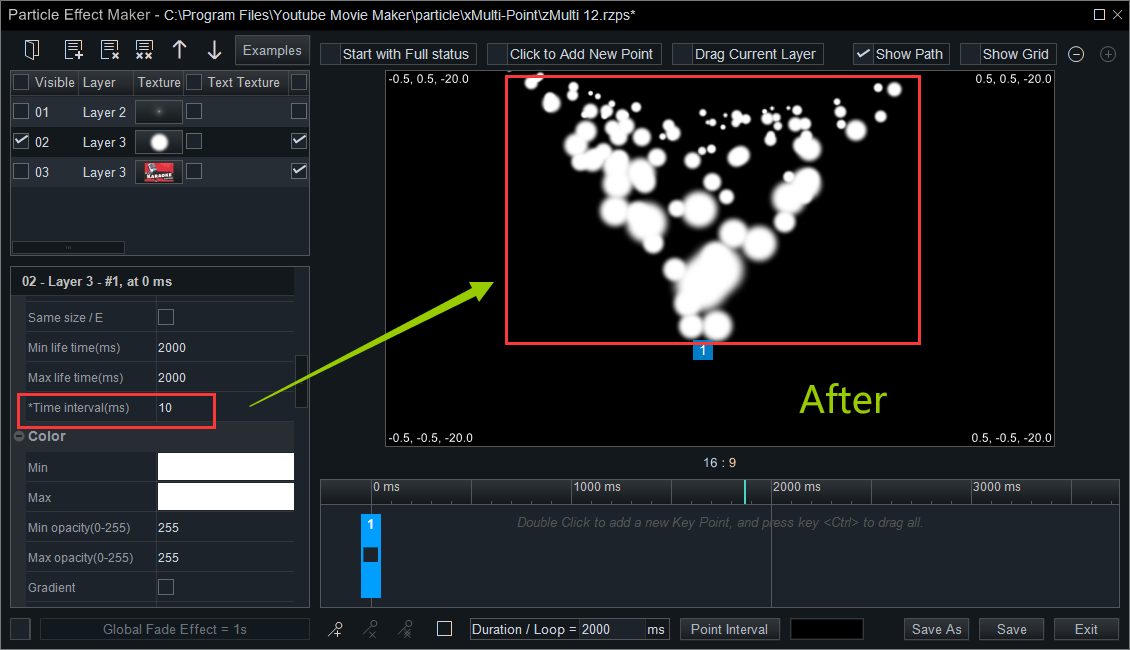
Time interval(ms): Set the value of particles’ emission time interval, the smaller the value, the more particles emitted per unit time. Otherwise, the larger the value, the fewer particles emitted per unit time.
For example, change the time interval from 50 into 10, and the particle effect is as follows.
The second one is Color.
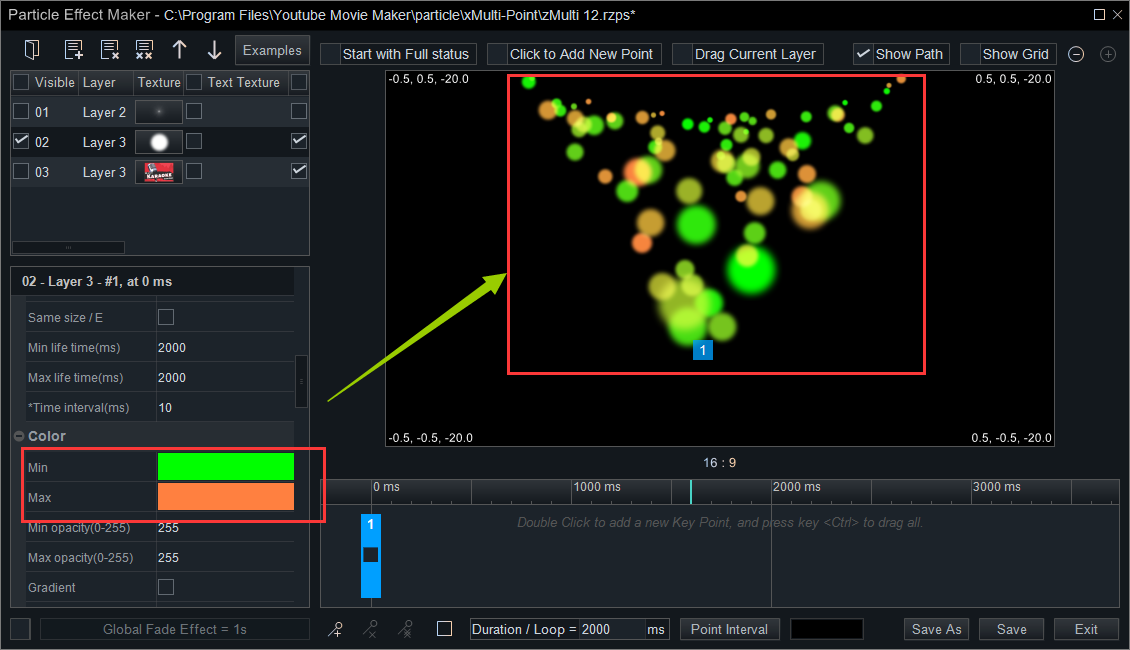
Min: Set the first color of the combined colors in a gradient.
For example, set the “Min” as “Red” and keep the “Max” as “White”, and we can see the particles have many other colors belong to the gradient between white and red.
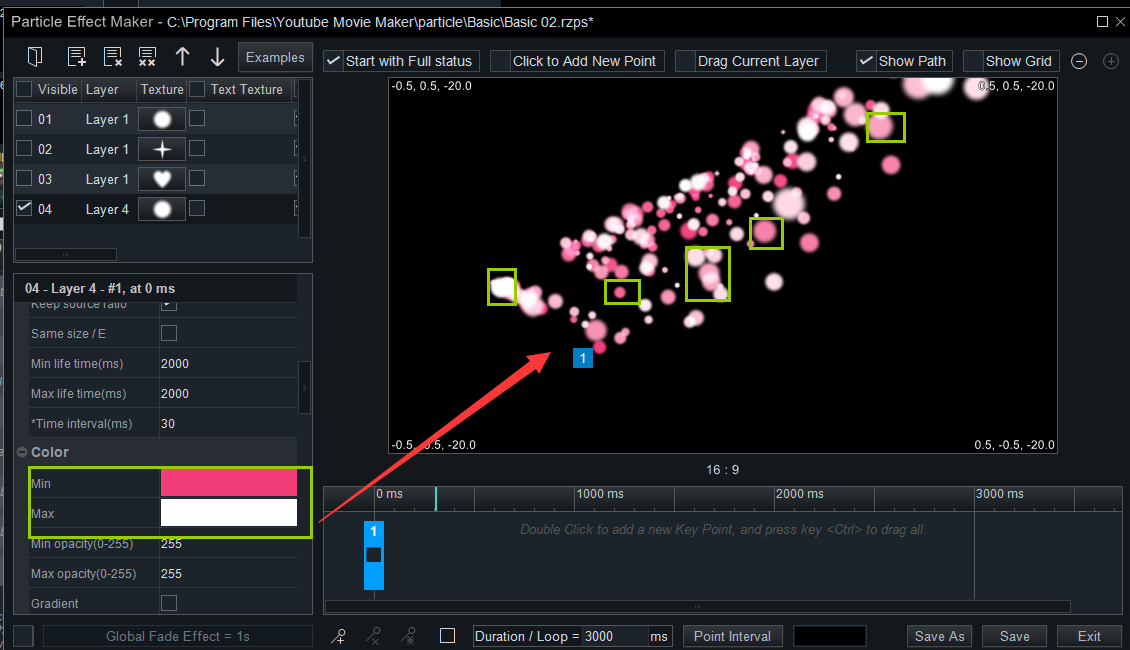
Max: Set the second color of the combined colors in a gradient.
For example, set the “Min” as “Green” and set the “Max” as “Orange”, and we can see the particles have many other colors belong to the gradient between green and orange.
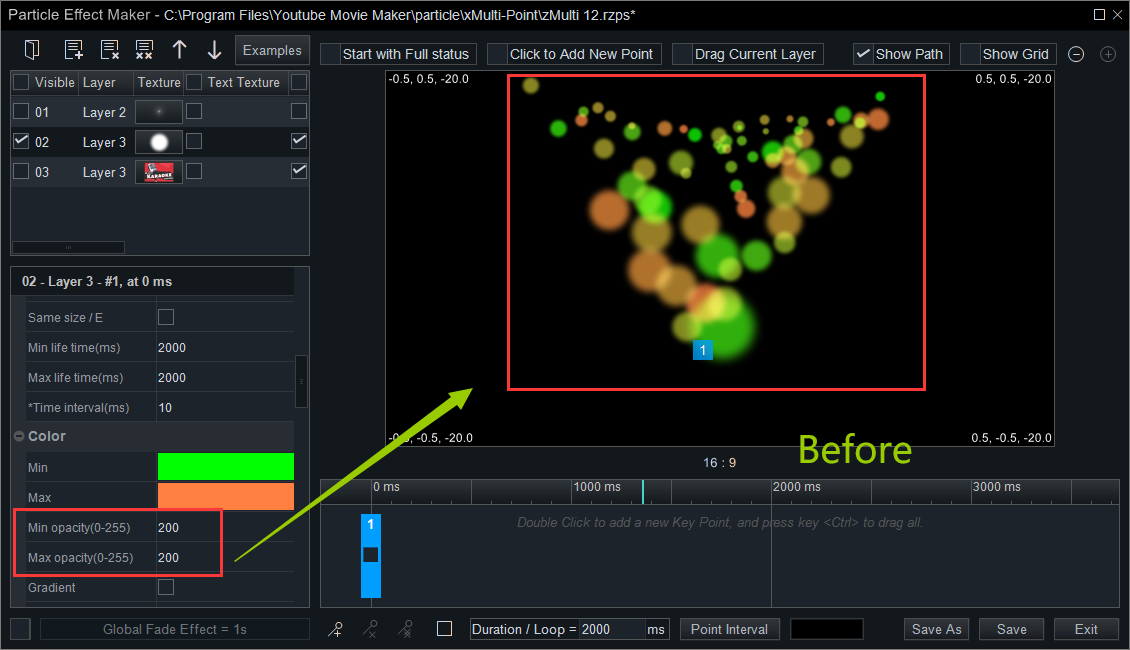
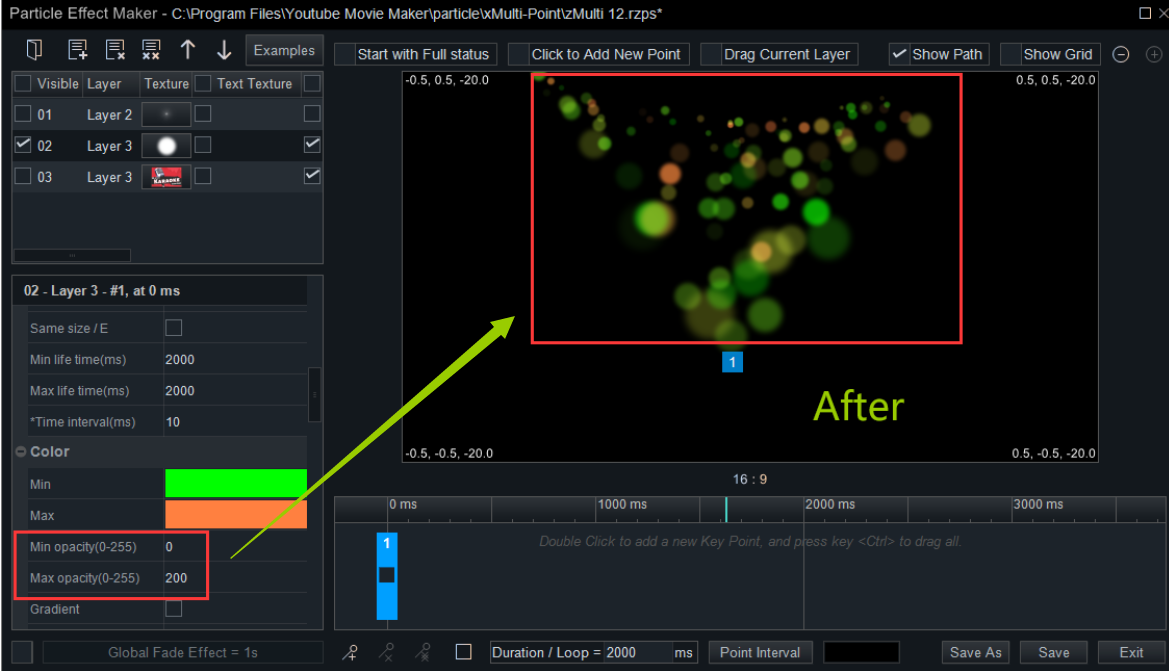
Min opacity(0-255): Pick a value of the min particles’ opacity in the given range of value.
Max opacity(0-255): Pick a value of the max particles’ opacity in the given range of value.
For example, We changed the “Min opacity” from 200 to 0 and keep the “Max opacity” as “200”, then we can see the transparent of the particles became higher.
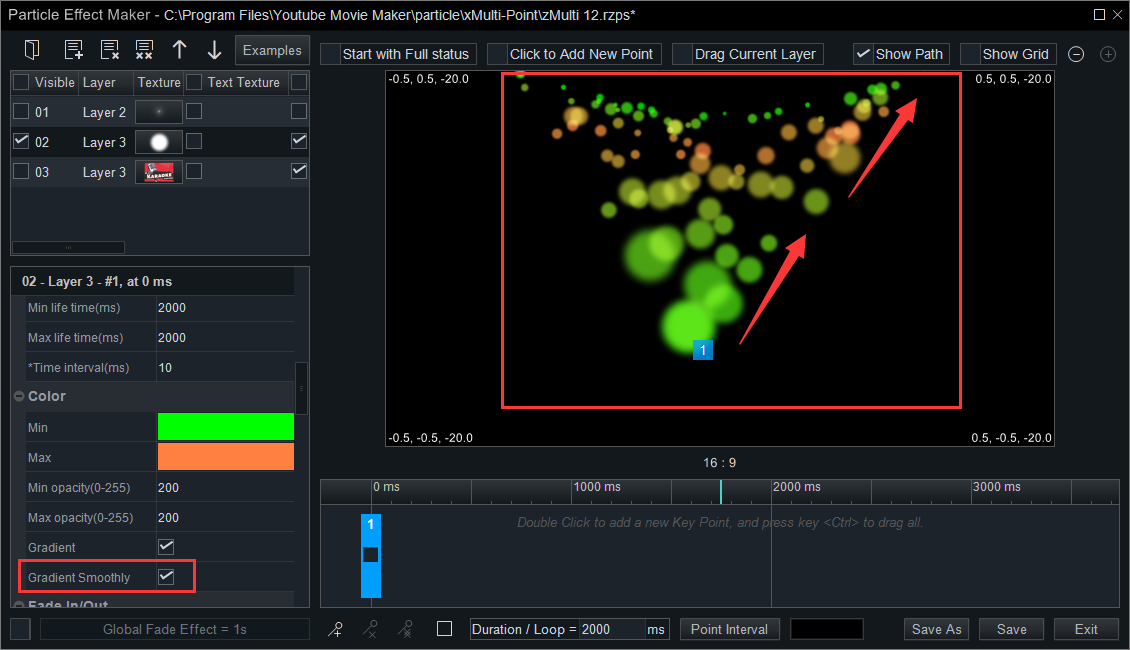
Gradient: Check the box to make the color of the particles have a gradual effect.
For example, we set the “Min” as “Green” and set the “Max” as “Orange”, and check the “Gradient” box, we can see the color of the particles have a gradual effect from green to orange.

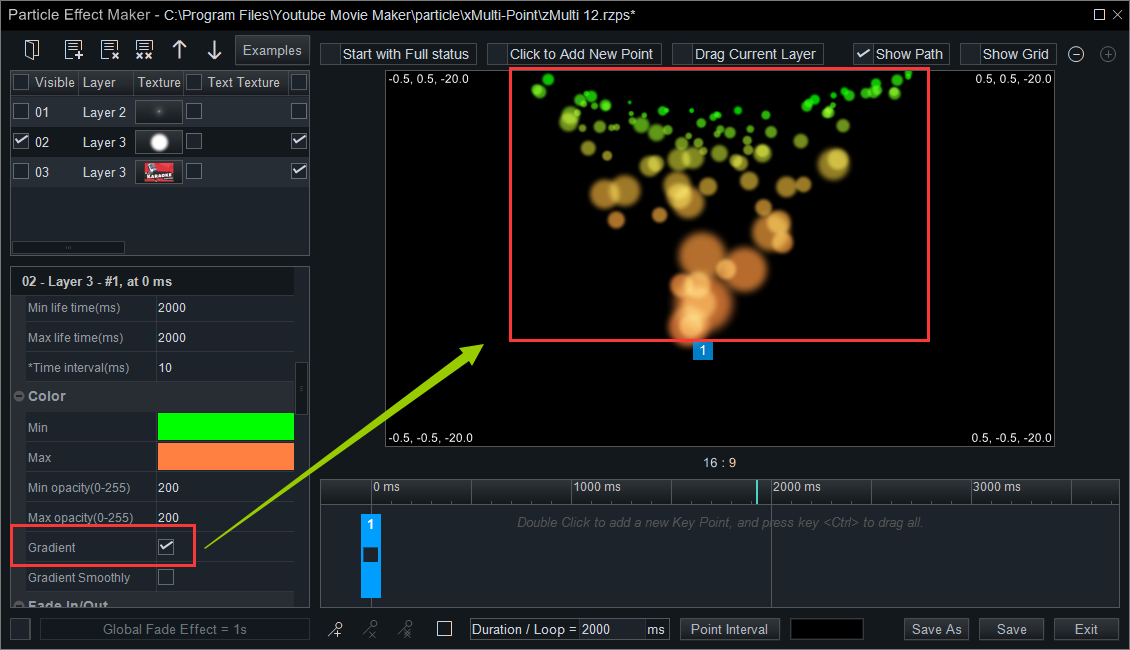
Gradient smoothly: Check the box to make the gradual effect change smoothly.
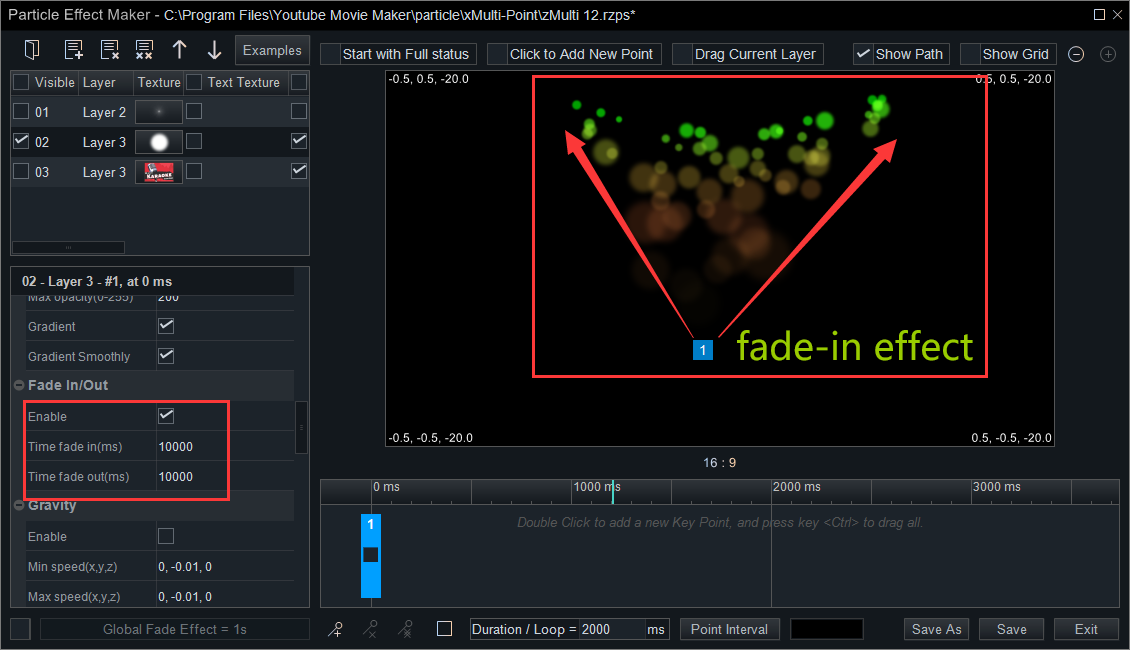
The third one is the Fade in/out effect.
Time fade in: Enable the “Fade-in/out” feature to make the particles have a fade-in effect
Time fade out: Enable the “Fade-in/out” feature to make the particles have a fade-out effect
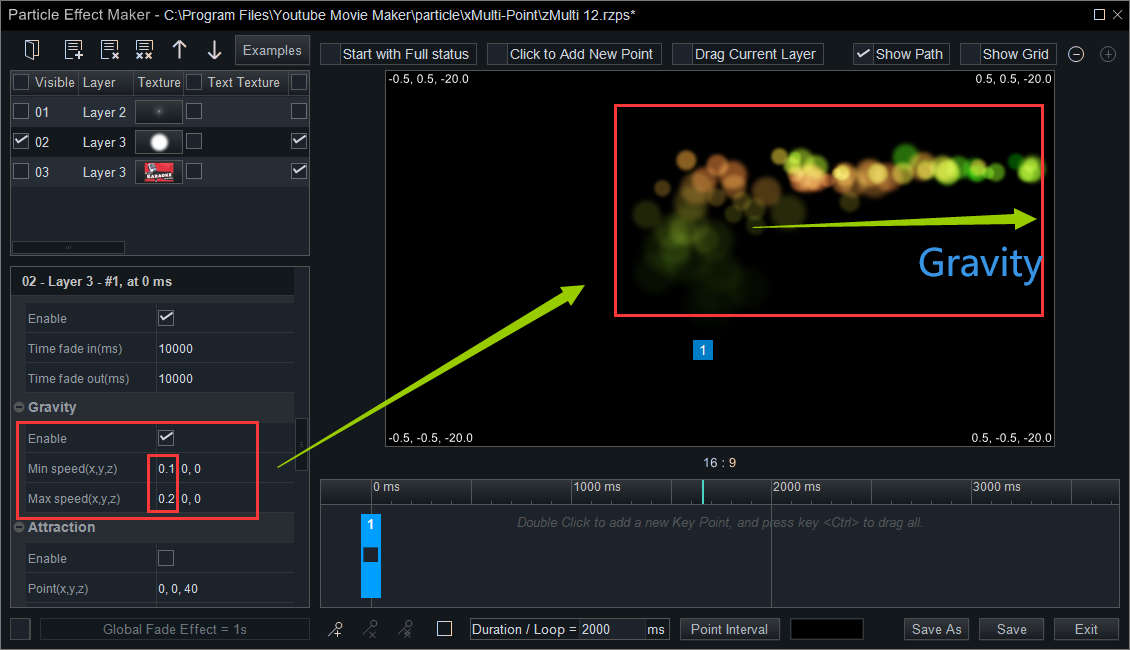
The fourth one is Gravity.
Min Speed(x,y,z): Set the value of the minimum gravitational acceleration that the particles run to the X, Y, Z axes.
Max Speed(x,y,z): Set the value of the maximum gravitational acceleration that the particles run to the X, Y, Z axes.
For example, we Enable the “Gravity” feature and set the “Min Speed” as 0.1 on the X-axis, then we set the “Max Speed” as 0.2 on the X-axis. Next, we’ll see a particle effect as follows.
The fifth one is Attraction.
Point(x,y,z): Set the value of the X, Y, Z axes to fix the position of the axial point. (You can directly drag the axial point on the screen casually to change its position.)
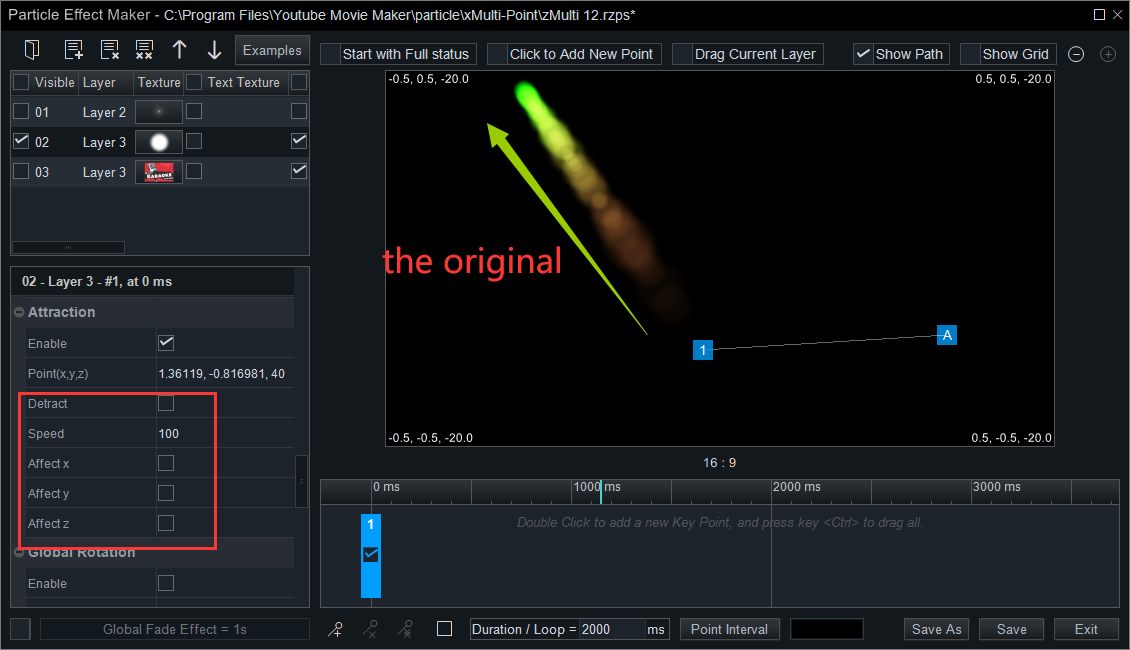
For example, we Enable the “Attraction” feature, and then we can see the particles were attracted to the point.
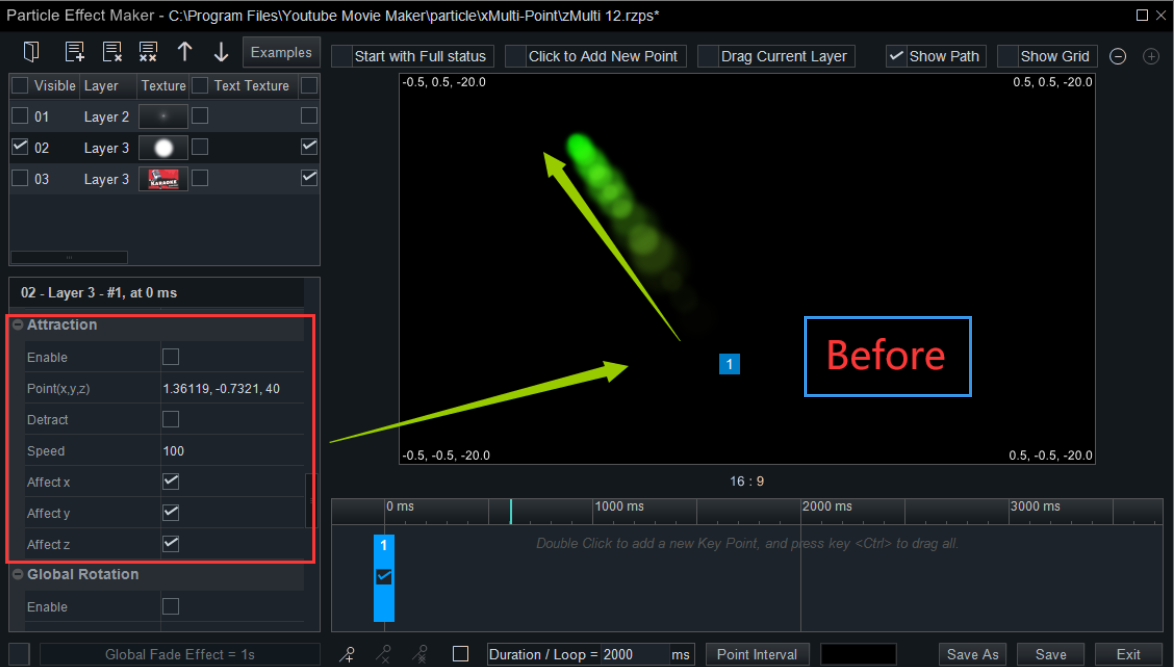

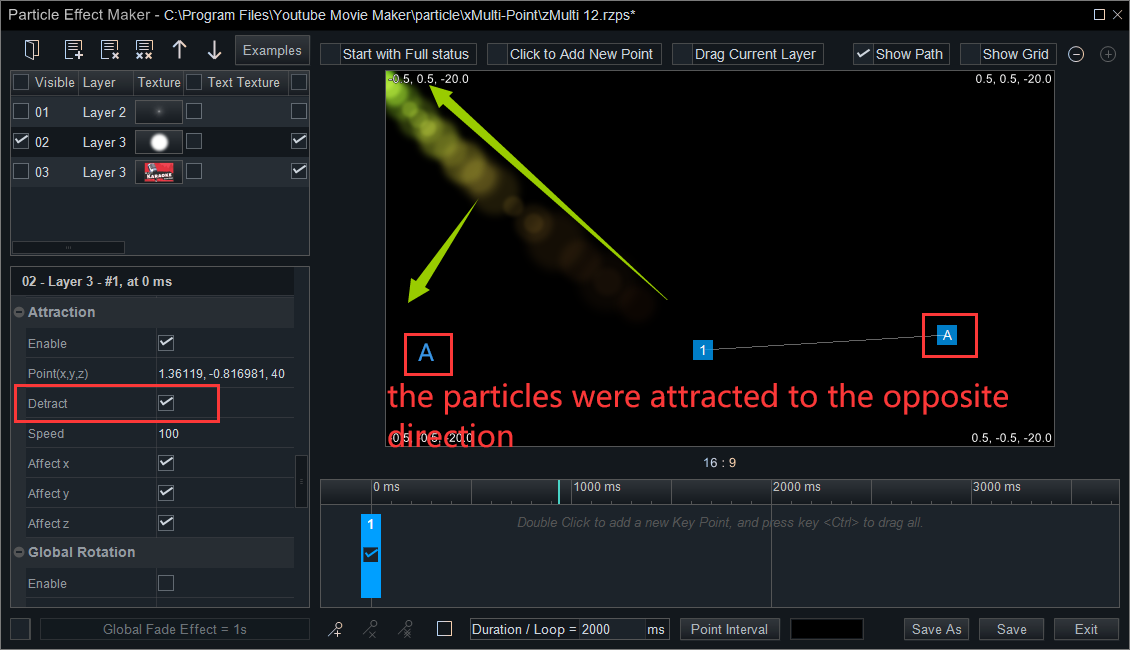
Detract: Check the box of “Detract” to attract the particles to the opposite direction of the axial point.
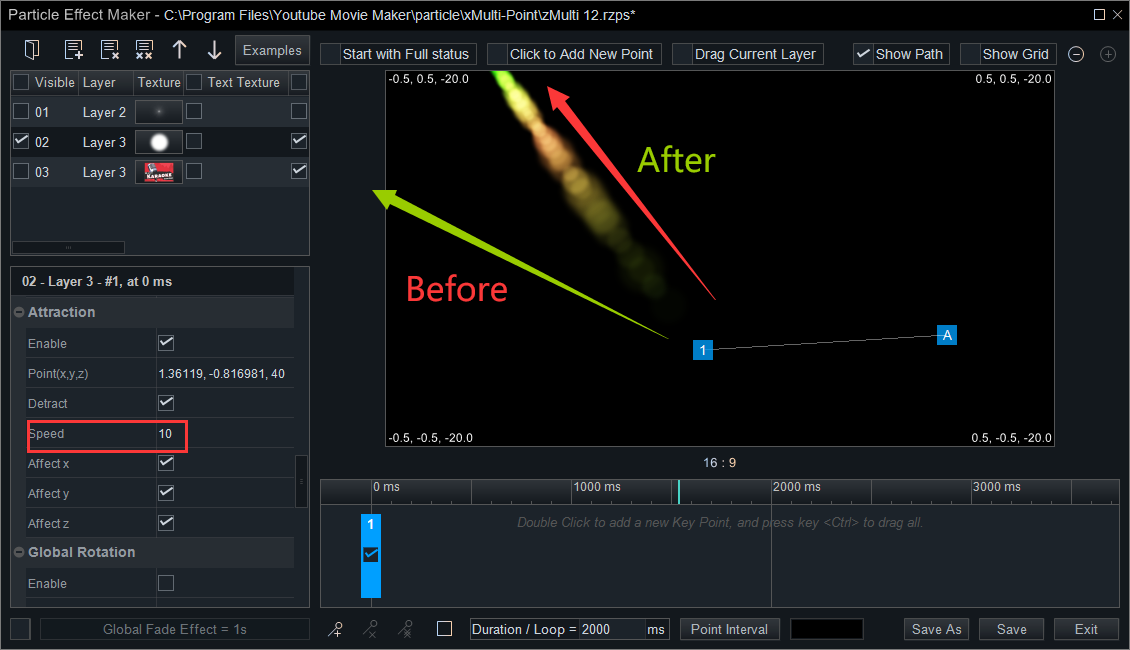
Speed: Set the value of the speed that the particles run to the axial point.
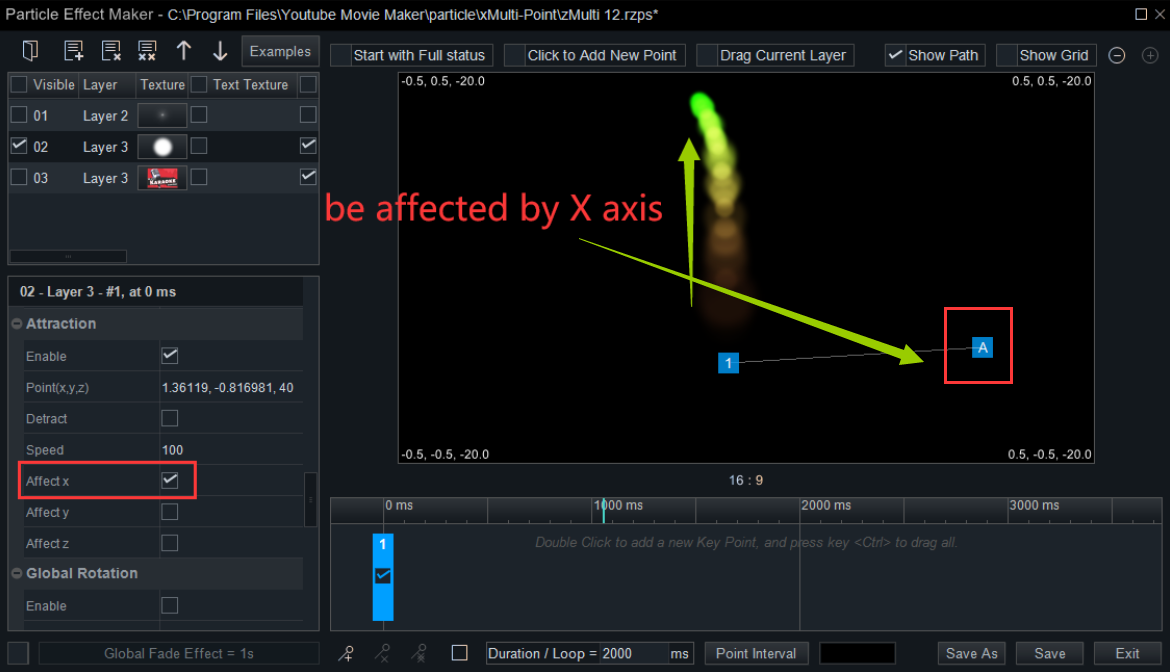
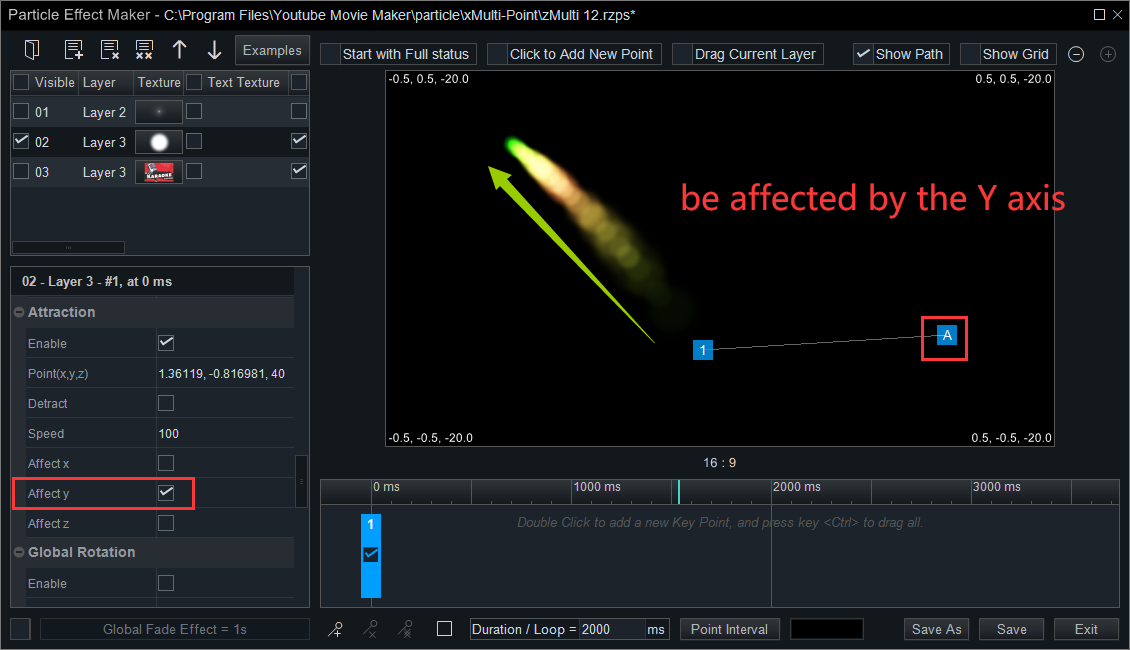
Affect x: Check the box to affirm the particles can be attracted to the X-axis.
Affect y: Check the box to affirm the particles can be attracted to the Y-axis.
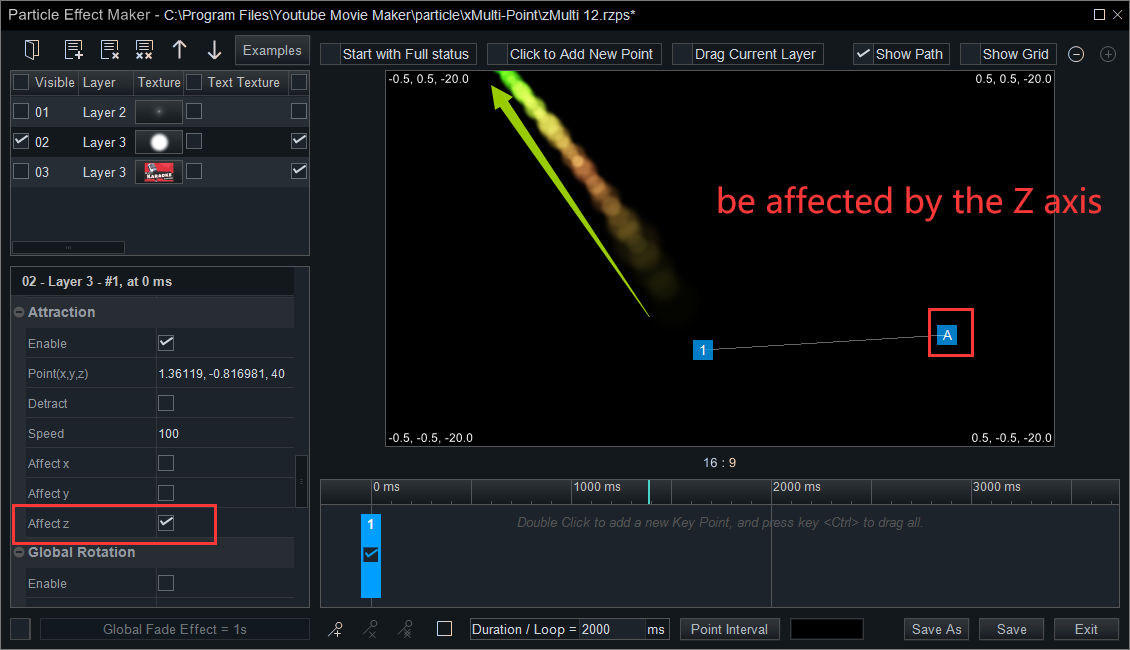
Affect z: Check the box to affirm the particles can be attracted to the Z-axis.
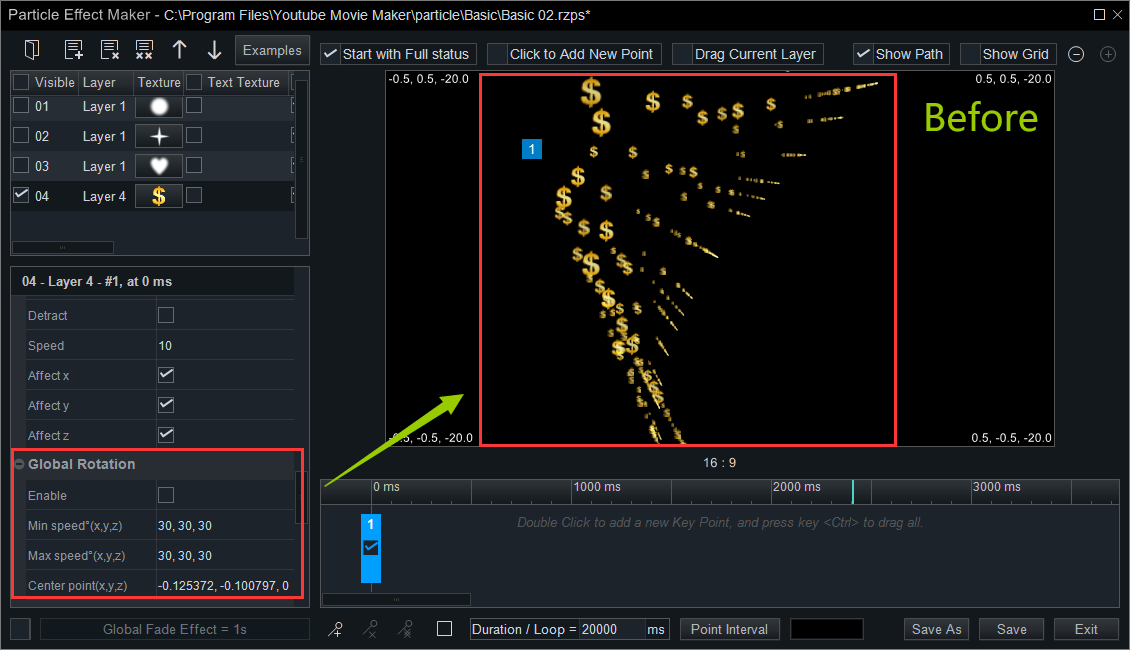
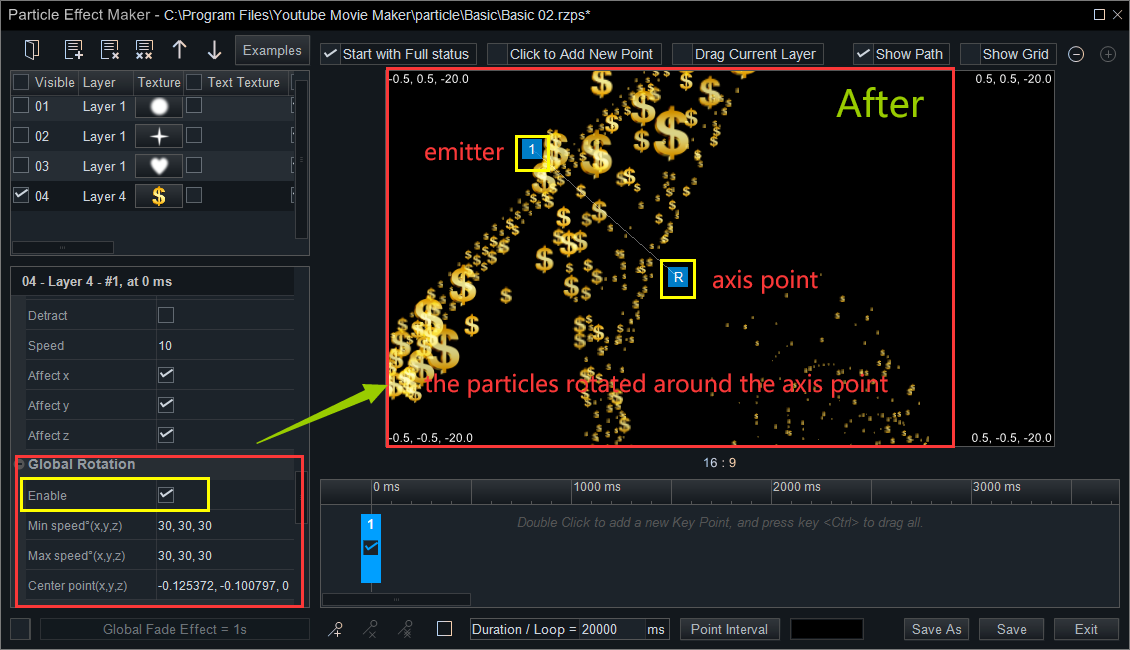
The sixth one is Global rotation.
Min speed: Set the value of the min speed the particles rotated.
Max speed: Set the value of the max speed the particles rotated.
Center point(x,y): Set the value of the X, Y axes to fix the position of center point in which the particles rotated around.
For example, we enable the “Global Rotation” feature, and set the values of speed and center point position. Then, we ‘ll see comparison as follows.
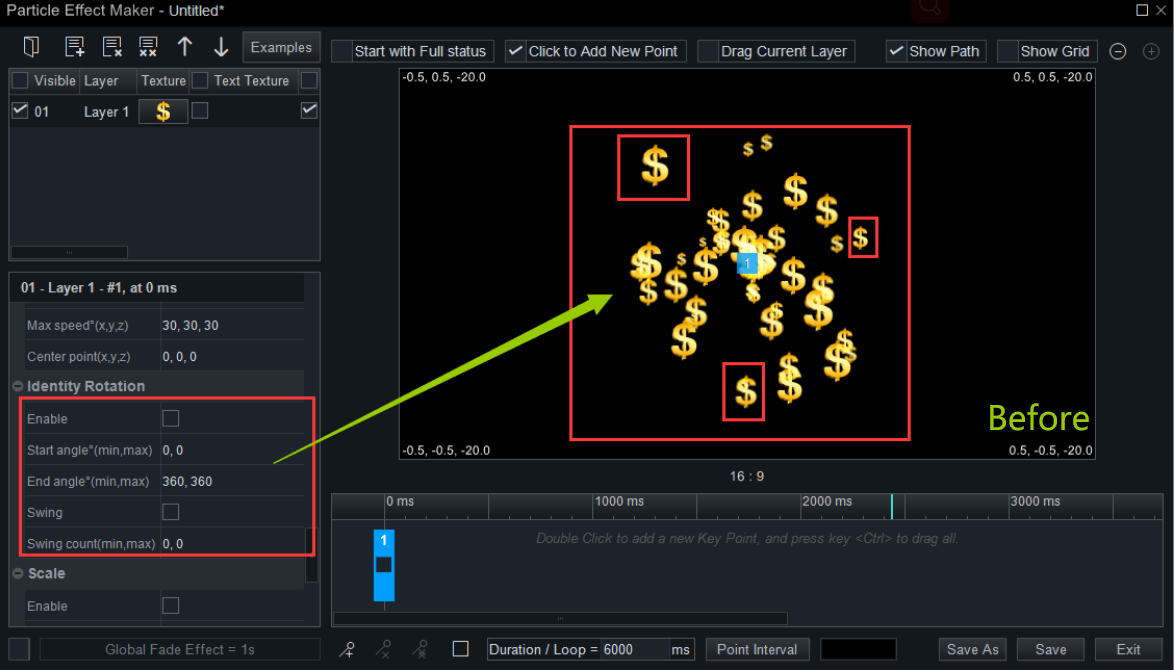
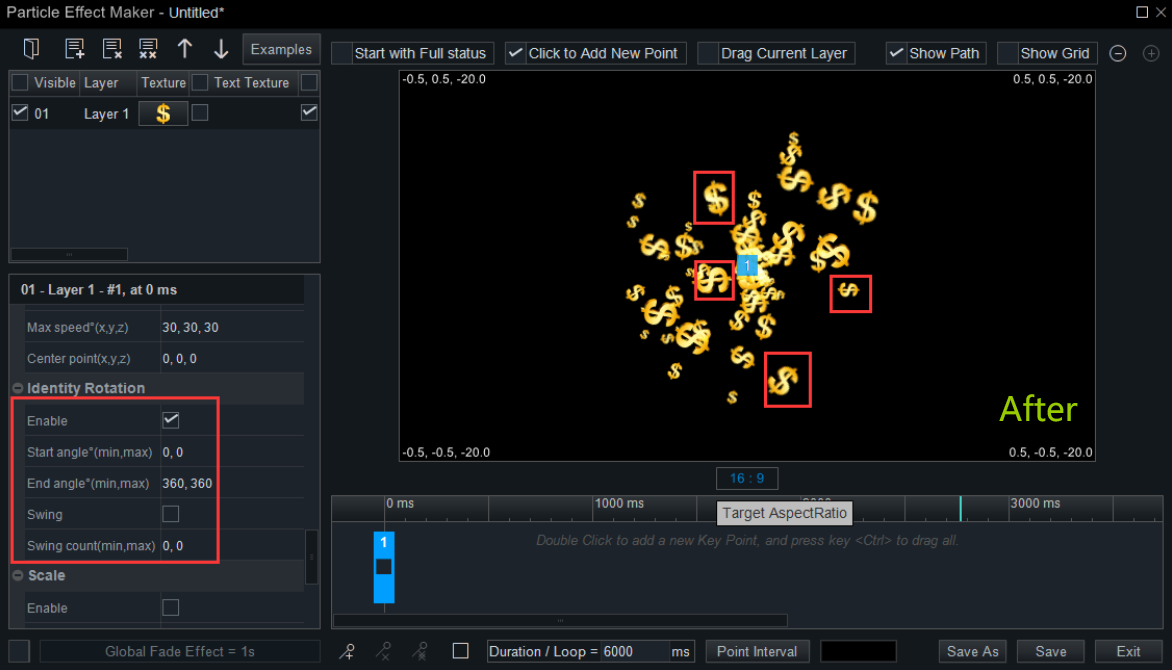
The seventh one is Identity rotation.
Start angle: Set the start angle of the particles’ central rotation.
End angle: Set the start angle of the particles’ central rotation.
For example, we enable the “Identity Rotation” feature, and we can see the particles rotated around their center points.
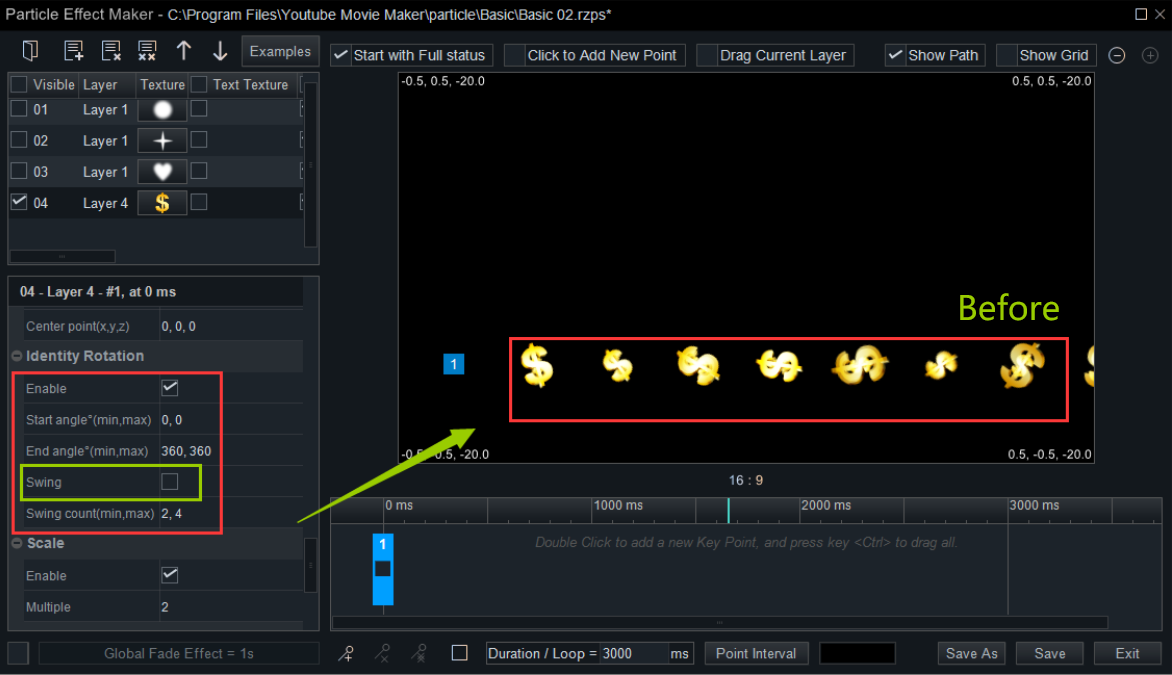
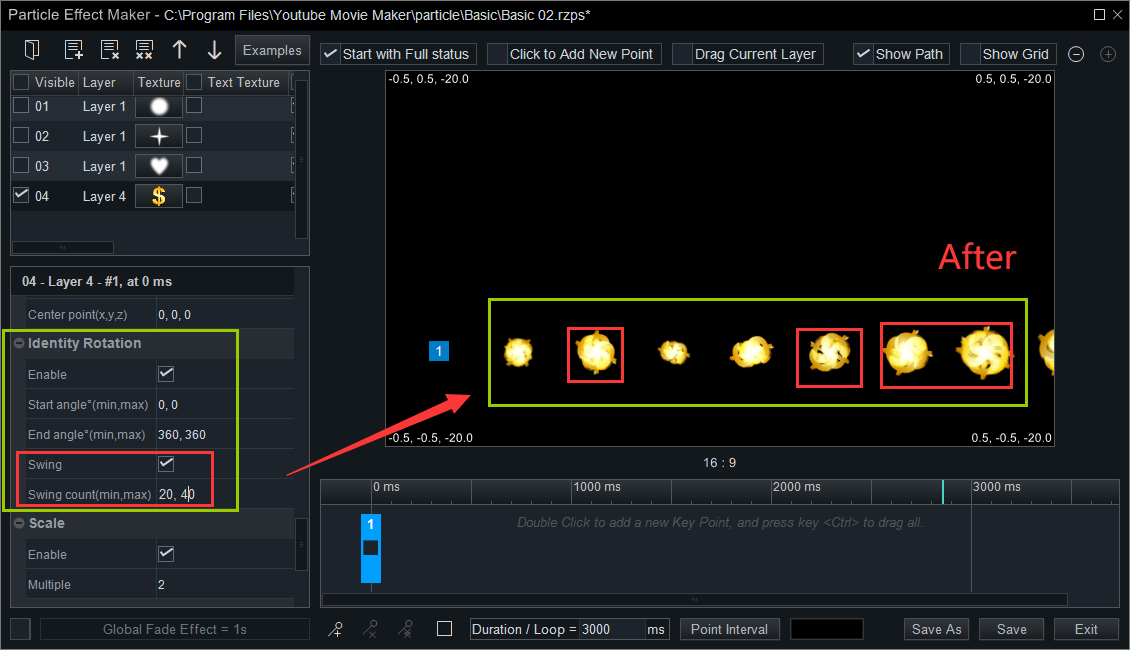
Swing: Enable the “Swing” feature to shake the particles.
Swing count(min, max): Set the values of the minimum shaking amplitude and the maximum shaking amplitude.
For example, we enable the “Swing” feature and change the value of the “Swing Count” into 20 and 40, so we see comparison as follows.
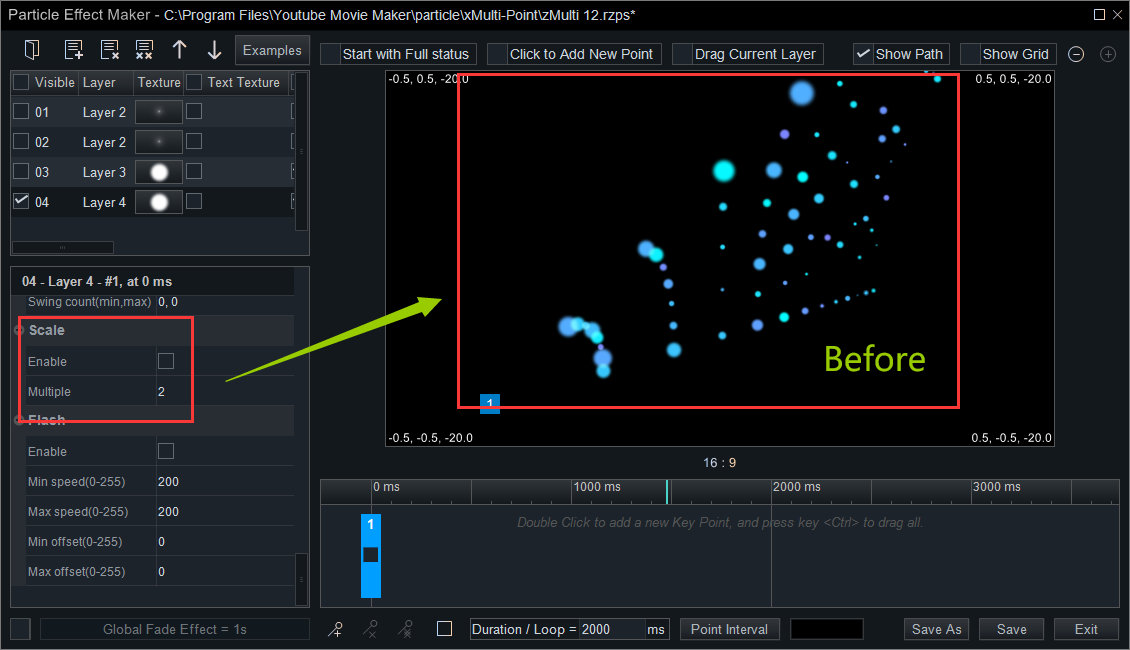
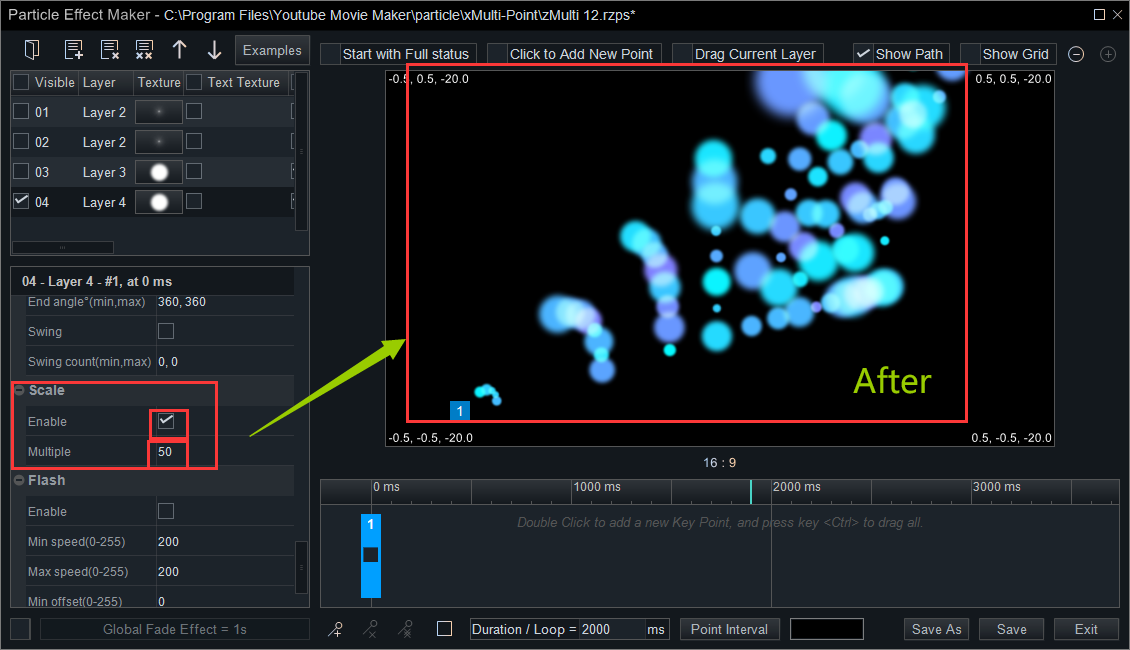
The eighth one is Scale.
Multiple: Set the value to change the particles’ volume ratio.
For example, we enable the “Scale” feature and change the value from 2 to 50, then we can see the clear comparison as follows.
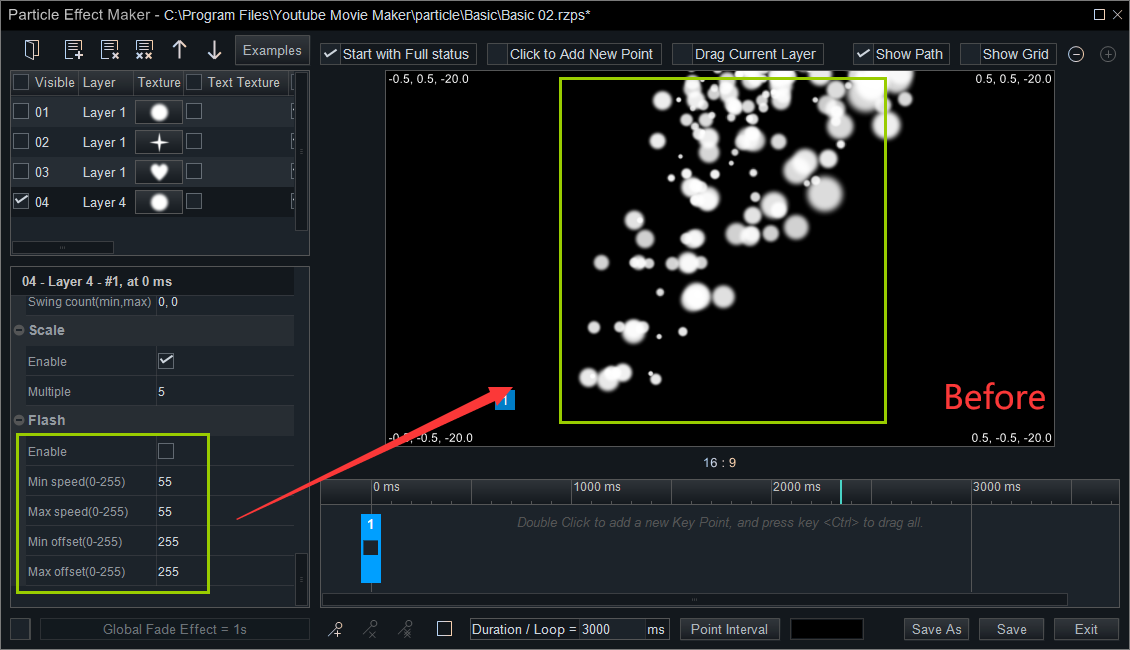
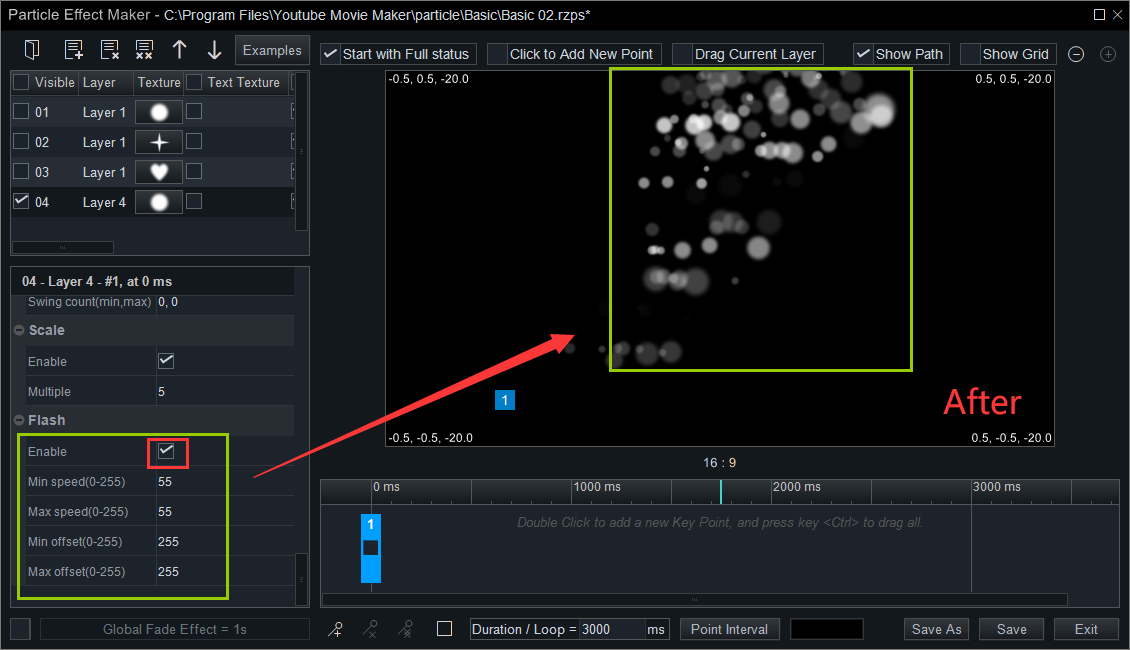
The ninth one is Flash.
Min speed: Set the value of the min flash speed of the particles.
Max speed: Set the value of the max flash speed of the particles.
Min offset: Set the value of the min offset distance of the particles.
Man offset: Set the value of the max offset distance of the particles.
How much have you understood after reading this article? Practice based on theory is always the most effective way to learn new things. So how about making a particle effect right now? I am kind of afraid that you’ll fall in love with the funny creating progress. If you find it interesting, you’re welcome to share it with your friends.
