Here is a content list for you to directly locate at what you need.
Best Color Correction Software:
Most people tend to think that color correction and color grading are the same, but actually, there is a difference between them in the filmmaking process. Color correction is a kind of technical work for we correct colors to get a natural and real image while color grading focuses on the artistic effect. But they are both important parts that a colorist needs to do in post-production.
Color correction creates a clean base for the colorist to go to the further step, color grading.
What is a color correction?
Colorists use color correction in videos or films to make a single shot look natural.
Color correction is a process to balance the colors and adjust the exposure and contrast so that the colors of all objects look more natural and realistic, just like the look in human’s view.
it is not only for one shot. Because the time of shooting footage is different, the natural conditions changed, and the weather and seasons will influence the shot result, especially the color effect of the footage.
For example, when you shot on a cloudy day, the footage will appear dark because of insufficient exposure, while the shot on a sunny day will be over bright because of sufficient exposure. Therefore, color correction is a crucial step to keep all the shots consistent.
What is color grading?
Color grading pushes video making to another level by enhancing emotional expression. Unlike color correction, it colors footage in an unnatural way to tell the story creatively and skillfully.
Color grading is about manipulating colors to create a new hue or mood which helps add atmosphere and create the environment. That’s why video color grading can emphasize a theme or indicate what is going to happen.
We take this as an example. The footage was shot on an overcast day, while the footage is about a happy story. That’s the moment you need a colorist to adjust the color grading of the shot appropriately to reach the director’s expectations. Because an overcast day with a dark hue makes watchers feel depressed at the first sight. However, a warmer color, like orange or yellow, will make people feels good. This is the beauty of color grading.
According to Studiobinder.com, “Color can affect us emotionally, psychologically and even physically, often without us becoming aware.” Color grading can make a drastic change to footage.
Best Color Correction Software
DaVinci Resolve is a One-off payment professional color corrector which is popular in Hollywood movies because of its host of powerful features. Though it may be a little complicated for a lot of beginners, it is still a very powerful free software for color correcting and grading your footage. Since its video color corrector weighs too much we almost forget that it is also capable of editing video.
How to use DaVinci Resolve in your color-grading tasks?
When firstly using DaVinci Resolve to do color correction or color grading, you need to know about several areas on its color page.
They are the interface toolbar, the gallery, the viewer, the node editor, the timeline, the left palette, the center palette, the keyframe editor, video scopes, and Information. All the above tools are what you need in color process work.
Before adding a basic color correction to clips, using the Primaries Wheels to do a primary grade on the first node. Or you can add a label to the node, right-click on it, select Node Label, and type a name. As you add more and more nodes to the clip, it becomes easier to see what they’re doing.
Add a Look, right-click on the first Node to add a new Serial Node, then going to Add Node and choosing Seria.
Then you can adjust the temperature, the Lift, Gamma, and Gain to get an expected effect on your clip. The Temperature Control is in the shared adjustment controls at the bottom part of the Left Palette.
If you want to do a secondary color correction, you can add another node by right-clicking on Look Node, and then go to Add Node and choose Parallel Node.
Red Giant is a complete set of plugins, so you are allowed to directly correct color or grade color in your footage using any video editing software. It has a host of shinny points, including a GPU that uses a graphics card, a feature that allows you to see the changes you made instantly and plenty of LUT presets. You can expect a lot on it as a great color correction/grading tool.
What Red Giant Colorista offers in color adjustment workflow?
Except for basic balance colors, adjust contrast, exposure, Red Giant Colorista enables users to use customizable presets based on popular movies and TV shows to footage, then you’ll see it has a cinematic contrast and sophisticated color palettes in seconds.
Colorista allows users to fine-tune their colors and contrast to give the scene the look they want by using a basic three-color control wheel and a digital slider.
If you professional colorist and compositor who has more advanced demands in professional work, Colorista also provides Color Decision List. You can share values with CDL-compliant applications and set colors that conform to industry standards. Using the CDL Burn utility, you are also allowed to share color correction operations and projects with colleagues.
In Final Cut Pro X, you can precisely control all color corrections over the look of every clip. You can turn any of the corrections off and on to see their effect. But the order to use these color correction tools is important. As a recommendation, you can use them in the order of Balance Color, Match Color, and manual color correction.
How to use Final Cut Pro X to do video color correction?
Step 1: Neutralize color casts and maximize image contrast.
Step 2: Select more clips to match the color look of any clip was chosen.
Step 3: Define a white or neutral gray highlight in a clip by using an eyedropper and remove an unwanted color cast.
Step 4: Manually correct a clip’s color, saturation, and exposure.
Step 5: Use color or shape masks to target a particular color range or area.
Step 6:Save color correction settings and apply them to other clips.
It is worthy to mention that Final Cut Pro X offers a guide to each operation on color correcting, so you needn’t worry that you’ll be confused about how to use it.
VEGAS Pro has a Color Grading Panel which was used to do both the technical color correction and the artistic color grading with a set of tools. It can satisfy your needs whether it is standard color or High Dynamic Range (HDR) footage.
How to color correct and color grade using the Color Grading Panel?
Step 1: Set project properties to work with HDR(HDR10 or HLG), if needed
Step 2: Bring clips into the VEGAS Pro Timeline by adding events to the project timeline
Step 3: Open the Color Grading panel
Click the Color Grading button to open the Color Grading panel which contains three sections with various color controls, and they display color wheels, color curves, and an array of buttons separately. You can do a lot of operations under the three sections, such as input types and controls, Gamma, Gain, and Offset adjustments, an automatic white balance button, a Broadcast Colors filter, and so on.
Step 4: Import a camera LUT
You can load the camera LUT in the Input LUT tab in case some cameras, or some formats (such as LOG) require camera LUT for the image.
Step 5: Correct exposure
Adjust exposure to change brightness properly. Use Y sliders under the Lift, Gamma, and Gain wheels to adjust the brightness of the darkest, middle, or brightest parts of the image individually. And the color curves can adjust different areas of brightness more precisely.
Step 6: Correct white balance
Click the Auto Adjust button under White Balance in the Color Curves tab to correct it. Or make finer adjustments manually.
Step 7: Correct contrast (Gamma)
Setting proper contrast or “gamma” is about adjusting the brightest brights and darkest darks.
Use the Y sliders to adjust contrast, and use the color curves but for the most precise adjustments. Then the brightest brights and darkest darks.
Step 8: Import a Look LUT if desired
You can add LUTs to emulate popular specific looks in Hollywood-style productions and others
Step 9: Use color grading tools to dial in the look you want
You can then enhance the look that LUT gives you, or use the controls in the color grading panel to do your own color grading.
Compared to the former 4 professional color correction software, YouTube Movie Maker is not so professional but more suitable for beginners. There are no finer adjustment tools and controllers in the video color-correcting panel, however, beginners who have simple demands of correcting color can finish the color workflow in one minute.
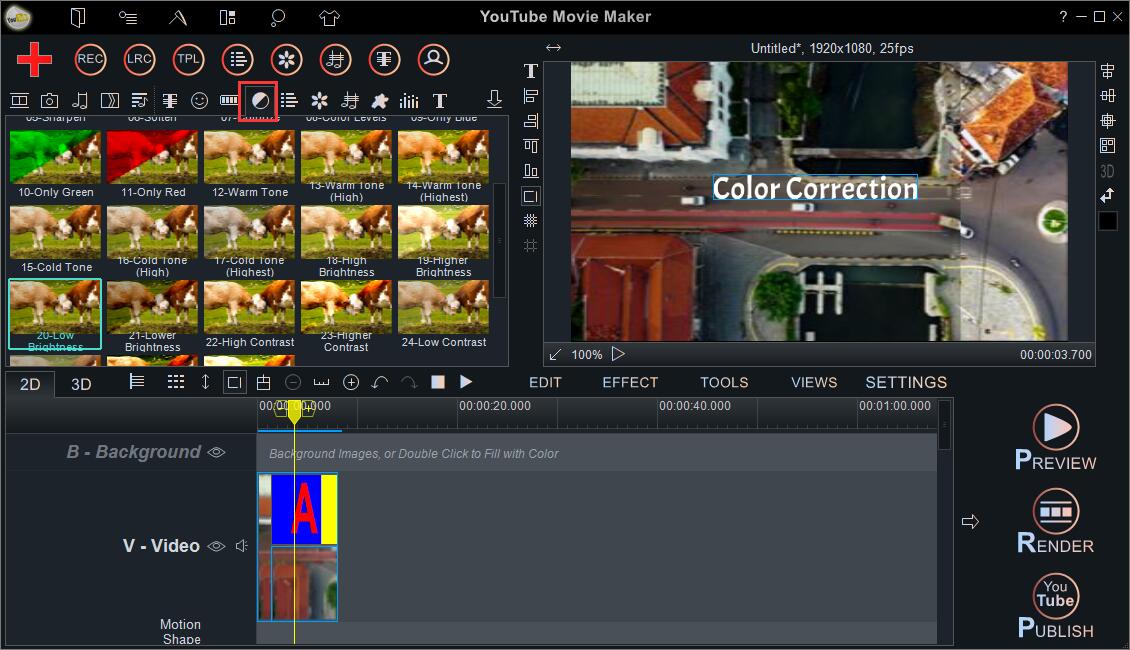
Although it’s not a well-known video editing software, it contains all the basic tools that every video editing software has and some surprising features that all video creators want. Except for basic tools like “Brightness and Contrast”, “Color Levels”, “Colorize”, “Saturate”, “Jitter”, it also has functions like “Grey Scale”, “Soften”, “Sharpen”, “Blur”, “Edge Detection” and “Mosaic”.
Watch a demo of video color correction made in YouTube Movie Maker
As for how to do color adjustment in YouTube Movie Maker/Easy Video Maker, we’ve released an article about all the details that you can check the link to get a text tutorial right now.
Under the “Color Adjustment” block, there are also many popular color templates for you to add to your video directly.
Try it free and you won’t be regret.


