In the last article, we’ve discussed how to create a Pan Zoom Effect to make a static image move horizontally.
Therefore, we’ll talk about the second part, and that is how to use the Pan Zoom effect to make the static image move up/down smoothly.
Video Tutorial:
We’ve learned the basic operations in the first part, so let’s come to the point at once.
When creating a pan zoom effect to make a static image right/right move or up/down move, the difference is mainly shown in moving directions.
How to use the Pan Zoom Effect to make the whole image move vertically?
Example 1:
When the image is a long vertical image (the height of the image is greater than the width), we usually need to use the PAN ZOOM effect, which can make images move in the vertical direction. First, we need to enlarge the image according to its actual scale, avoiding the distortion, and make the image larger than the display screen.
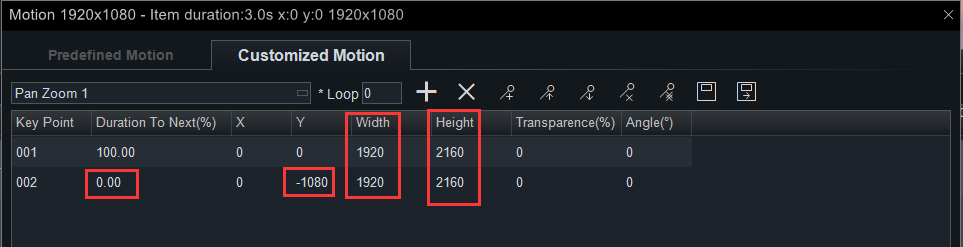
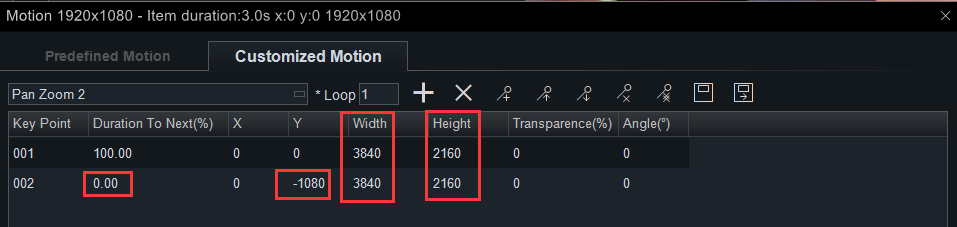
For example, we change the “Height” of “Key Point” 001 and 002 from “1080” to “2160”. And then, change the value of the Y-axis of key point 002 from “0” to “-1080”.
Why we have to do this?
We change the “Height” from “1080” to “2160” is to make the image cover the screen while the image is up-moving. Of course, you can change the “Height” to any number greater than “1080”.
If you want to keep the original image ratio, you can set the width and height according to the original image ratio. If you don’t need to keep the original ratio, you can simply stretch the image by 2 times or more here.
In order to keep the image move stable along the Y-axis, we need to keep the “Height” of 001 and 002 the same value, the same as the value of the X-axis.
The X-axis and the Y-axis of the start point 001 is (0,0), so the end key point should be 002 (0,-1080).
We also need to change the value of “Duration to Next(%)” of the key points. We’ve explained why we have to do this in the former part. If you want to know the reason, you can get back to figure it out.
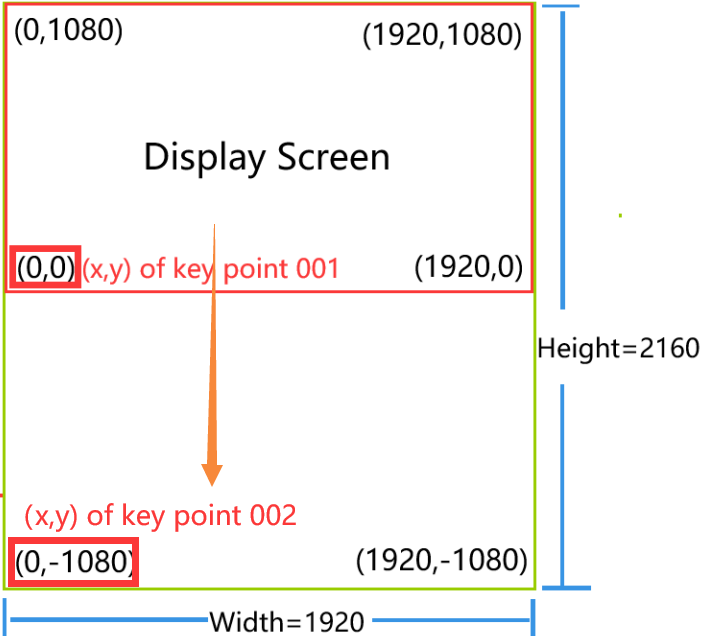
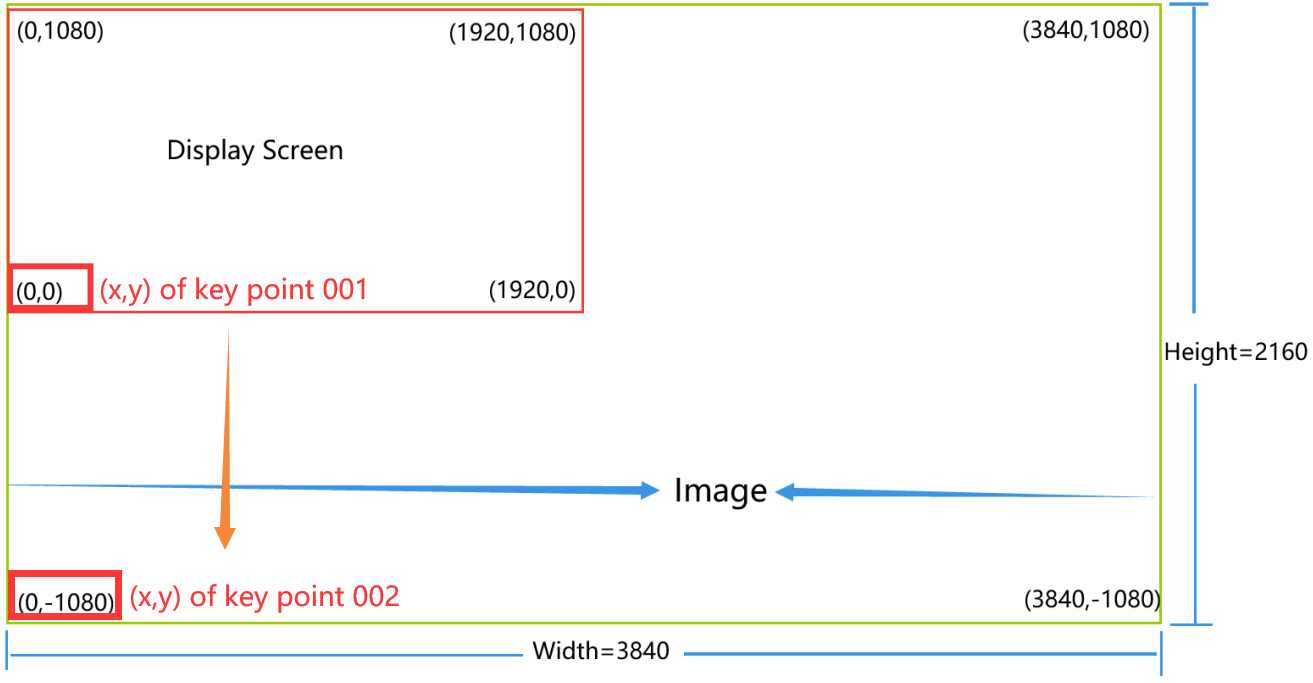
Key Point 001 as shown in the figure: (The red box area is DISPLAY SCREEN, and the green area is the image.)

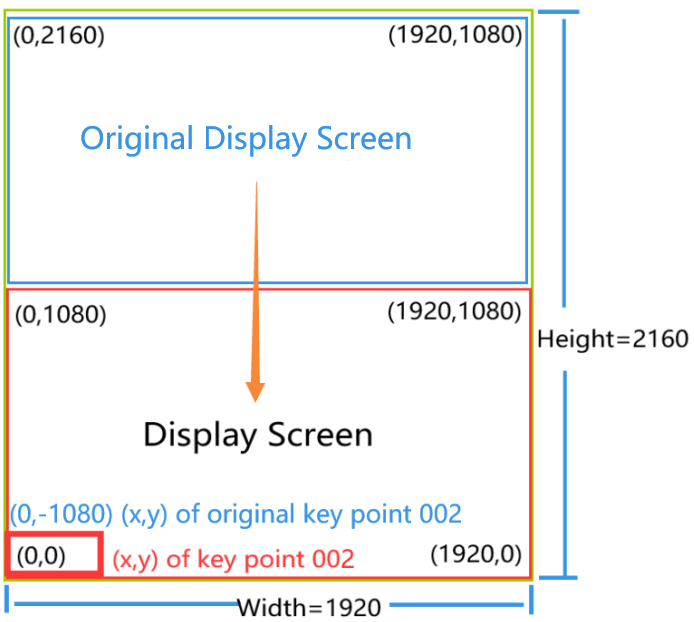
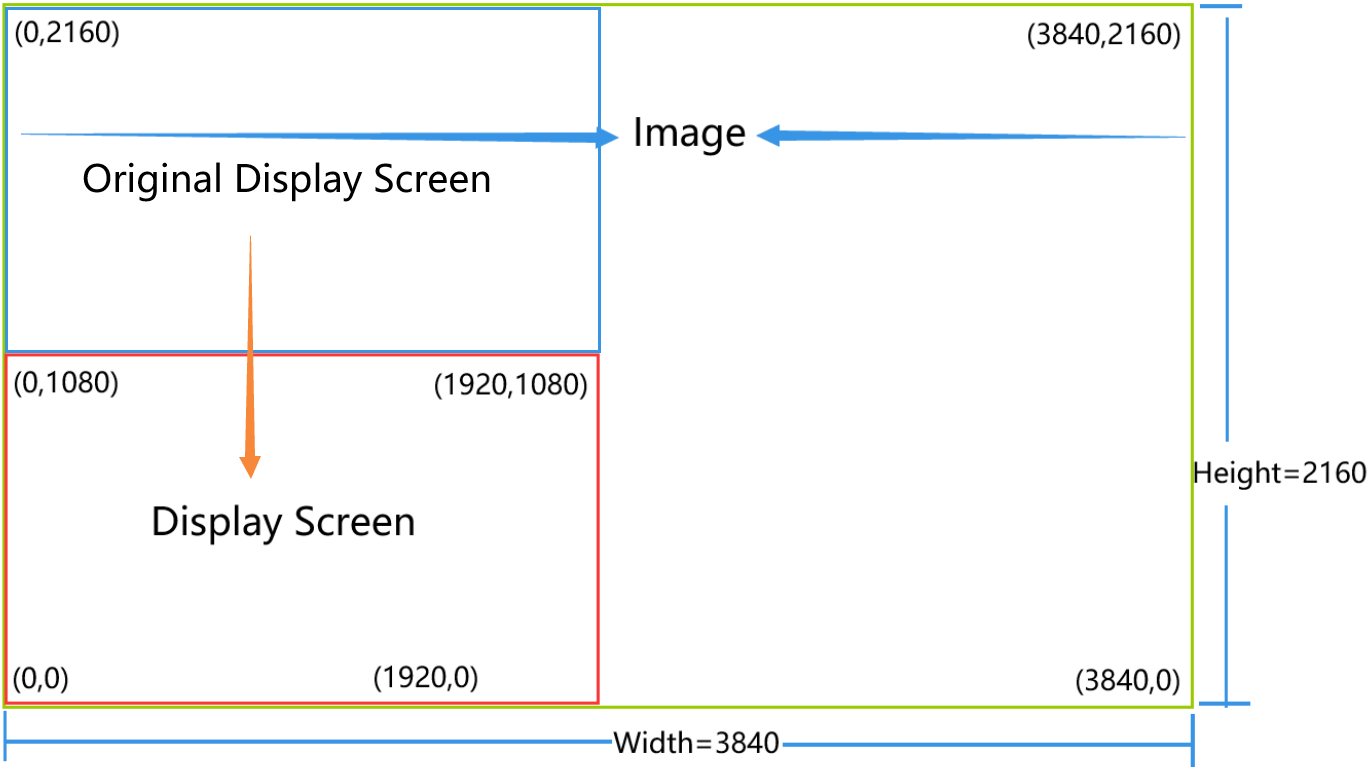
Key Point 002 as shown in the figure: (The red box area is DISPLAY SCREEN, and the green area is the image. And the blue box area is the Original Display Screen.)
As you can see, the image moved up and the (x,y) of the four vertices of the display screen didn’t change. However, the (x,y) of key point 002 disappeared when the image moved from the (x,y) of key point 001 to the (x,y) of key point 002.

How to use the Pan Zoom Effect to make the left half of the image move vertically?
Example 2:
When we want to show a part of an image by moving it vertically, we can change the “Height” of “Key Point” 001 and 002 from “1080” to “2160”. And then, change the value of the Y-axis of “key point” 002 from “0” to “-1080”. Next, change the “Width” of “Key Point” 001 and 002 from “1920” to “3840”.
Why we change the “Width”?
On the one hand, we change the “width” of the two key points to capture a specific part of the image, and then make a pan zoom effect to the part. On the other hand, we double the value of the image’s “width” and “height” at the same time, so the image will not deform.
Key Point 001 as shown in the figure: (The red box area is DISPLAY SCREEN, and the green area is the image.)

Key Point 002 as shown in the figure: (The red box area is DISPLAY SCREEN, and the green area is the image. And the blue box area is the Original Display Screen.)
We captured the left half of the image by changing the (x,y) of the two key points.
Same as example 1, the (x,y) of key point 002 disappeared when the image moved from the (x,y) of key point 001 to the (x,y) of key point 002.

How to use the Pan Zoom Effect to make the right half of the image move vertically?
Example 3:
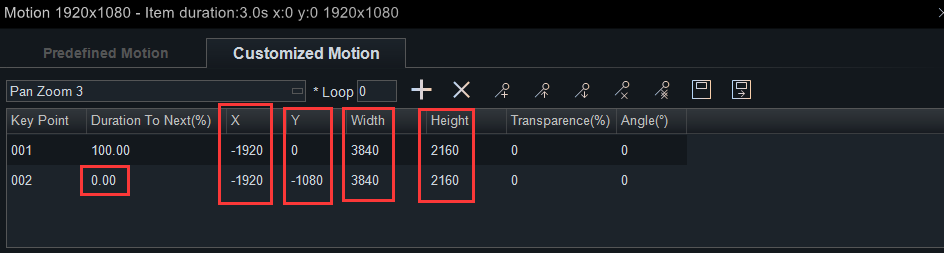
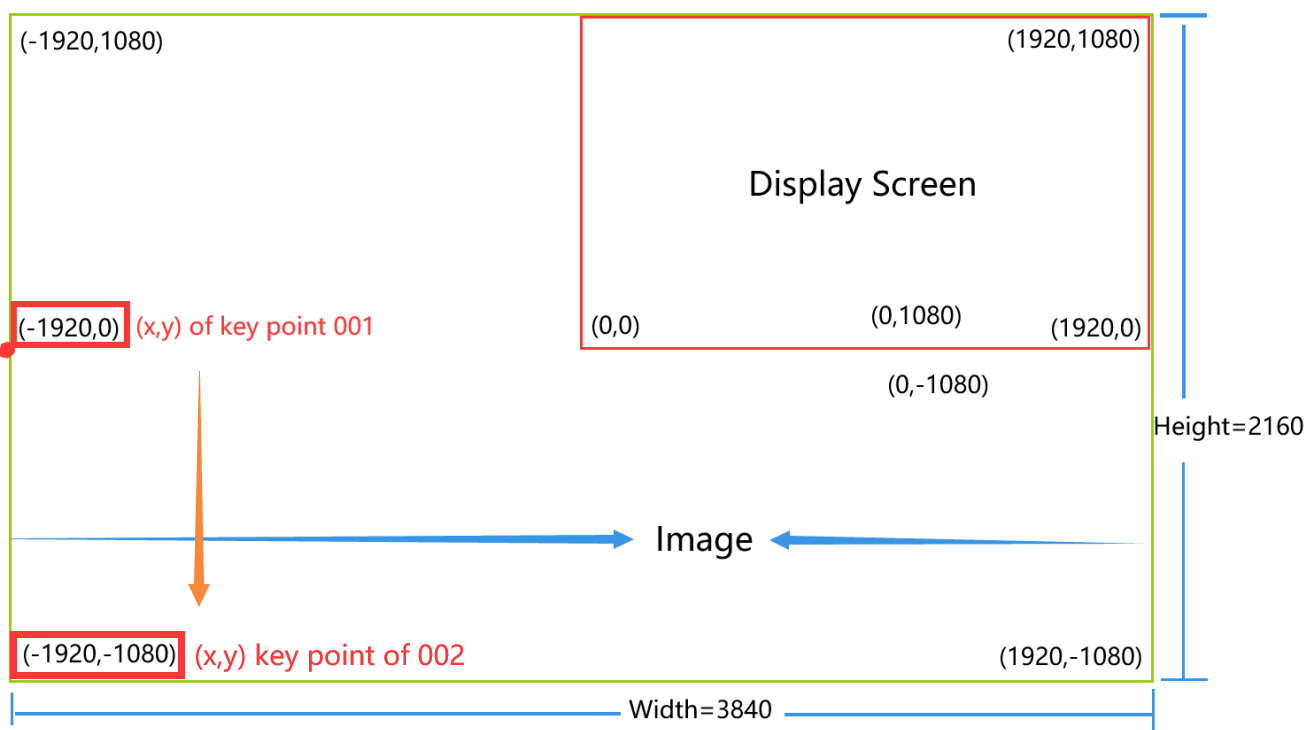
We change the “Height” of “Key Point” 001 and 002 from “1080” to “2160”. And then, change the value of the Y-axis of “Key Point” 002 from “0” to “-1080”. Next, change the “Width” of “Key Point” 001 and 002 from “1920” to “3840”. Last, we change the value of the X-axis of “Key Point” 001 and 002 from “0” to“-1920”.
Why we change the value of the Y-axis of the two key points?
As we mentioned in example 2, the picture will change as the value increasing. The picture is a part of the complete image. The width and height determine which part remains on the screen.
You can directly drag the image on the screen right/left to find the part you want to remain. And make sure both the width and the value of the X-axis of “key point” 001 and 002 must be the same. Then the image can smooth move along the Y-axis.
Remember to keep the image spread over the screen while dragging the image right/left.
Key Point 001 as shown in the figure: (The red box area is DISPLAY SCREEN, and the green area is the image.)

Key Point 002 as shown in the figure: (The red box area is DISPLAY SCREEN, and the green area is the image. And the blue box area is the Original Display Screen.)

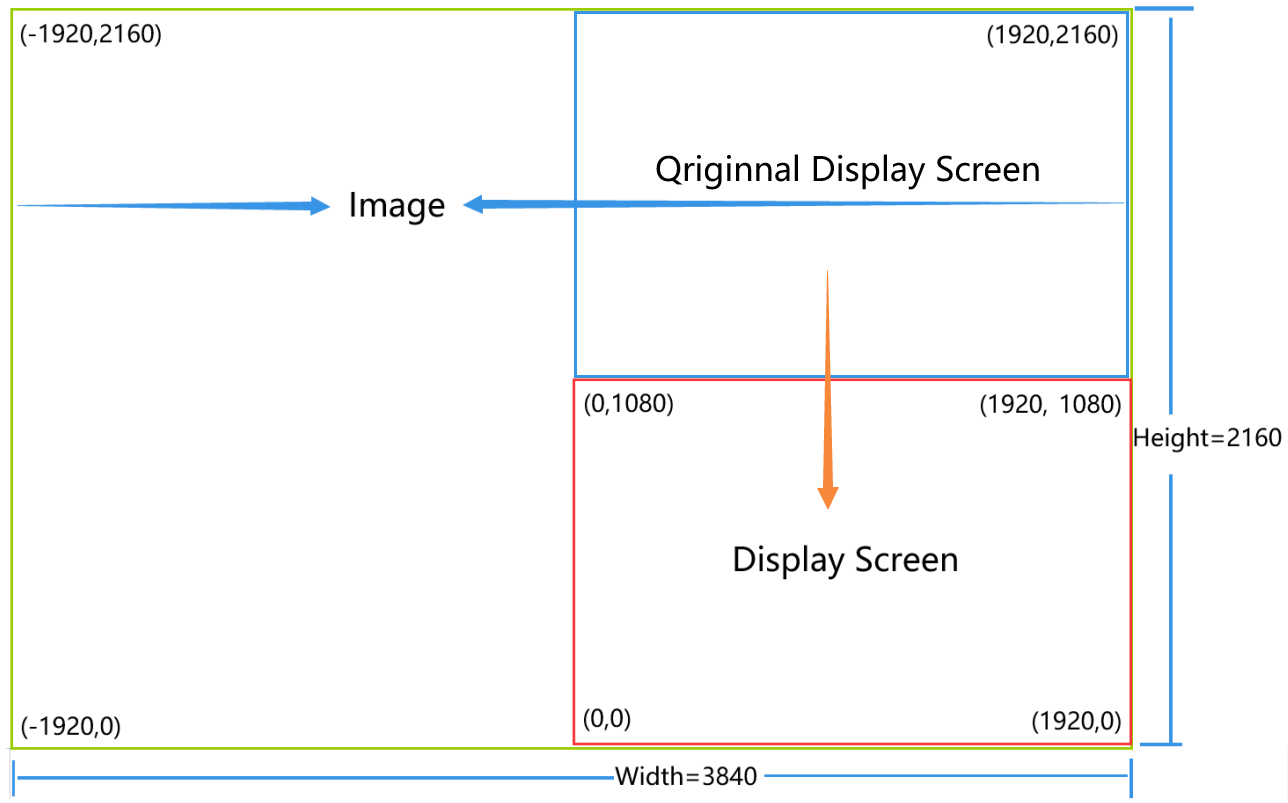
In this example, we captured the right half of the image. You can remain any part of the image by changing the (x,y) of the two key points. But always remember that the value of the Height must larger than the “Height” of the video resolution you set before.
That’s all steps for how to make a static image move vertically by adding a pan zoom effect to it. This effect can be used to show your text papers when doing a presentation. Or it can be added to comics. You can make everyone see your content clearly by adjusting its scrolling speed. There are still many unexpected usages of the Pan Zoom Effect that you can use on various pictures. If you find it’s an amazing challenge, how about trying it yourself, and see what will happen. Welcome to share this with your friends.
We updated an article about how to make a static image move horizontally. If you are interested in it, check it out.


")